
You walk downstairs after a night of hard rain, flashlight in hand, and find a wet line where the basement floor meets the wall. The dehumidifier is running, the gutters looked fine last week, and the waterproofing paint you rolled on still looks intact. Yet the concrete is damp again.
That scene doesn't automatically mean you need a new drainage system. Groundwater intrusion, interior humidity, and condensation can look remarkably similar, but they require different fixes. A dehumidifier won't stop water pushing through a foundation crack, and a paint-on sealant won't solve humid air condensing on a cold wall.
The most expensive waterproofing basement mistake is choosing a product before identifying the source. Use the diagnostic steps below, correct the cheap exterior causes first, and then match the remaining problem to an interior or exterior system.
Table of Contents
- Why Basements Leak and What That Means for You
- Diagnosing Where the Water Is Actually Coming From
- Interior vs Exterior Waterproofing Systems Compared
- What Waterproofing a Basement Really Costs
- Why Waterproofing Is a System You Maintain, Not a Repair You Forget
- DIY or Hire a Pro and the Maintenance Plan
- Your Next Steps and When to Call a Contractor
Why Basements Leak and What That Means for You
After a hard East Texas storm, water can press against the foundation even if the basement has stayed dry for years. Rain saturates the soil, collects near the footing, and exploits weak points such as the cove joint, masonry cracks, window wells, and floor seams. Expansive soil, poor grading, and downspouts discharging beside the house can turn one storm into a leak. Homeowners looking to find fixes for damp basements should first identify which condition they are dealing with.
A damp-looking wall does not always indicate groundwater. Warm, humid air can meet cool concrete and leave moisture on the interior surface. Cooking, showers, humidifiers, unvented dryers, HVAC operation, construction moisture, and humid outdoor air all contribute to basement humidity, according to the University of Minnesota Extension guide to basement moisture causes and solutions. Condensation points to an indoor moisture problem, not automatically to a failed foundation barrier.
Practical rule: Do not choose a waterproofing system until you know whether water is entering through the structure or forming on its interior surface.
The outside conditions matter
Foundation depth, soil type, gutter performance, window wells, and finished-grade slope determine how much water reaches the wall. A clean gutter can still cause trouble if its downspout releases roof water at the footing. Soil that settles toward the house creates a basin beside the foundation, allowing water to collect against an otherwise sound wall.
Paint-on sealants have a limited role. They may help with light surface dampness where meaningful water pressure is absent. They do not relieve pressure, collect water, repair failed drainage, or correct a defective window well. Water entering through a crack or floor joint needs that path sealed or managed. Another room-side coating only hides the symptom for a while.
The scope of the problem also affects the budget. One industry summary reports that about 98% of basements experience some form of water damage during their lifetime, while more than 60% of existing basements have a moisture problem. It also reports that around 38% of basements with moisture problems develop mold or fungus growth, and that leakage and mold growth can reduce property value by up to 25%. Those figures appear in the Basement Waterproofing Facts infographic.
The decision path is direct: identify the source, trace the entry path, select the system, and price the complete scope. A grading correction may solve the problem. A foundation leak may require drainage or structural work. Choosing products before making that distinction is how a manageable exterior issue becomes an unnecessary excavation project.
Diagnosing Where the Water Is Actually Coming From
Start with a weekend diagnosis, not a contractor quote. You need to separate moisture forming inside the room from water entering through the wall or slab.
Run the surface test
Clean and dry a suspicious section of wall and floor. Tape a 12-inch square of aluminum foil tightly to each surface and leave it undisturbed for 24 hours. This is a simple field check, not a laboratory test, but it can reveal the direction of the moisture.
- Beads on the room-facing side: Interior humidity or condensation is more likely.
- Dampness behind the foil: Moisture may be moving through the wall or slab.
- Wetness on both sides: Investigate both indoor humidity and exterior water conditions.
Check a cool corner, the wall-floor joint, and an area near a visible crack. If the basement smells musty but no exterior path is evident, measure room humidity with a hygrometer and inspect HVAC airflow, dryer venting, and dehumidifier operation before ordering foundation work.
Trace the entry path
Look closely at the cove joint, wall cracks, floor cracks, pipe penetrations, window wells, and sump pit. During active rain, observe the exterior if conditions are safe. Look for overflowing gutters, downspouts terminating beside the foundation, soil that slopes toward the house, and water standing in window wells.
A crack doesn't automatically explain every wet spot. Water may travel behind a wall finish or along a slab before appearing several feet from the actual entry point. Homeowners dealing with a different climate can also review this regional resource on basement leak diagnosis for South Florida homes, while East Texas homes still require site-specific evaluation of soil, rainfall, and drainage.
Track timing and pressure clues
Record when the moisture appears. Storm-only moisture points toward rainfall, grading, gutters, or hydrostatic pressure. Year-round dampness may involve a high water table, a persistent plumbing issue, or indoor humidity. Seasonal patterns can point to changing groundwater conditions or ventilation behavior.
Then inspect for bowed walls, horizontal cracks, mud tracking, and unusually heavy sump discharge. These signs don't prove a structural emergency, but they justify professional evaluation. The foundation may be carrying pressure that a surface coating can't address.
If the problem is primarily vapor movement through a wall, a properly designed vapor barrier installation may be part of the solution. It still won't replace drainage where groundwater is entering under pressure.
Symptom-to-Cause Diagnosis Matrix
| Symptom You See | Likely Source | Urgency | First Diagnostic Step |
|---|---|---|---|
| Water beads on the foil room side | Interior humidity or condensation | Moderate | Check humidity, HVAC operation, and dryer venting |
| Dampness behind foil on a wall | Wall seepage or vapor movement | Moderate | Inspect exterior grading, gutters, and wall cracks |
| Water at the wall-floor joint after storms | Groundwater and hydrostatic pressure | High | Observe the cove joint during rain and inspect drainage |
| A narrow wet line at one crack | Localized crack entry | Moderate to high | Mark the crack and monitor it during the next storm |
| Water around a window well | Surface runoff or poor well drainage | Moderate | Check the well, cover, soil slope, and downspout discharge |
| Bowed wall or widening horizontal crack | Possible structural movement | High | Stop cosmetic repairs and call a qualified professional |
Interior vs Exterior Waterproofing Systems Compared
Interior and exterior waterproofing don't do the same physical job. Interior systems manage water after it reaches the basement, while exterior systems aim to keep water away from the foundation wall in the first place.
An interior system may include a perimeter drain beneath the slab, a sump pit, a pump, a wall membrane, vapor control, and localized crack repairs. A French drain or interior drain tile collects water and routes it to the sump. A dimpled drainage membrane can collect water running down the wall and direct it toward that drain. This approach often fits an existing home where excavation would damage landscaping, patios, porches, or access routes.
Exterior waterproofing requires excavation down to the footing. The contractor exposes the foundation, repairs the wall as needed, applies a waterproof membrane and often a drainage board, then installs or restores the exterior footing drain before backfilling. It addresses water before it reaches the wall, but the work creates more disruption and requires careful excavation near the foundation.
What each system can and can't do
A high-performance design begins with hydrostatic conditions, not a preferred product. Below-grade walls exposed to groundwater need a system proven for intermittent hydrostatic pressure. A drained Type C system is intended to collect and remove water, not act as a hydrostatic barrier. The ASTM C1471/C1471M-22 reference identifies ASTM D5385 as the key hydrostatic-resistance test method used for comparing membrane performance.
Design should start with geotechnical information and soil chemistry where available. The manufacturer should confirm in writing that the selected membrane tolerates the specified pressure and soil conditions. Some specifications cite 40 mil cured membrane thickness for certain spray-applied systems and 60 mil minimum for some hydrostatic vertical-wall or underslab applications, but the applicable requirement depends on the system and design.
| Factor | Interior System | Exterior System |
|---|---|---|
| Primary function | Collects and removes water after entry | Blocks water before it reaches the wall |
| Typical disruption | Interior slab cutting, dust, and possible finish removal | Excavation, landscaping removal, and access disruption |
| Best fit | Existing homes, recurring seepage, difficult exterior access | Severe wall seepage, new construction, or walls that must stay dry |
| Main dependency | Drain routing, sump capacity, power, and maintenance | Membrane continuity, footing drainage, backfill, and grading |
| Limitation | Doesn't keep the exterior foundation dry | Can be impractical beside additions, patios, or neighboring structures |
| Resale consideration | Visible equipment and interior restoration may affect presentation | A dry foundation and documented work may support buyer confidence |
The practical comparison in this guide to interior and exterior waterproofing methods is useful, but no generic ranking replaces a site diagnosis. A hybrid solution may be more sensible than either extreme. Correcting gutters and grading, sealing a confirmed crack, and adding interior drainage for residual groundwater can solve the actual combination of problems without full excavation.
Neither approach is enough when the wrong problem is being treated. Interior drainage can't correct a structural wall movement by itself, and exterior membrane work won't solve condensation caused by humid indoor air.
What Waterproofing a Basement Really Costs
A basement quote can cover a downspout correction, a crack repair, or excavation along the entire foundation. Those jobs share a label, but not a scope or price. A market summary places the average U.S. basement waterproofing project at about $4,920, with many projects between $2,300 and $7,575. Use those figures for orientation, not as a substitute for an itemized, site-specific proposal.
The four cost drivers
The first driver is the water source. Condensation may call for humidity control, while groundwater can require drainage, a sump, crack repair, or exterior work. That ten-minute source check matters because treating indoor humidity with drainage, or treating groundwater with paint, wastes money.
The second driver is scope. One accessible, stable crack is a limited repair. Water appearing around much of the perimeter may involve drainage, pumping, concrete removal, and restoration. Exterior excavation also adds labor, equipment, spoil handling, access planning, backfill, and site repairs. Interior work avoids digging outside but can involve slab cutting, debris removal, sump installation, wall membrane work, drywall removal, flooring replacement, and finish restoration.
| Solution | Typical Cost Range | What Drives the Price |
|---|---|---|
| Exterior grading and drainage corrections | Qualitative, usually the least expensive category | Soil movement, downspout extensions, gutter repairs, and access |
| Interior sealant or moisture-control coating | Qualitative, low material cost | Surface preparation and whether pressure is absent |
| Localized crack repair | Qualitative, limited-scope work | Crack location, movement, accessibility, and injection method |
| Interior drain tile and sump system | $3,000 to $8,000 in the cited industry comparison | Slab cutting, perimeter length, pump equipment, discharge routing, and restoration |
| Exterior membrane and footing drainage | $8,000 to $30,000 in the cited industry comparison | Excavation depth, soil, access, membrane, drainage, backfill, and landscaping |
The cost categories and ranges above come from the Basement Waterproofing Systems Comparison. Its ranges cover different systems, so they should not be applied unchanged to a single crack or a full exterior excavation. A broader market average has the same limitation.
Read each line before comparing bids. Confirm whether the proposal includes floor jackhammering, concrete disposal, sump pump equipment, battery backup, check valves, discharge piping, wall repairs, dehumidification, drywall replacement, flooring, permits, and final grading.
Financing may be available, while insurance coverage depends on the cause and policy. Treat a quote as incomplete when the contractor has not identified the source, calls the work “waterproofing” without describing the system, or leaves the sump pump and restoration outside the price.
Why Waterproofing Is a System You Maintain, Not a Repair You Forget
A basement stays dry because several connected systems keep working. Groundwater management directs rain and soil water away. Mechanical pumping removes collected water when gravity can't do the job. Interior barriers and humidity control limit vapor movement and condensation inside the room.
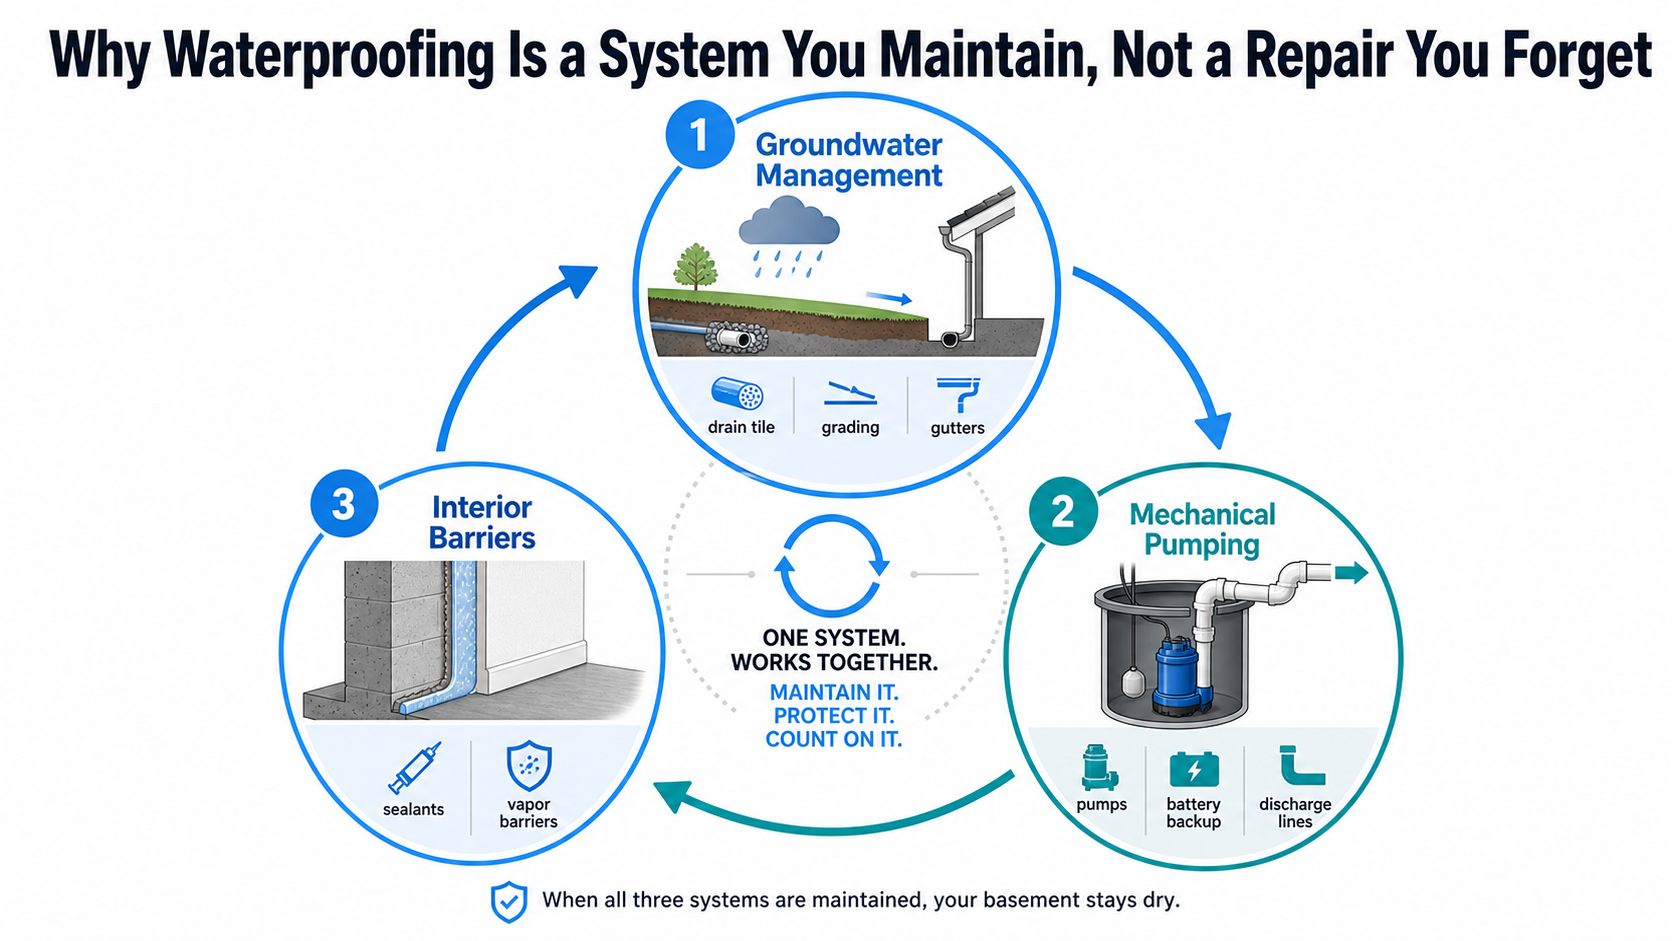
A drain can clog. A sump pump can fail during the storm that demands it most. A check valve can stop working, a discharge line can freeze or disconnect, and a sealant can dry and crack. A dehumidifier can also lose effectiveness when its filter or coils become dirty.
Think in three connected subsystems
Groundwater management includes gutters, downspouts, grading, exterior footing drains, and interior drain tile. Keep roof water away from the foundation and check that discharge lines remain open. If a drained system collects water but has nowhere reliable to send it, pressure and dampness can return.
Mechanical pumping includes the primary pump, backup pump or power source, check valve, float switch, pit, and discharge route. Test the pump by adding water to the pit according to the manufacturer's instructions. Confirm that the discharge exits safely away from the foundation and that any backup arrangement starts when the primary system is unavailable.
Interior barriers include membrane continuity, sealants at penetrations and corners, vapor control, and humidity management. Inspect exposed joints and penetrations instead of assuming a warranty makes maintenance unnecessary.
Industry guidance identifies poor drainage design or installation as a common failure mode in drained Type C systems because these systems manage water rather than sustain water pressure. The same guidance cites an NHBC waterproofing failure rate of 2.5%, while accepted best practice treats the tolerable failure rate as effectively zero because the consequences can be severe. Review the Type C waterproofing guidance when evaluating a drained cavity approach.
Homeowners should document pump tests, inspect gutters and discharge lines, clean dehumidifier filters, and review sealants on a regular schedule. A structured quality assurance process also helps keep installation details, product information, and follow-up responsibilities visible.
DIY or Hire a Pro and the Maintenance Plan
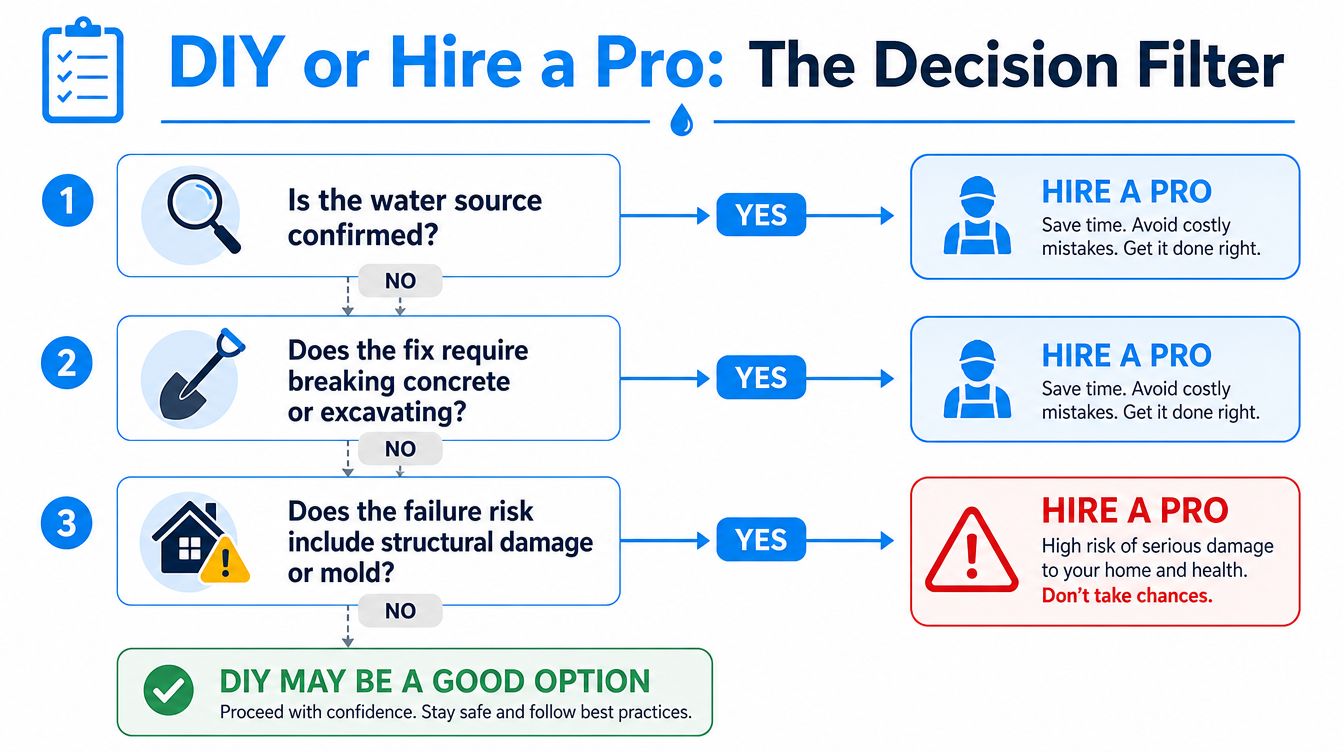
Use three questions before picking up a shovel.
- Is the water source confirmed? If not, stop and diagnose. A weekend spent extending downspouts or running a dehumidifier is reasonable, but installing a system without knowing the source isn't.
- Does the work require breaking concrete or excavating? If yes, hire a contractor. Interior drain tile requires controlled slab removal, proper drainage routing, and sump integration. Exterior foundation excavation carries safety and structural risks.
- Could failure cause structural damage or mold? If yes, get professional evaluation. A cosmetic patch is not an appropriate response to a bowed wall, active foundation flow, or extensive wet finished materials.
Work that fits a capable DIYer
A homeowner can often clean gutters, extend downspouts, add soil to correct minor surface grading, seal a small non-structural crack, and install a basic dehumidifier. These tasks still need observation afterward. If water returns during the next storm, the exterior adjustment didn't address the full problem.
A contractor should handle interior drain tile, exterior excavation to the footing, structural crack repair, work around load-bearing walls, and systems involving hydrostatic pressure. Don't use hydraulic cement as a universal answer. It can be a reasonable short-term patch for a small, stable leak, but it doesn't replace drainage when water is pressing against the foundation.
A maintenance schedule that works
- Quarterly: Clean gutters, inspect downspout outlets, check grading for settlement, test the sump, and clean the dehumidifier filter.
- Annually: Inspect the sump pit, pump float, check valve, discharge line, wall membrane, visible sealants, window wells, and finished-wall areas.
- Every five years: Reassess exterior drainage, inspect accessible buried-system connections, review pump age and backup capacity, and plan repairs before the equipment fails.
The maintenance plan is part of the waterproofing system, not an optional extra. For a visual reminder of the decision filter, use the accompanying flowchart before deciding whether a small repair is safe to handle yourself.
Your Next Steps and When to Call a Contractor
Start with the four-part diagnosis: identify the moisture source, trace its entry path, record its timing, and look for pressure clues. Correct gutters, downspouts, and grading where they contribute. Then match the remaining condition to humidity control, localized crack repair, interior drainage, exterior waterproofing, or a combination.
Get two written quotes when the proposed budget exceeds $5,000. Ask each contractor to identify the source, state whether the system blocks or manages water, list pump and discharge equipment, describe restoration, and explain maintenance responsibilities.
Stop DIY work and call a professional if water is actively flowing through the foundation wall, a visible crack is wider than a quarter inch, or a finished basement has more than two square feet of water damage. These thresholds don't diagnose the cause, but they signal that a surface patch may hide a larger problem.
A hydraulic cement patch can be a Saturday project when the leak is small, stable, and understood. Full exterior excavation can take one to two weeks, followed by repair of the surrounding grounds, depending on access and scope. Keep the following checklist by the utility room:
- Run the foil test and inspect the exterior.
- Record when water appears.
- Correct gutters, downspouts, and grading.
- Obtain written proposals for system work.
- Test the sump and backup arrangement.
- Check barriers, sealants, humidity, and discharge lines on schedule.

For homeowners who need coordinated repairs or renovation work after moisture damage, contractors serving Tyler and East Texas can help connect the waterproofing scope with related remodeling needs. The important part is still the same: diagnose before selecting the repair, and document what the completed system includes.
Home Pro's Remodeling & Repairs provides licensed and insured remodeling, exterior improvement, repair, and restoration services for residential and commercial properties across East Texas. Visit Home Pro's Remodeling & Repairs to request an onsite consultation or estimate for basement-related repairs and the surrounding work needed to restore a dry, usable space.