
A hailstorm has passed through Tyler, the roof looks mostly intact from the driveway, and a contractor is offering to start work before you've compared paperwork. The hard part isn't just choosing shingles. It's making sure the contractor, written scope, permit records, installation photos, and any insurance documents tell the same clear story.
A careful process protects you whether the roof needs a repair, a full replacement, or no storm work at all. Before you sign, verify who's doing the job, what the contract includes, how the roof will be ventilated, and which records you'll keep if a claim becomes necessary.
Table of Contents
- Credentials Every Tyler Roofing Contractor Should Show
- How a Roof Replacement Runs From Estimate to Final Inspection
- Hail and Wind Ratings That Decide Material Choice
- Roof Materials Compared for Tyler Homes
- Attic Ventilation Sizing for a Tyler Reroof
- Roofing Warranties and What Each One Covers
- Separating Cosmetic Wear From Insurable Roof Damage
- What Drives a Tyler Roof Replacement Cost
- Book a Free Roof Estimate in Tyler
Credentials Every Tyler Roofing Contractor Should Show
Texas has no statewide occupational roofing license, and a 2025 proposal to create one didn't become law, according to this overview of Texas roofing laws. With no license number to verify, the paperwork does that job instead. Request the documents below and file the copies together, because the same folder that proves a contractor is qualified becomes your record if a Tyler hailstorm turns the project into an insurance claim.
| Requirement | What to request | Why it matters | Red flag |
|---|---|---|---|
| General liability insurance | Current certificate of insurance with policy dates and you listed as certificate holder | Covers property damage during tear-off and installation | Refuses to provide a certificate or sends a screenshot only |
| Workers' compensation | Certificate of coverage or written exemption | Clarifies coverage if a worker is injured on the roof | No answer, or says the crew is "just helpers" |
| Permit responsibility | Name of the party pulling the City of Tyler permit, plus permit number and inspection dates | Creates a record of code review and inspection | Suggests skipping the permit to save time |
| Written scope | Itemized list of deck repairs, underlayment, starter course, fastener pattern, flashing, and ventilation | Makes the work measurable and auditable | Scope is one lump-sum line |
| References | Three recent projects with Tyler or East Texas addresses | Lets you ask about workmanship in local conditions | References only come from unrelated regions |
| Business identity | Physical address, working phone line, and company name matching the insurance | Helps confirm who's responsible after the job | Only a mobile number, or company names change across documents |
The certificate holder line deserves a second look. Listing you on the certificate ties your project address to the policy, so the document is about your job rather than a generic PDF the contractor forwards to every prospect. The same logic applies to the scope. An itemized scope gives an adjuster or inspector something to check the finished roof against, line by line, long after the crew leaves.
The table won't catch every risk. Treat cash-only pricing, a missing written contract, and door-to-door crews who arrive from outside the area after a storm as reasons to slow down and verify further.
A contractor must not waive, absorb, rebate, or offset your insurance deductible. An offer to "take care of" the deductible isn't a discount to accept. It raises a compliance and fraud risk, so get the project price and payment terms in writing and contact your insurer with policy questions.
Practical rule: Don't sign until the company name on the contract matches the name on the insurance documents, and the scope names the person responsible for permits.
Home Pro's Remodeling & Repairs is a licensed and insured contractor, so ask for its current certificate of insurance and a written scope before you sign, then compare both with this checklist.
How a Roof Replacement Runs From Estimate to Final Inspection
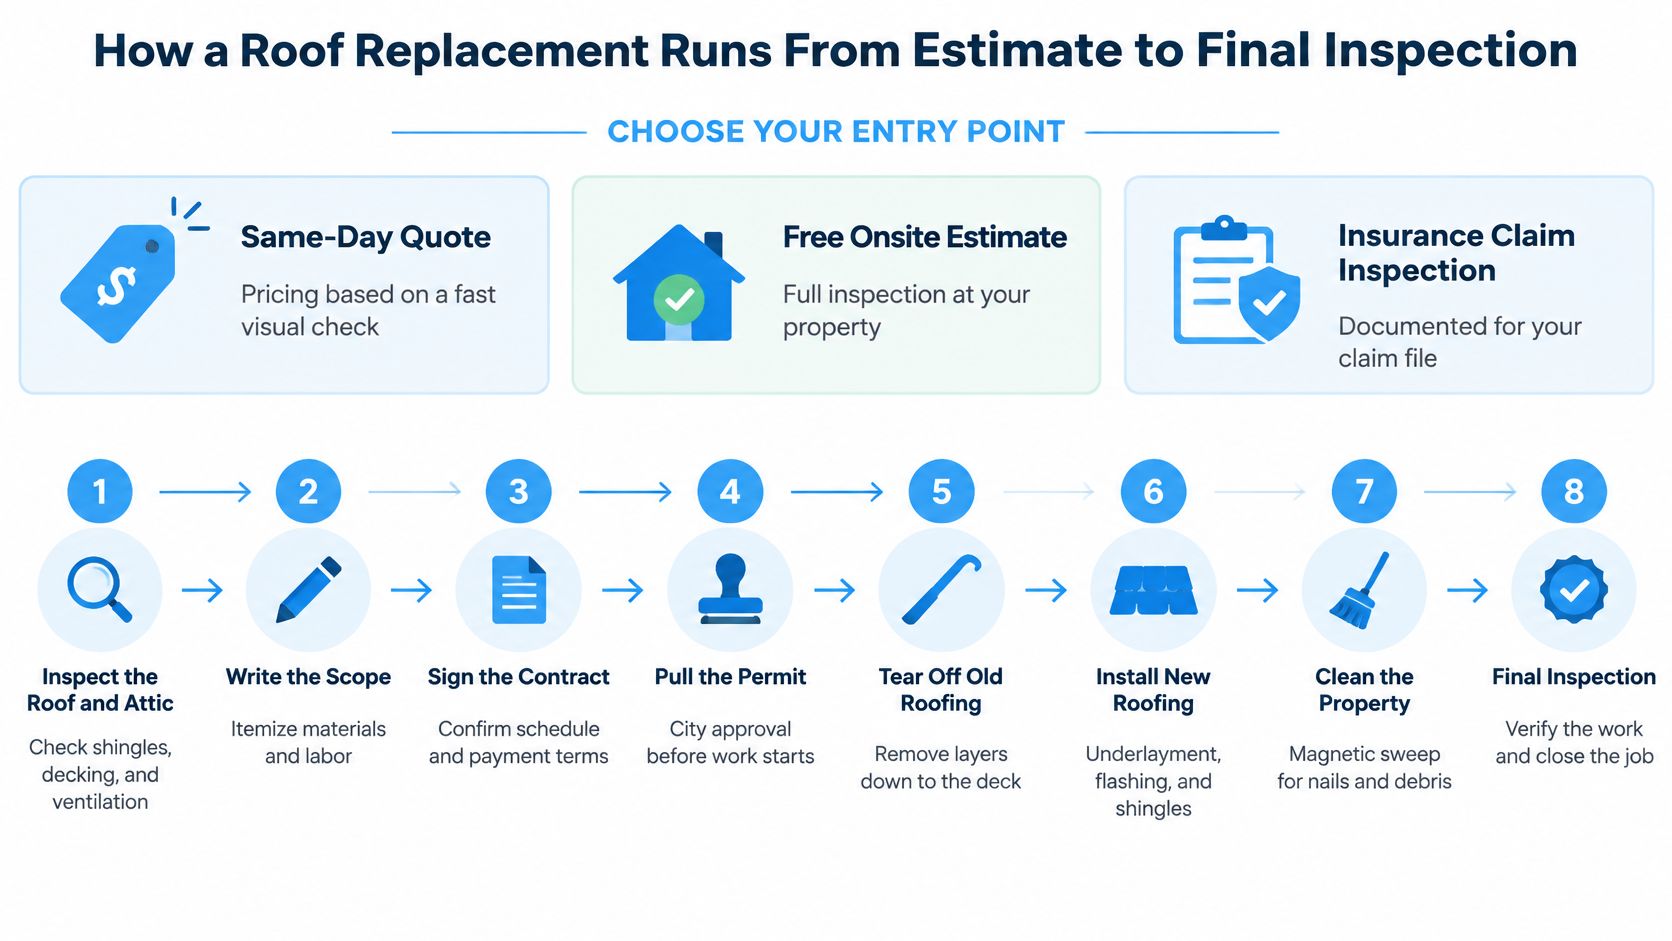
A project may start with a same-day quote, a free onsite estimate, or an inspection arranged to document a possible insurance claim. The first option is useful for an initial budget, but don't treat a quick visual quote as a substitute for a documented roof and attic inspection.
Inspect the roof and attic. Ask for date-stamped photos of each roof slope, penetration, vent, and gutter, plus attic conditions and any visible deck damage. You approve access and receive the inspection record.
Agree on a target budget and written scope. The scope should identify deck repairs, fastener pattern, underlayment, starter course, flashing, and ventilation. Review and approve the estimate before materials are ordered.
Confirm the code and installation system. The contractor should check the adopted local code, site-specific wind criteria, roof geometry, and the manufacturer's instructions for the selected products. The 2021 International Residential Code requires asphalt shingles to meet applicable wind-design and testing provisions, and wind performance depends on the installed assembly, not just the shingle label.
Pull the permit and schedule inspections. Get the permit number, identify who's responsible for obtaining it, and confirm how inspection dates will be shared. Approve the project schedule once permit responsibilities are clear.
Tear off and inspect the deck. The crew removes old roofing, checks for soft or rotten boards, and replaces damaged decking under the agreed scope. You should approve any additional work that changes the price before it proceeds.
Install the new system. The crew installs underlayment and any required water barrier, then applies shingles or panels using the manufacturer's fastening pattern. Ask for photos of layers and flashing before they're covered.
Complete cleanup and final inspection. The contractor should arrange the final inspection, conduct a magnetic nail sweep, remove debris, and walk the property with you. Record any remaining corrections in writing before signing the completion approval.
Close the file. Keep the permit, invoices, product details, inspection results, installation photos, and warranty registration together. Confirm the final payment terms and receive copies of the completed records.
Most single-family reroofs take a few working days, though weather and roof complexity affect the schedule. The homeowner's approvals should be documented at each point where scope, price, schedule, or completion changes.
Hail and Wind Ratings That Decide Material Choice
Hail and straight-line wind hit Tyler-area roofs on a recurring basis, so the ratings printed on a shingle bundle are a buying decision, not a spec-sheet detail. Those ratings also belong in the same paper trail as the contract and the permit. If a later storm leads to an insurance claim, the product documentation you collected during the estimate becomes part of the file that supports it.
Understand what the ratings say
Under ASTM D7158, wind-resistance classes D, G, and H correspond to design resistance of about 90, 120, and 150 mph, respectively. The 2021 IRC requires asphalt shingles to be designed for the applicable ultimate wind speed and tested under the standard, so check that the packaging or cut sheet identifies the classification. The rating lets you compare products on the shelf. It says nothing about whether your deck, fastening, or edge details can deliver that performance.
For hail, ask whether the product carries a UL 2218 Class 4 impact-resistance rating. Class 4 means the shingle resisted a standardized impact test. It does not make the roof hail-proof. Roof shape, penetrations, surrounding trees, and installation quality still decide how a real storm plays out.
Compare the complete assembly
Say you're weighing a Class D three-tab against an architectural shingle carrying a higher wind classification. Ask which product matches the project's applicable wind design, then request the manufacturer's required nail count and pattern in writing. That line in the scope is what turns a rating on paper into resistance on the roof.
The written scope should also name the starter strip, edge securement, underlayment, and flashing details, plus the points where the crew photographs layers before they get covered. A high-rated shingle nailed outside the manufacturer's pattern performs like a weaker product, and the photos are the only record proving the fastening went in correctly. I treat those photos as seriously as the shingle spec itself.
Texas coastal windstorm provisions do not automatically govern an inland Tyler project. Confirm the applicable requirements with the City of Tyler rather than assuming coastal rules apply, or that no local review applies at all.

Roof Materials Compared for Tyler Homes
Choose materials by matching the roof's exposure and geometry to your budget and plans for the home. Service-life figures below are typical under normal exposure, not guarantees; hail, wind, maintenance, ventilation, and installation quality can shorten service life.
| Material | Typical service life | Hail and wind performance | Best fit |
|---|---|---|---|
| Three-tab asphalt | 15–20 years | Lower wind resistance; older products have limited ratings | Budget reroofs and rental properties |
| Architectural asphalt | 25–30 years | Higher wind ratings and a wide range of styles | Most single-family homes |
| Impact-resistant asphalt (UL 2218 Class 4) | 25–30 years typical; confirm with manufacturer | Designed to resist hail impact, not hail-proof | Homes in hail-prone areas |
| Standing-seam metal | 40–70 years | Sheds wind and hail well; dents can show on the finish | Long-term owners and modern profiles |
| Clay or concrete tile | 50 years or more | Strong hail resistance; heavy and needs a structural check | Homes built to carry tile load |
| Wood shake | 20–30 years | Vulnerable to wind uplift and rot; fire restrictions may apply | Limited use; check local rules first |
| TPO or modified bitumen (low-slope) | 20–30 years | Membrane needs a puncture-resistant cover | Flat roofs, additions, and commercial buildings |
A Class 4 shingle is a reasonable option to compare when hail resistance matters, but it doesn't make the roof invulnerable. Ask for the product's warranty terms and installation requirements, then compare those with the scope and the roof's ventilation and flashing needs.
Metal roofing can handle weather well, but hail may leave visible dents even when the panel's seams and protective function remain intact. Decide whether appearance after impact matters to you, and ask the installer how the selected finish and panel profile are expected to show dents.
Tile has a different trade-off: its weight means the structure needs to be checked before installation. For low-slope areas, compare membrane systems as a roof assembly, including the cover or protection against punctures, rather than choosing by membrane name alone.
Attic Ventilation Sizing for a Tyler Reroof
Ventilation is a balanced intake-and-exhaust system, not a ridge vent added by itself. The commonly applied IRC baseline is one square foot of net free ventilating area for every 150 square feet of attic or roof-cavity area; the ratio can be reduced to 1:300 only under specified conditions for balanced openings, upper-roof distribution, vapor retarders, and climate zones, as described in the TAMKO Heritage application instructions.
Calculate the target by dividing attic floor area by the ratio denominator. Then compare that required net free area with the manufacturer-rated capacity of the vents, using the same units.
| Attic floor area (sq ft) | Net free area at 1:150 (sq ft) | Net free area at 1:300, conditional (sq ft) | Notes |
|---|---|---|---|
| 1,200 | 8 | 4 | Small single-story home |
| 1,800 | 12 | 6 | Typical three-bedroom home |
| 2,400 | 16 | 8 | Two-story home |
| 3,000 | 20 | 10 | Large home; split intake and exhaust evenly |
Ask the estimator to show the attic area, required net free area, intake-and-exhaust split, selected products, and any exception for an unvented roof assembly in the proposal.
Before accepting the ventilation plan, check that:
- Soffit intake stays open. Insulation shouldn't block the openings at the eaves.
- Intake and exhaust balance. Don't add exhaust capacity while leaving intake restricted.
- Vents resist weather and pests. Every opening needs suitable protection.
- Flashings integrate with the underlayment. Chimneys, walls, skylights, valleys, and plumbing penetrations need more than a bead of surface caulk.
- Air leaks get sealed separately. Ceiling penetrations, recessed lights, ducts, and attic access can leak conditioned air; roof ventilation won't fix those leaks.
Roofing Warranties and What Each One Covers
A roof may come with separate material, system, and workmanship warranties. They protect against different problems, so get the full terms rather than relying on a sales description.
Material and system coverage
A manufacturer's material warranty generally addresses defects in shingles or panels, such as cracking or premature granule loss. Confirm the term, whether coverage is prorated, and exclusions such as improper installation, ventilation failure, or storm damage.
A manufacturer's system warranty may cover approved materials and installation when the complete system is installed under the manufacturer's rules. Ask which components must come from the approved system and whether a certified installer is required. Non-approved products or an installer who doesn't meet the program's conditions can affect eligibility.
Contractor workmanship coverage
The workmanship warranty addresses installation-related leaks or failures. Get its term and exclusions in writing, including how it treats storm damage, later alterations, and attic moisture. Before final payment, ask what support the contractor provides if a workmanship issue appears and how you request service. See the workmanship warranty details and compare the stated coverage with the contract.
Registration can affect coverage and transfer rights. Some warranties require registration within a stated period, and a later home sale may involve specific transfer rules. A homeowner could register a system warranty yet still face a denied claim for early granule loss if poor attic ventilation violates the warranty conditions.
Check these potential coverage problems before approving the work:
- Installer: Is the contractor approved or certified where the warranty requires it?
- Registration: Who submits it, and by what deadline?
- Ventilation: Does the proposal document a suitable intake-and-exhaust plan?
- Repairs: Does the warranty require approval before other contractors make changes?
Request the warranty documents before final payment, not after a problem appears.
Separating Cosmetic Wear From Insurable Roof Damage
A storm report naming your county does not prove your roof has a covered loss. Coverage turns on your policy language and on the insurer's judgment about functional impairment: whether the roof still keeps water out and protects the building. A dented vent cap that still seals is wear; a punctured seam that lets water reach the deck is damage. Disputed claims usually sit between those two cases, and the outcome comes down to documentation.
| Observation | Usually cosmetic or wear | Possibly functional damage |
|---|---|---|
| Granule loss in gutters | Normal aging when the shingle mat remains covered | Exposed mat or bare patches that speed further loss |
| Dents on metal panels | Surface dent with intact finish and seams | Punctures, cracks, or separated seams |
| Cracked or missing shingles | A single cosmetic crack that remains sealed | Missing tabs exposing underlayment or nail heads |
| Dented vent caps or flashing | Surface dent only | Split, lifted, or unsealed flashing |
| Ceiling stains or soft decking | Old stain that is dry and not spreading | Active leak, wet insulation, or water in the attic |
Build a claim file before repairs
Keep a dated record so the condition of the roof is clear before temporary work or replacement changes it:
- Photos: Take date-stamped pictures from the ground and the attic, covering every slope, penetration, vent, and interior water mark.
- Temporary repairs: Save invoices and receipts for tarping or other emergency work.
- Weather records: Note the event date connected to the reported damage.
- Policy details: Keep the declarations page and identify the wind and hail deductible and depreciation rules.
- Itemized estimate: Ask the contractor to separate repairable components from upgrades required by code.
That file is your baseline. If an adjuster sees the roof weeks after the storm, these records show what it looked like the day after.
Texas law prohibits a contractor from waiving, absorbing, rebating, or offsetting your insurance deductible, so treat any promise to cover it as a serious warning sign. Texas also has no statewide roofing license, which makes the written record do double duty: the insurance documents, permit responsibility, and line-item scope that vet the contractor become the same paper trail that supports your claim.
When the scope, the photos, and the itemized estimate tell one consistent story, an adjuster can trace what was damaged and why it had to be fixed. For the repair-versus-replacement decision, compare that documented condition against the roof replacement versus repair guidance. A careful assessment keeps cosmetic wear from driving an unnecessary replacement and gives owners with real functional damage a cleaner claim.

What Drives a Tyler Roof Replacement Cost
A quote you can act on shows line items, not one total. Ask what each price covers and whether the written scope matches the work you expect, because the same estimate that justifies the price also becomes part of your paper trail if a later hail claim questions what was installed.
- Roof area and pitch. Steep or complex roofs take more labor and safety setup than straightforward roof planes.
- Tear-off layers. Each existing layer adds removal time and disposal, so confirm how many layers the price assumes.
- Deck condition. Ask for a unit price per sheet of replacement decking, so repairs discovered after tear-off have a written basis rather than a verbal add-on.
- Material selection. Compare options from three-tab asphalt to standing-seam metal or tile; tile also calls for a structural review before it is priced.
- Ventilation and flashing. Added intake or exhaust vents, and new flashing at chimneys, walls, and valleys, change the scope.
- Permit, inspection, and disposal fees. Confirm whether each is included or billed separately.
- Storm-related work. An insurer may or may not cover a particular item; keep the contractor's estimate distinct from the coverage decision, since the estimate describes the work and the policy decides payment.
Roofing Contractor's report on ServiceTitan's Exterior Service Report indicates that material prices are among the biggest concerns for exterior contractors, so ask how long the estimate is valid and whether the contract includes a price-change clause. A clause in writing tells you exactly what happens if shingle costs move between signing and build day.
Compare bids only when they describe the same materials and work. Two totals aren't comparable if one includes a different underlayment, fastener count, ventilation plan, or deck-repair allowance. For a broader budgeting framework, review the average roof replacement cost guide.
My recommendation: treat the estimate as a claims document from day one. A scope that names the shingle line, underlayment, ventilation plan, and permit responsibility protects you twice, once at signing and again if a storm turns the roof into an insurance file.
Book a Free Roof Estimate in Tyler
Home Pro's Remodeling & Repairs serves Tyler, Lindale, Flint, Bullard, Whitehouse, Frankston, Chandler, Kilgore, Chapel Hill, Hideaway, Ben Wheeler, Gladewater, Jacksonville, and nearby communities. Treat the booking as the start of one paper trail: the license and insurance proof, the written scope, the permit responsibility, and the photos or invoices that may later matter in a hail or wind claim should all point to the same job and the same roof.
Booking steps
- Request an estimate. Ask for a same-day quote or schedule a free onsite estimate.
- Meet for an inspection. Review photos of the roof, attic, and gutters with the estimator.
- Review the written estimate. Confirm the target budget, scope, and estimated production schedule.
- Check the documents. Compare the insurance details and written scope with the contractor checklist.
- Sign and confirm permit responsibility. Make sure the contract names who will pull the permit and manage inspection arrangements.
Have the roof's age, past repair invoices, any relevant insurance declaration page, and HOA rules ready. Ask for copies of the documents discussed during the visit, not verbal summaries, so the estimate file stays usable if damage is later disputed. If you manage incoming calls for a roofing business, Mercateer for roofing businesses offers information about handling customer inquiries, which can help owners understand what to expect when requesting an estimate.

Arrange an inspection soon if your roof is past its expected service life, shows possible storm damage, or the attic has signs of moisture. I would book before small leaks become deck repairs, because the written scope is cleaner when the estimator can separate wear, storm damage, and moisture findings in one visit.
Home Pro's Remodeling & Repairs offers roof inspections, estimates, repairs, and replacement work for Tyler and East Texas properties. Bring your roof photos, repair records, and insurance documents to Home Pro's Remodeling & Repairs to discuss a written scope and the next practical step.