
You're standing on a perfectly good East Texas patio, looking at a grill that has to be rolled out, connected, cleaned, and stored every time friends come over. Online photos make the answer look simple: build a long stone island, add a refrigerator, install a sink, hang a pergola, and call it an outdoor kitchen. On a real backyard site, that approach can spend your budget before you've dealt with heat, humidity, clay soil, drainage, utilities, and the condition of the deck or slab.
The practical way to learn how to build an outdoor kitchen on a budget is to treat the project as a phased remodel. Build the cooking zone first, protect the structure from East Texas weather, and leave smart access for improvements you may want later. National estimates put outdoor kitchens around $16,000 to $16,533 on average, but reported projects range from about $950 to more than $65,000, depending on size, materials, appliances, and site conditions (Angi's outdoor kitchen cost guide). A smaller, durable setup usually gives you more value than a large shortcut that needs to be rebuilt.
Table of Contents
- What a Budget Outdoor Kitchen Really Looks Like
- Where the Money Goes
- Planning the Layout on a Deck or Patio
- Choosing Materials and Appliances That Stretch the Budget
- A Phased Build Plan That Grows With Your Budget
- Permits, Utilities, and East Texas Site Prep
- Putting Your Build Plan Together
What a Budget Outdoor Kitchen Really Looks Like
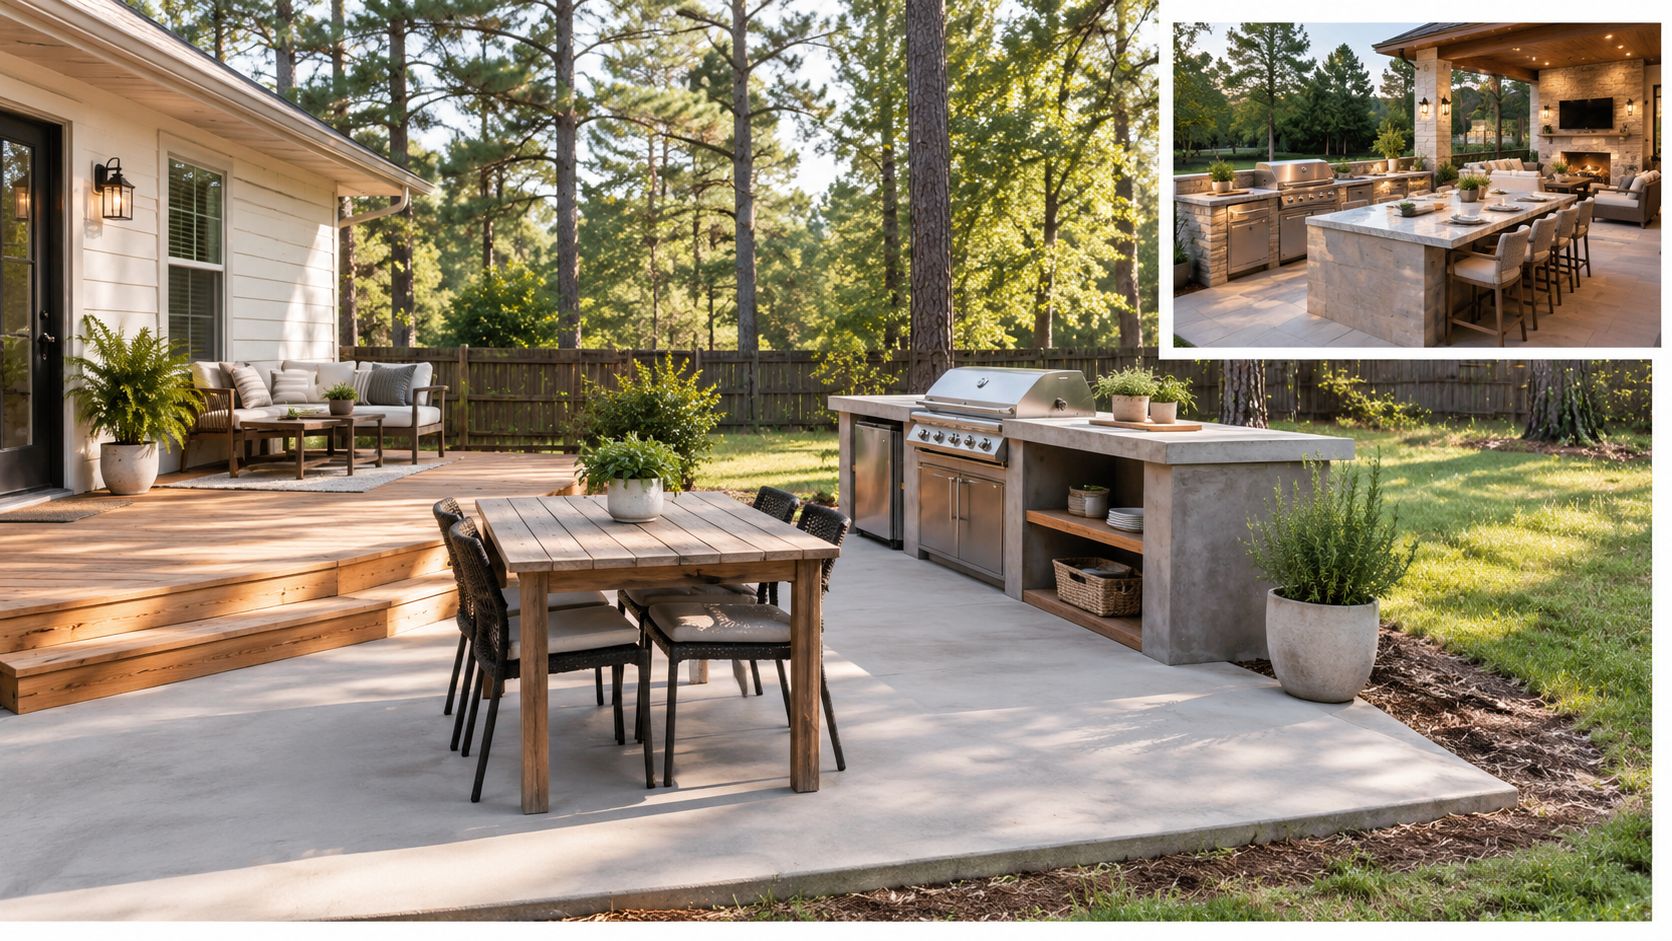
On a typical East Texas backyard with a modest patio or low deck, a budget kitchen isn't a resort-style entertaining wall. It's a focused cooking station that gives you a stable place for the grill, enough counter to set down a tray, and storage for the tools you use every weekend.
A sensible first phase includes:
- A cooking zone: Use a freestanding propane grill or a built-in grill selected for the final layout.
- A short prep counter: Keep the run compact and place landing space beside the grill.
- A protected base: Use a sealed framed enclosure, modular island, or weather-rated cabinet system.
- Minimal utilities: Keep the first phase free of a sink, refrigerator, and complicated plumbing.
- Future access: Leave capped or accessible routes for later gas, electrical, water, or drainage work.
Build for the weather, not the photograph
East Texas heat and humidity punish weak construction. Framing needs a finish and enclosure that keep moisture away from vulnerable materials. Use stainless or hot-dip galvanized fasteners, protect cut edges, and avoid leaving untreated lumber exposed behind a decorative finish. A countertop that looks attractive on installation day won't stay attractive if water can reach the substrate or mold can collect at an unsealed joint.
Heat clearance matters, too. A grill placed tight against vinyl siding can damage the siding and create a safety issue. Keep the cooking appliance away from combustible surfaces, eaves, and overhanging limbs according to the appliance manufacturer's instructions and local requirements. Smoke direction also matters. A kitchen that blows smoke toward the back door or a neighbor's seating area will be frustrating no matter how inexpensive it was.
Why phasing beats a cheap shortcut
A basic, kit-based setup may begin around $1,400 to $2,000, while budget-conscious partial DIY or kit builds commonly fall around $2,000 to $6,000 (Angi; Backyard Focus). The lowest price isn't automatically the best value. A shortcut that traps moisture, uses the wrong fasteners, or places utilities where they can't be serviced can turn into demolition.
For Phase 1, keep the scope to the grill, prep counter, and basic storage. Don't add a sink or refrigerator until the cooking zone has performed through an East Texas summer. If the patio or deck is already sound, this approach gives you a useful kitchen now while preserving the option to expand without tearing out the first build.
Where the Money Goes
The appliance package sets the upper limit, but labor, utility work, and site preparation decide whether the project stays near budget. Labor commonly accounts for 20% to 50% of total outdoor kitchen cost, according to the BBQ Authority investment guide. A simple enclosure with short utility runs can therefore cost less than an attractive masonry island, even when both use the same grill.
For an East Texas budget, treat the following figures as allowances, not promises. Access, existing construction, local requirements, soil conditions, and the selected finish can change the bid. Heat, humidity, and occasional freezing weather also make weather protection and serviceable utility connections worth funding before decorative upgrades.
A working budget by line item
| Line Item | Budget Range |
|---|---|
| Grill head | $400 to $1,200 |
| Modular base or framed island | $300 to $900 |
| Countertop | $200 to $700 |
| Propane line or tank placement | $150 to $400 |
| GFCI electrical run | $200 to $500 |
| Weather protection | $100 to $400 |
These figures do not cover every condition. Delivery, permits, planning, site preparation, and utility complications need separate allowances. One independent budgeting guide suggests planning around $2,000 for utility work, $2,500 for site preparation and assembly, and $1,000 for planning and permits, in addition to appliances and countertops (BBQ Authority).
Budget rule: Fund the parts that keep the kitchen safe, dry, serviceable, and usable first. Decorative finishes come after the base, grill, counter, and utility plan.
The items that break the budget
Trenching beneath an existing deck costs more because crews may need to work around framing, footings, and finished surfaces. Moving a gas meter can turn a short connection into a larger utility project. Custom tile adds labor at every corner, while a masonry base may require excavation, reinforcement, curing, layout, and finish work.
Deferring a sink and refrigerator reduces more than the appliance list. It also removes water, drainage, electrical, winterization, and service-access requirements from the first phase. Build the grill and prep station now, then add those appliances after the cooking zone has handled an East Texas summer and the utility routes are confirmed.
A basic grill-and-prep station can remain in the low-thousands for materials, while a DIY-oriented build with a refrigerator, sink, and storage is commonly estimated around $2,000 to $3,500 in materials (Backyard Focus).
For local planning, compare the first-phase scope with this East Texas outdoor kitchen cost guide. A licensed contractor's gas or electrical rough-in bid includes permitting, code compliance, testing, scheduling, and liability. Those requirements cost less than correcting an unsafe installation after the cabinets and counters are in place.
Planning the Layout on a Deck or Patio
Start with the surface under the kitchen. A concrete patio and a framed deck don't accept the same loads, and neither should be treated as automatically ready for a stone or masonry island.
On a deck, verify the footing and framing before adding dead weight. Confirm that the footings extend below the applicable local frost-depth requirement, inspect the ledger and connections, and have the framing checked for the proposed load. Masonry and stone can overwhelm a structure that was designed only for normal deck use. If the deck needs reinforcement, do that before the kitchen is ordered.
A slab deserves the same discipline. Look for settlement, cracks that indicate movement, ponding water, and edges that may not support a new enclosure. Adding a heavy base over an unstable surface doesn't correct the problem. It hides it until the finish cracks or the kitchen shifts.

Map the site before choosing the cabinets
Walk the shortest practical route from the house to the proposed kitchen. Mark the gas source, electrical panel, water supply, drainage path, doors, windows, eaves, trees, and combustible siding. A layout that looks compact on paper can become costly if every connection has to cross finished concrete or run around a deck beam.
Use the kitchen's final footprint even if you're building only the first phase. A grill and prep run around 6 to 8 feet gives you a workable starting point for cooking and landing space, but the correct size depends on the selected appliance and required clearances. Leave one end accessible for capped utility stubs or a future module.
Protect movement and service access
The work pattern should be obvious. Food comes from the house or storage, lands beside the grill, moves across the cooking surface, and returns to a clean counter. Keep a clear aisle of about 36 inches off a back door so people can pass without stepping into the cook's space. Confirm overhead clearance from eaves and tree limbs, and orient the grill so prevailing wind doesn't drive smoke into the house.
For a deck-specific cost and condition discussion, use this deck building cost estimate. The cheapest layout is the one that avoids moving the door, cutting the deck, relocating the meter, or rebuilding the surface after the kitchen design is complete.
Choosing Materials and Appliances That Stretch the Budget
Three purchases determine whether an outdoor kitchen survives East Texas weather: the grill, the countertop, and the base. Select them as one system. A high-end grill in a weak enclosure wastes money, while a propane cart can be a practical first appliance if the future island accounts for its dimensions, heat, and service clearances.
Compare the core choices
| Component | Budget Option ($) | Mid Option ($) | Premium Option ($) | East Texas Durability |
|---|---|---|---|---|
| Grill | $300 to $500 propane cart | $400 to $1,200 grill head | $900 to $1,500 built-in stainless unit | Protect from heat, rain, and corrosion |
| Countertop | Concrete overlay, $8 to $15 per square foot installed | Sealed tile, $12 to $25 per square foot | Porcelain pavers, $25 to $45 per square foot | Sealing and edge detailing matter |
| Base | Framed enclosure with cement board | Modular outdoor cabinet system | Masonry shell with premium veneer | Keep moisture out of framing and joints |
For planning purposes, basic grill-and-prep materials generally fall around $800 to $1,800. A DIY-oriented build with refrigeration, a sink, and storage can reach about $2,000 to $3,500. Treat those figures as allowances, not bids. East Texas supplier pricing, delivery, fabrication, and site conditions can shift the final cost.
Grill strategy
A propane cart is often the soundest first purchase. It stays movable, avoids locking the base to a built-in cutout, and lets you postpone a permanent enclosure until the layout and utility work are settled. If you later build an island, confirm the cart's required clearances and ventilation before enclosing it.
A built-in stainless unit gives the kitchen a cleaner finished appearance, but it fixes the appliance dimensions and usually requires more structural and utility coordination. Delay a side burner, pizza oven, or specialty appliance until you know the heat output, gas demand, ventilation, and counter clearances. In East Texas heat and humidity, extra equipment also means more surfaces and connections to clean, protect, and maintain.
Counter and base strategy
Laminate is a poor outdoor countertop choice. Concrete, sealed tile, and porcelain can perform well when installed over the right substrate with finished edges, drainage, and regular maintenance. Seal concrete and detail its joints so water cannot sit there. Use exterior-rated tile installation and sealed grout. Porcelain handles demanding outdoor conditions well, but fabrication and edge work can push the project into a higher cost tier.
For the base, pressure-treated framing covered with cement board and a properly installed exterior finish can cost less than modular cabinets and leave room for later changes. East Texas humidity makes exposed framing a short-term saving. The same applies to a countertop that traps water or veneer installed over a surface that moves.
Match the materials to the spending cap, not the showroom photograph. A $2,500 plan may call for a cart grill, compact counter, and simple weather protection. A $5,000 plan can support a more permanent base and stronger finish. An $8,000 plan may allow additional storage or better appliances, but plumbing, refrigeration, and masonry can still push the total higher. Build the weather-resistant cooking station first, then defer decorative finishes and specialty appliances until the structure, drainage, and freeze protection are settled.
A Phased Build Plan That Grows With Your Budget
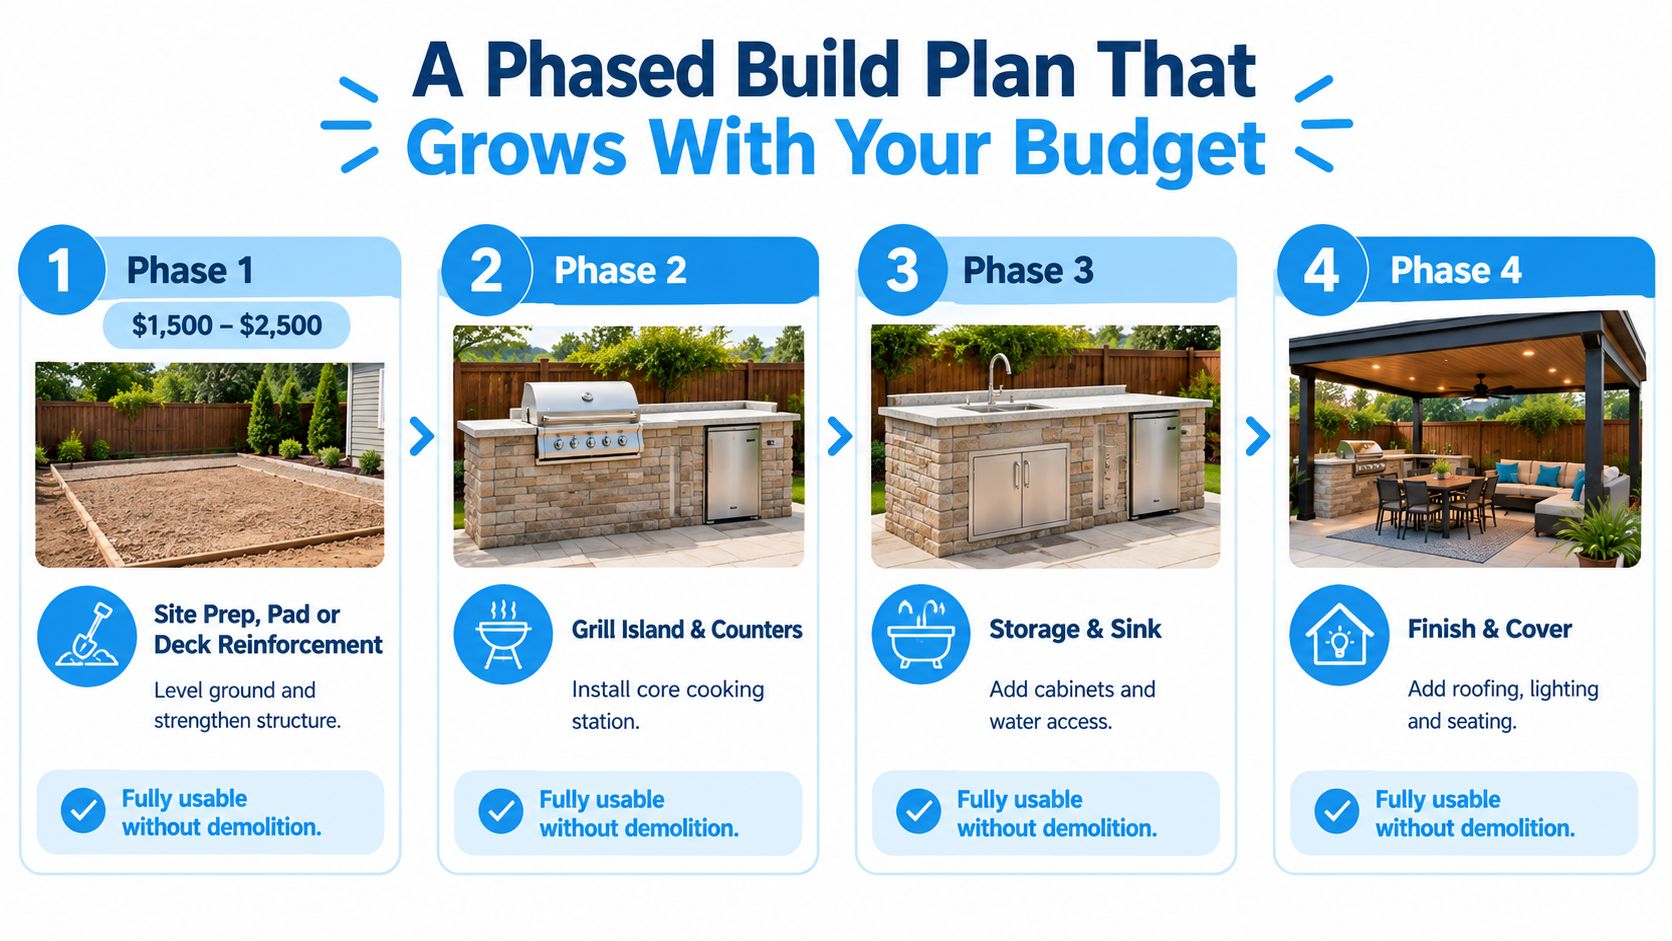
Build each phase so it works independently and leaves a clear connection point for the next one. Starting small is practical. Building a first phase that later requires demolition is the expensive mistake, especially in East Texas, where heat, humidity, shifting soil, and freeze risk can punish rushed site work.
Phase 1 creates a usable cooking station
Plan on around $1,500 to $2,500 for site preparation, pad or deck reinforcement, and a basic grill-and-counter setup. Use a portable cart until the permanent enclosure and utility routes are settled. Correct the slope, stabilize the surface, confirm safe clearances, and place the grill where the final cooking pattern will work.
This stage should let the household cook outdoors immediately. Defer the sink, refrigerator, roof, decorative masonry, and specialty storage. In humid conditions, keeping the first installation simple also limits the number of joints and surfaces that need protection.
Phase 2 builds the permanent core
A realistic planning range for the framed or masonry base, correctly sized gas connection with shutoff, and permanent countertop is $2,000 to $3,500. Leave removable panels or knockout sections for a future side burner, sink, or service connection.
Before closing the base, photograph every route and label each shutoff. For a built-in grill, verify the cutout, ventilation, access panel, and manufacturer clearances before fabricating the counter. Do not cover a connection that may still require inspection or future service. In East Texas, protect exposed work from moisture and account for soil movement before committing to masonry.
Phase 3 adds convenience
Add the sink, storage, finish veneer, and a weatherproof GFCI outlet for a mini-fridge later. A practical allowance for this stage is roughly $1,500 to $2,500. Water and drainage require more planning than running a supply line into the cabinet. Set the shutoff, slope, discharge, cleanout, and winterization details before installing the sink.
A quick-connect gray-water arrangement or another drainage solution may suit some layouts, but local requirements and site conditions determine what is permitted. Keep the drain accessible. A buried line without a cleanout can turn a minor blockage into countertop or masonry removal.
Phase 4 finishes the outdoor room
A simple roof or pergola, storage drawers, lighting, seating, and a later grill upgrade can fit within roughly $1,000 to $2,000. Defer the cover if the budget is tight, but reserve its attachment points and drainage path early. A roof affects shade, wind, runoff, structural connections, and permit requirements, so it is more than a decorative finish.
Use this video as a visual reference while comparing layouts and sequencing:
At every phase, leave a capped route or accessible chase for future work. A planned stub is cheaper than opening finished masonry, removing a countertop, or trenching across a completed patio.
Permits, Utilities, and East Texas Site Prep
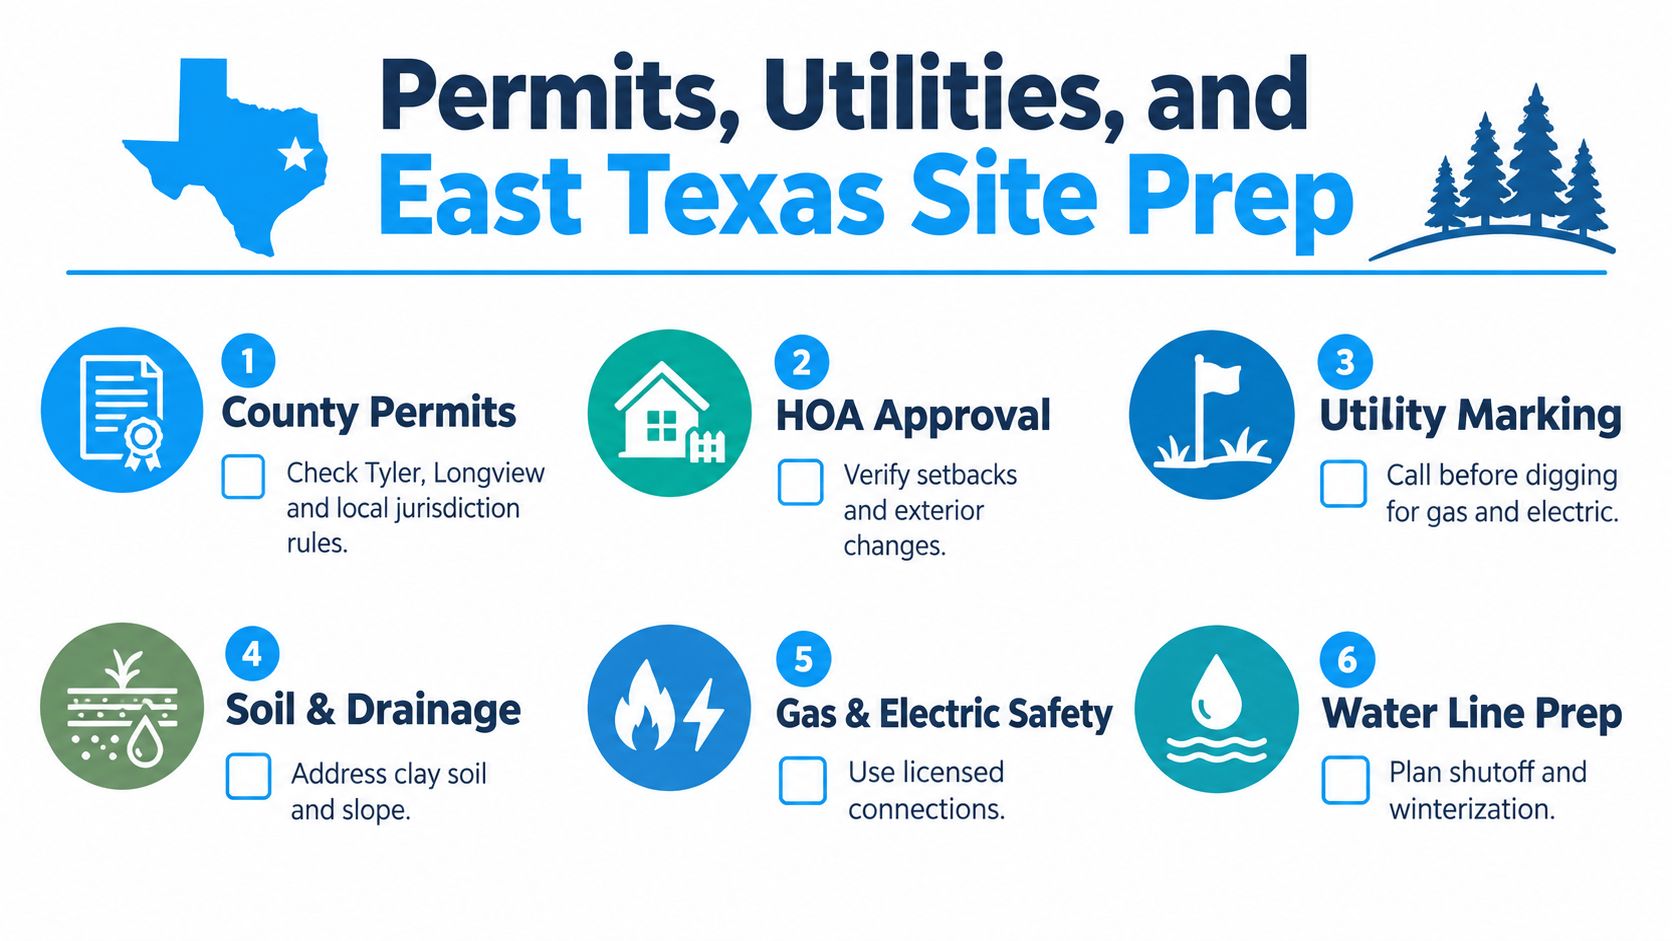
Permits and utility coordination are where a budget kitchen can become a construction project. A freestanding propane grill may avoid much of the work associated with a permanent installation, but a built-in kitchen tied to gas, electrical, plumbing, a new pad, or a roof structure can trigger local review. Rules vary by city, county, and property, so call the authority having jurisdiction before ordering materials.
Check the HOA documents as well. Setbacks, sight lines, exterior structures, fire provisions, and roof restrictions may apply even when the kitchen sits behind the house. An approval problem discovered after framing starts is expensive to correct.
Utilities must be designed before the finish
Call 811 before digging. Gas, electrical, water, and drainage routes should be marked before excavation or trenching begins. A gas line needs the correct sizing for the appliance package, not just the grill you own today. If you may add a side burner later, tell the designer or plumber before the line is installed.
Electrical equipment outdoors needs weather-resistant components and proper GFCI protection. Plan a dedicated circuit where appropriate, use suitable conduit, and avoid treating an extension cord as permanent infrastructure. Gas and electrical connections should be completed and tested by qualified professionals familiar with the local requirements.
For a broader explanation of residential permit questions, review this kitchen remodeling permit guide. The guide isn't a substitute for a jurisdiction-specific answer, but it can help you prepare the right questions for the permit office or contractor.
Prepare for clay, rain, and movement
East Texas clay can hold water, shrink, and swell. A new slab needs a properly prepared base, reinforcement, drainage, and compaction appropriate to the site. Don't place a heavy island over roots, soft fill, or a low area that regularly receives roof runoff. Correcting the ground first costs less than repairing a settled kitchen.
Water management also protects the finish. Slope the patio away from the home, keep countertop joints sealed, and make sure the roof or pergola won't discharge onto the cooking area. Freeze risk is less severe than in northern climates, but water lines still need a shutoff and a practical winterization plan.
Putting Your Build Plan Together
Start with three decisions, in this order.
First, lock the footprint. Draw the grill, landing spaces, prep counter, storage, traffic aisle, door swing, and future modules. Mark the shortest gas and electrical routes, then identify where a future sink or refrigerator could connect without cutting the finished base.
Second, install the core cooking zone. Build the surface correctly, choose the grill based on how you cook, and use a durable counter and sealed base. Keep the first phase useful without depending on a sink, refrigerator, pergola, or specialty burner.
Third, test the kitchen before expanding it. Live with the cooking height, smoke direction, counter space, storage needs, and afternoon heat through an East Texas summer. You may discover that shade matters more than a refrigerator, or that a longer prep counter is more useful than a decorative veneer.
Use this final field checklist
- Sketch the layout: Mark clearances, landing zones, door traffic, overhead hazards, and future utility points.
- Write the material list: Include the grill, base, countertop, fasteners, sealers, weather protection, and access panels.
- Choose DIY carefully: Homeowners can handle some assembly and finish work, but gas, electrical, structural reinforcement, and permit-related tasks deserve qualified review.
- Call before digging: Confirm permits, HOA approval, utility marking, drainage, and inspection requirements before excavation.
- Protect future openings: Leave removable panels, capped stubs, and documented routes so later phases don't require demolition.
Avoid untreated lumber in wet, humid areas, undersized gas lines that can't support future burners, and concrete poured over roots or uncompacted East Texas clay. Those choices can look inexpensive on the first invoice and expensive after the surface moves or the utility package changes.
If the patio or deck is already sound, Phase 1 can be a focused weekend project. If the surface is unstable, repair or pour the slab first, then build the kitchen on a reliable base.
Home Pro's Remodeling & Repairs provides design-build remodeling and outdoor living work, including decks, patios, and outdoor kitchens, with onsite consultations for East Texas homeowners planning around a target budget. Visit Home Pro's Remodeling & Repairs to discuss your layout, site conditions, utility needs, and a practical phased build plan.