
You're unloading the dishwasher when someone needs the refrigerator, the oven door is open, and the only clear path disappears. Even a kitchen that looks reasonably sized can feel like a phone booth when counters, cabinet doors, and traffic all compete for the same floor area.
The practical answer to how to maximize space in a small kitchen isn't automatically more shelving or a larger island. Start with the hidden geometry. Protect movement, keep the main work zones close, and choose storage that makes the back of a cabinet usable instead of merely filling the room with more boxes.
Table of Contents
- Why Small Kitchens Feel Cramped and How to Fix the Core Problem
- Mapping the Work Triangle and Protecting Clearances
- Storage Strategies That Reclaim Usable Space
- Concealed Zones Versus Open Counter Space
- Appliances Lighting and Finishes That Expand the Room
- Common Small Kitchen Remodeling Mistakes to Avoid
Why Small Kitchens Feel Cramped and How to Fix the Core Problem
A refrigerator door opens into the prep area. The pantry swings across the only useful aisle. A base cabinet holds cookware, yet finding one pan requires kneeling, reaching, and unloading everything in front of it. These kitchens feel cramped because their floor-plan problem makes storage work against movement.
Audit the room before pricing new cabinets. Measure opposing counters, record every door swing, and mark the routes people take. A kitchen needs at least 36 inches of aisle clearance, while 42 to 48 inches feels more comfortable, according to small-kitchen design and layout guidance. The clearance determines whether one person can open the dishwasher while another passes safely.

The three violations worth finding first
- Blocked circulation: A walkway cuts through the cooking area, sending household traffic across the cooktop or sink.
- Competing door swings: The refrigerator, dishwasher, pantry, or corner cabinet opens into another working zone.
- Missing landing and prep space: An appliance has no nearby surface for a hot pan, groceries, or ingredients.
An island should come after these conflicts are resolved. It can add storage, but it also narrows the route around it and may weaken the relationship between the sink, refrigerator, and cooktop. In a compact room, a shorter cabinet run with clear movement often performs better than a larger installation that forces everyone to turn sideways.
Practical rule: Measure the empty floor area first. If proposed storage reduces safe movement or usable prep space, it is relocating the problem rather than maximizing the kitchen.
Corners and vertical surfaces offer secondary storage opportunities. Ceiling-height cabinets, enclosed corner storage, and wall-mounted accessories can add capacity while preserving the central work area. Task-specific, enclosed storage also keeps counters clear without creating the visual clutter that open shelving can introduce.
The strongest remodels make the room calmer by removing obstacles, not by fitting in the greatest number of cabinets.
Mapping the Work Triangle and Protecting Clearances
A small kitchen can look neatly fitted and still work badly. The problem usually appears in the hidden geometry: appliance doors collide, traffic crosses the cooking area, or the only useful prep surface disappears. Map those relationships before selecting cabinet colors or ordering an island.
Mark the sink, refrigerator, and cooktop on graph paper or a basic floor-planning app, then connect them. This work triangle remains a useful test for compact kitchens, as long as it guides movement rather than dictating the entire design.
Each triangle leg should generally remain between 4 and 9 feet, with a total perimeter of about 13 to 26 feet, according to professional small-kitchen design standards. Keep household traffic outside that working relationship. A layout fails when someone must cross the cook zone to reach a door, even if the cabinets look orderly.
Map movement before ordering cabinets
Start with a scaled plan and work through these checks:
- Record fixed conditions. Measure walls, windows, plumbing points, electrical locations, doors, radiators, and vents. Show the direction of every door swing.
- Place the primary zones. Set the sink, cooktop, and refrigerator first. An island or tall cabinet comes later.
- Check each triangle leg. Measure sink to cooktop, cooktop to refrigerator, and refrigerator to sink. Keep the overall relationship within the recommended range.
- Mark circulation. Shade routes to doors, dining areas, laundry rooms, and exterior spaces. Any route through the triangle deserves a redesign.
- Test open doors. Draw the sweep of the refrigerator, dishwasher, pantry, and corner cabinet. Change the hinge direction, shift the cabinet, or reduce appliance size when doors compete.
Leave at least 24 inches of sink-to-range prep counter, with 36 inches preferable, based on the layout guidance cited earlier. This surface handles groceries, ingredients, chopping, and hot cookware. Replacing it with a decorative filler or oversized sink can reduce the kitchen's working capacity more than expected.
Aisle width must match the household. 36 inches is a basic clearance, while 42 to 48 inches gives more comfortable movement when more than one person cooks. Treat the aisle as active workspace, not leftover floor area to fill with another cabinet.
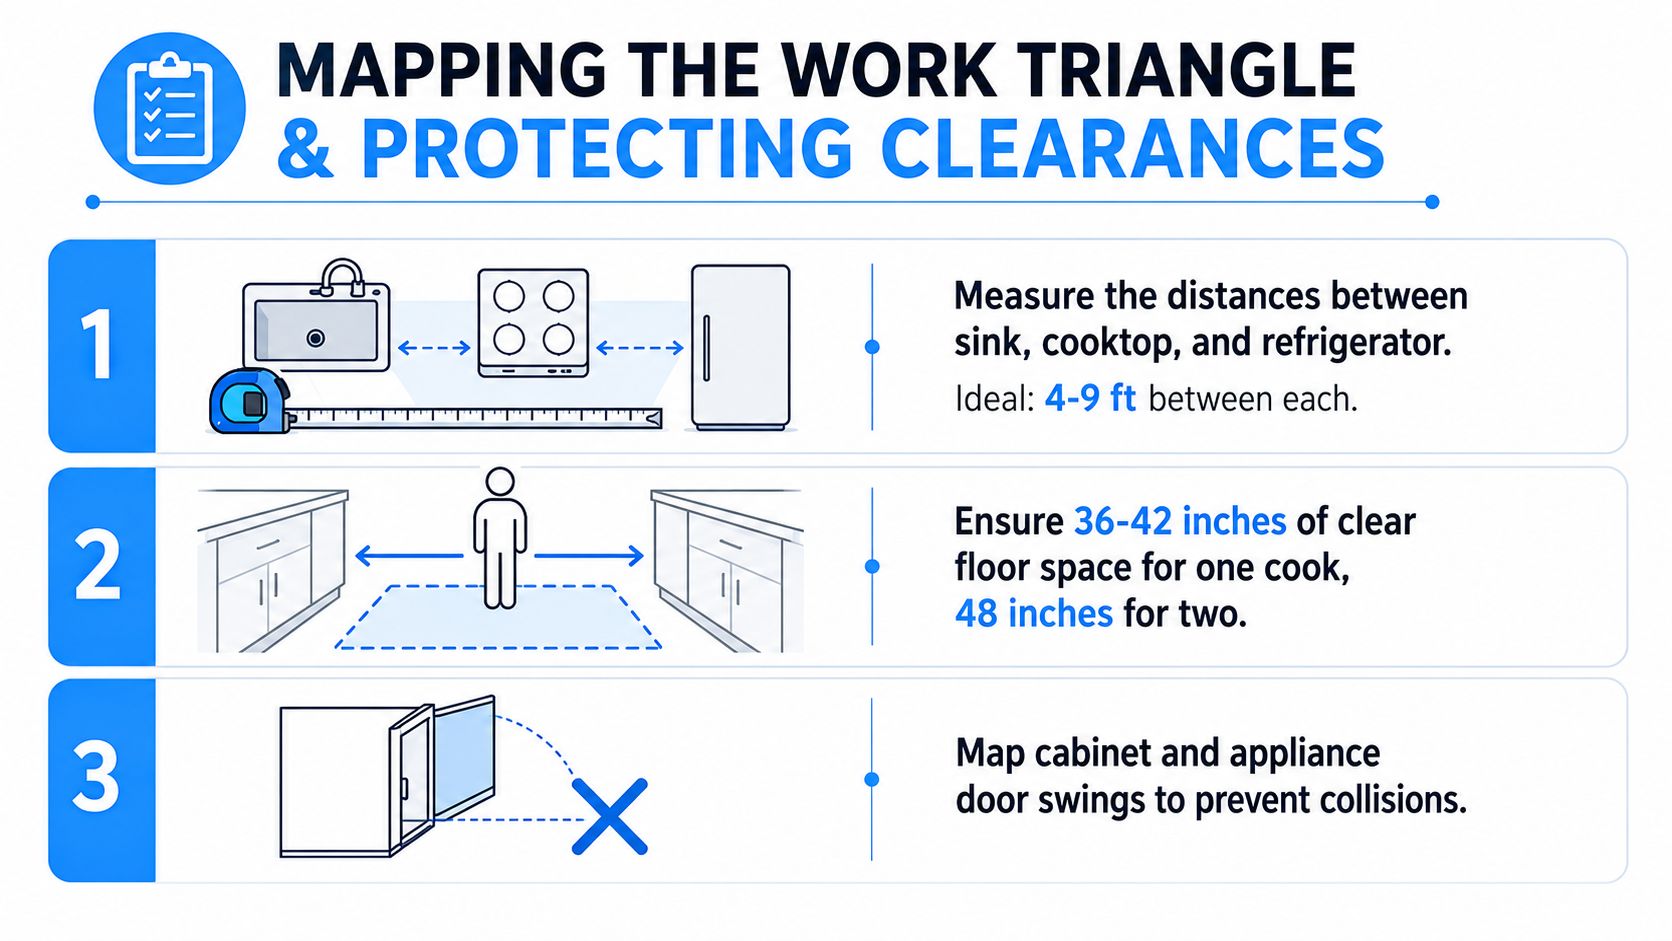
Galley kitchens perform well when opposing runs leave enough room to pass and work. Compact galley layouts often remain practical at around 7 feet wide or more, while an L-shaped kitchen commonly needs about 70 square feet or more, as described in small-kitchen layout guidance. These figures are planning references, not substitutes for a site measure. If a new cabinet run tightens the aisle or interrupts the triangle, it can make the room less useful despite adding storage.
Use this video as a visual aid while sketching appliance locations, clearances, and door swings:
Storage Strategies That Reclaim Usable Space
Storage planning starts with the cabinet's relationship to the work zone, not with the number of shelves. Open shelving uses wall area, but it exposes every dish, collects grease and dust near cooking surfaces, and can make a compact room look crowded. In most small remodels, enclosed, task-specific storage performs more reliably because each item has a defined location close to where it is used.
Full-height cabinets use vertical volume that base cabinets leave untouched. A cited kitchen-planning benchmark describes a 24-inch-wide pantry cabinet, typically 84 to 96 inches tall, holding dry goods in about two square feet of floor space through rollout trays. That example comes from small-kitchen storage guidance. The practical takeaway is to move capacity upward, then add pull-outs and interior organizers so the back of the cabinet remains accessible.
Deep drawers suit cookware, mixing bowls, plates, and small appliances because they provide direct access from above. One storage benchmark estimates that deep drawers can provide 40% more capacity than traditional cabinets for the same footprint, while ceiling-height storage can add up to 30% more storage space. Both figures are reported in kitchen storage optimization guidance. Treat them as planning references, not promises. Hardware, clearances, and cabinet construction determine the result in a specific kitchen.
Match storage to the work
Assign each cabinet to a repeated task:
- Drawers: Place them below prep and cooking areas for heavy pans, utensils, plates, and food containers.
- Pull-out pantry units: Use them for cans, spices, oils, and dry goods that vanish on fixed shelves.
- Corner systems: Add carousels or accessible swing-out hardware where a blind corner would otherwise waste usable volume.
- Upper cabinets: Store infrequently used serving pieces and seasonal equipment higher, while keeping daily items within easy reach.
- Internal dividers: Separate trays, lids, cutting boards, and baking sheets so vertical storage stays visible and controlled.
A common planning rule allocates roughly 60 to 70% of base storage to drawers and 30 to 40% to cupboards, with approximately 1.5 to 2.5 cubic meters of usable storage per person as a starting point. Those planning figures appear in the cited storage guidance. Inventory cookware, food, and countertop appliances before approving the cabinet schedule, since household habits matter more than a generic ratio.
| Storage Type | Accessible Volume | Cost per Linear Foot | Best Use Case |
|---|---|---|---|
| Deep drawer base | High, with direct top access | Higher | Heavy cookware and everyday tools |
| Pull-out pantry | High visibility through cabinet depth | Higher | Dry goods, bottles, and packaged food |
| Fixed-shelf base cabinet | Moderate, but lower items are harder to reach | Lower | Large occasional items |
| Open shelving | Depends on shelf depth and visual tolerance | Variable | Frequently used attractive dishes |
| Corner carousel | Recovers otherwise difficult corner volume | Higher | Pots, small appliances, and supplies |
The table avoids invented capacity and pricing figures. Hardware and installation costs vary with material, access, and local labor. For further planning context, compare kitchen cabinet storage solutions 2026, then assess whether cabinet refacing or replacement suits the condition of the existing cabinet boxes. A cabinet plan that improves access without narrowing the working aisle usually delivers more usable space than adding another shelf.
Concealed Zones Versus Open Counter Space
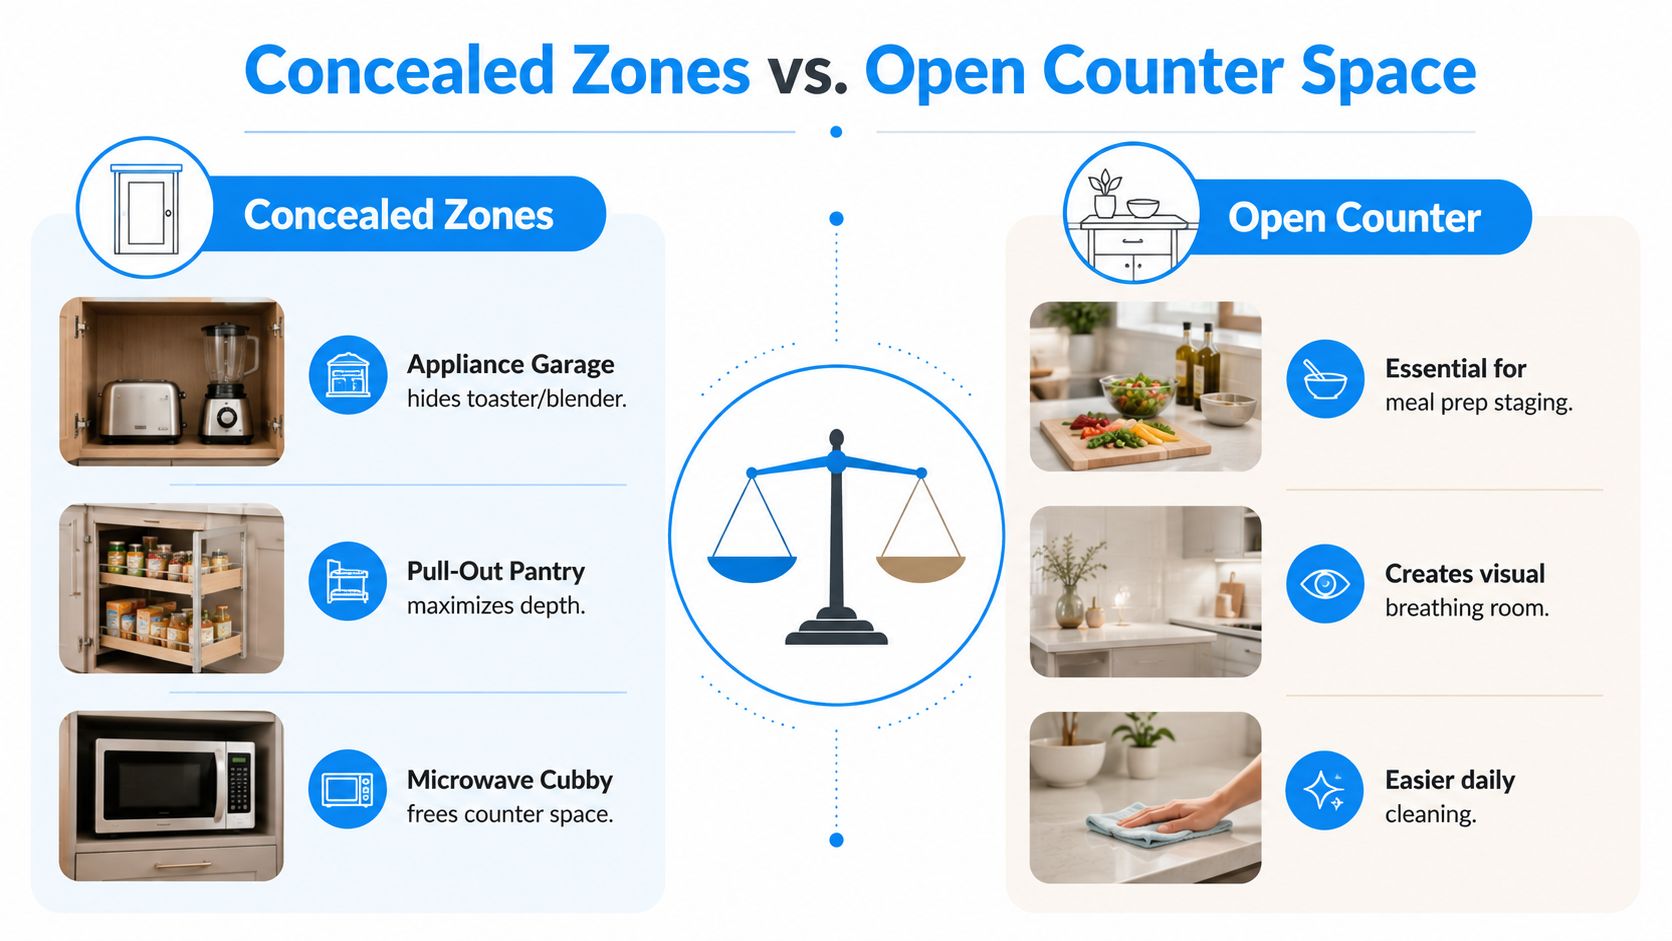
In a small kitchen, the counter beside the sink or cooktop often carries several jobs at once. A concealed zone earns its cabinet space only when it removes a bulky appliance without taking away the clear surface needed for prep, plating, or cleanup. An appliance garage can house a toaster, blender, or coffee machine. A pocket-door station can group breakfast supplies, while a microwave cubby moves the appliance out of the main prep run.
Open counter space is not wasted space. It stages groceries, supports a cutting board, gives baking sheets room to cool, and holds plates before serving. Enclose every surface and the kitchen may look orderly while becoming awkward to use. The better plan protects one uninterrupted work area and assigns enclosed storage to tasks that benefit from it.
Decide by habit, not appearance
A concealed station suits an appliance that is used often, occupies valuable prep space, and can remain plugged in safely. Coffee drinkers may gain from a cabinet that keeps beans, mugs, and the machine together. Someone who rolls pastry or prepares large meals may need the clear counter run more than another enclosed cabinet.
Use these questions before specifying a built-in:
- How often is the appliance used? Daily equipment deserves easy access. Occasional equipment can live higher or farther away.
- Does it need to stay assembled? A blender unpacked every morning may justify a lift-up or retractable station.
- Does the cabinet consume prep space? Keep the only counter beside the sink or cooktop available for work.
- Can the door stay out of the way? Pocket or retractable doors avoid the projection of a hinged door into the work area.
- Will heat and ventilation be managed? Enclosed appliances need suitable clearances and electrical planning.
Plumbing fixtures follow the same space calculation. If a filtered-water or boiling-water setup could remove countertop appliances, review 3-way tap installation advice before cabinet fabrication and sink selection. The fitting, service access, and cabinet layout need to work together.
A concealed zone should disappear when closed and work without rearranging the kitchen when open.
Keep the sightlines calm by grouping tall cabinets instead of scattering bulky units across several walls. Matching fronts help the storage read as part of the architecture rather than a collection of appliances. One well-planned hidden station can reclaim useful surface. Several specialized stations can overbuild the room, reduce open counter space, and interfere with the clearances that make a compact kitchen workable.
Appliances Lighting and Finishes That Expand the Room
A small kitchen can feel larger when its appliances, lighting, and finishes support the room's geometry. Start with the actual appliance models. Record door depth, handle projection, ventilation needs, and the space required to open each door before cabinet details are finalized. A counter-depth refrigerator can reduce visual bulk, while a slim dishwasher or combination microwave-convection unit may preserve cabinet space. Each choice still has to match how the household cooks.
Appliance placement also affects clearances and landing areas. A refrigerator door that opens into the main aisle can erase the space saved by its shallower body. Confirm fillers, panels, corner conditions, and adjacent work surfaces with the cabinetmaker before ordering.
Lighting should follow the work zones rather than the room's centerline. General ceiling lighting provides visibility, but under-cabinet LED strips illuminate the counter where chopping and cleanup happen. A pendant can focus light over a table or island without consuming countertop space. In a windowless kitchen, this layered approach prevents wall cabinets from casting shadows across the worktop.

Finishes can connect separate cabinet runs and reduce visual stops. Semi-gloss or high-gloss fronts bounce available light, while a light countertop and restrained backsplash keep the room visually continuous. Matching light tones can make tall storage read as one architectural volume. Continuous flooring through adjoining areas also avoids a hard break at the kitchen threshold.
Reflective surfaces do not solve crowded counters or inaccessible cabinets. Choose countertop materials according to cleaning habits, edge details, and maintenance, as well as appearance. This comparison of quartz versus granite countertops for kitchens helps frame the choice around daily use rather than color alone.
Finalize lighting locations only after cabinet elevations and the appliance schedule are stable. Moving a wall cabinet can shift an LED strip, and changing the refrigerator can alter both the sightline and nearby landing space. Locking the sequence early limits change orders and protects the clearances that keep the kitchen workable.
Common Small Kitchen Remodeling Mistakes to Avoid
The costliest mistake is treating every empty wall as storage space. Floating shelves may look light, but dishes, oils, and small appliances still need enclosed homes. Shelves work for attractive items used often, yet they do not replace a pantry and require regular cleaning, especially near the cooktop.
An oversized island creates a different problem. Extra drawers and seating do not help if the island narrows the work aisle, blocks appliance doors, or sends traffic through the cooking zone. Reduce its depth, limit its function, or remove it when the room cannot preserve clear movement.
Audit the proposal before signing
- Check the aisles: Confirm that the plan preserves at least 36 inches, with 42 to 48 inches preferred for comfortable movement. These clearances determine whether an island supports the kitchen or obstructs it.
- Test every swing: Draw refrigerator, dishwasher, pantry, and corner-door arcs at full size.
- Protect prep space: Keep at least 24 inches, ideally 36 inches, between the sink and range for preparation.
- Question fixed shelves: Ask whether drawers, rollout trays, or dividers would make lower storage easier to reach.
- Reserve task lighting: Verify that fixtures light the counters, not only the center of the ceiling.
- Review tall storage: Make sure full-height cabinets do not block windows, ventilation, or the main route through the room.
A cabinet count does not measure usable storage. A standard base cabinet may hold plenty while burying daily cookware, and adding organizers after installation often costs more than specifying the right drawer and pull-out configuration at the start. Review this guide to what not to do in a kitchen remodel before approving the plan.
Storage should match the work sequence. Enclosed drawers near the prep area can hold knives, utensils, and cookware without consuming the counter. A tall pantry can group dry goods, while open shelves remain limited to items that earn their visual space.
For homeowners comparing a targeted update with a full layout change, restore or remodel your kitchen offers a useful way to assess the scope. Cabinets, surfaces, lighting, and circulation often need to be reviewed together.
The final test is practical: open the important doors, move through the room without crossing the cooktop, reach daily cookware without emptying a cabinet, and keep enough clear counter to prepare a meal. If the drawing fails, revise the layout before ordering finishes.
Home Pro's Remodeling & Repairs helps East Texas homeowners plan kitchen remodels with coordinated layout updates, cabinets, countertops, flooring, backsplashes, lighting, and storage details. If you're in Tyler or a nearby community, visit Home Pro's Remodeling & Repairs to request an onsite consultation, free estimate, or same-day quote for a kitchen designed around the way you use it.