
The most popular kitchen advice starts with a work triangle and ends with a bigger island. Neither guarantees a kitchen that works. A compact triangle can put the cook directly in the path to the backyard, and a generous island can leave someone trapped between an open dishwasher and a stool.
Start with the people, not the centerpiece. Learning how to design a kitchen layout means finding places for cooking, cleanup, groceries, and passing traffic without making everyone negotiate for floor space. For a Tyler or East Texas remodel, that also means checking what the existing walls, floors, and utilities will let you change before you order cabinets.
Table of Contents
- Kitchen Clearances and the Work Triangle
- How to Map the Layout Before You Buy Cabinets
- Where Appliances and Cabinets Should Sit
- When an Island Helps and When It Hurts
- Lighting Power Materials and the Budget
- Hand the Plan to a Design-Build Contractor
Kitchen Clearances and the Work Triangle
A pretty cabinet run can't fix a short aisle. Before choosing door styles, draw the refrigerator, sink, and cooktop, then reserve the floor space people need around them. Cabinets should fill the space left after circulation works, not the other way around.
The work triangle connects the center fronts of those primary work centers. The University of Missouri Extension kitchen-planning guide identifies a 12-foot minimum combined length, about 15 to 22 feet as desirable, and 26 feet as the upper limit; its summarized planning guidance also calls for individual legs of 4 to 9 feet and no more than 12 inches of obstruction by an island or peninsula.
Kitchen layout clearances to mark first
Copy these items onto your drawing. Triangle dimensions follow the Extension guidance, aisle and appliance-space benchmarks follow the NKBA Kitchen Planning Guidelines, and accessible-layout clearances follow the U.S. Access Board's ADA standards.
| Item | Minimum | Preferred or limit | What it protects |
|---|---|---|---|
| Combined work triangle | 12 ft | 15 to 22 ft desirable; 26 ft maximum | Walking between fridge, sink, and cooktop |
| Each triangle leg | 4 ft | No more than 9 ft | A useful step without a hike |
| Island or peninsula blocking a leg | No more than 12 in of obstruction | Keep the route open | Unobstructed movement |
| Work aisle, one cook | 42 in (1,067 mm) | Use the multiple-cook allowance when sharing tasks | Prep and appliance access |
| Work aisle, two or more cooks | 48 in (1,219 mm) | Add room where simultaneous tasks need it | Passing while cooking |
| Passage-only walkway | 36 in (914 mm) | Don't treat it as a work aisle | Traffic outside the work zone |
| Clear floor at each appliance | 30 by 48 in | Check doors and drawers against usable standing space | Opening and standing room |
| Pass-through, opposing faces | 40 in | Measure to the furthest projecting faces | Accessible maneuvering between opposing elements |
| U-shape, opposing work areas | 60 in | Required in applicable accessible layouts | Turning and approaching work areas |
Planning guidance and accessibility requirements aren't interchangeable. The accessible dimensions apply to covered configurations, not automatically to every private kitchen remodel. Don't use an accessible pass-through minimum as permission to squeeze a shared cooking aisle.
Measure the actual obstruction
Measure between the surfaces that project into the aisle, not just the cabinet boxes. Refrigerator handles, countertop overhangs, and appliance fronts can change the usable gap. Draw the refrigerator with its door open far enough to remove its interior drawers.
For a visual explanation of how appliance placement affects movement, The Cabinet Coach's efficient kitchen layout measurements provide a useful companion to a scaled floor plan.
Practical rule: A short route isn't efficient if someone has to step aside every time you use it.
Don't stretch a single triangle to accommodate every appliance in a large kitchen. A separate baking counter or secondary preparation station can let another cook work without crossing the hot-pan route. Finish the drawing by plotting the primary centers and writing the actual aisle width beside every working run.
How to Map the Layout Before You Buy Cabinets
Use a typical weeknight as your test case: someone brings groceries inside while another person cooks, a child heads toward the pantry, and dirty dishes arrive from the dining table. Your drawing needs to accommodate those activities, not just an empty room.
A scoping review published in the Journal of Housing and the Built Environment identifies clear floor space, reach, workflow, lighting, ventilation, and visual access as influential kitchen-design factors, with safety priorities differing by age group. That's a strong reason to plan for the household's changing abilities rather than an idealized solo cook.
Use this planning sequence before you discuss cabinet finishes.
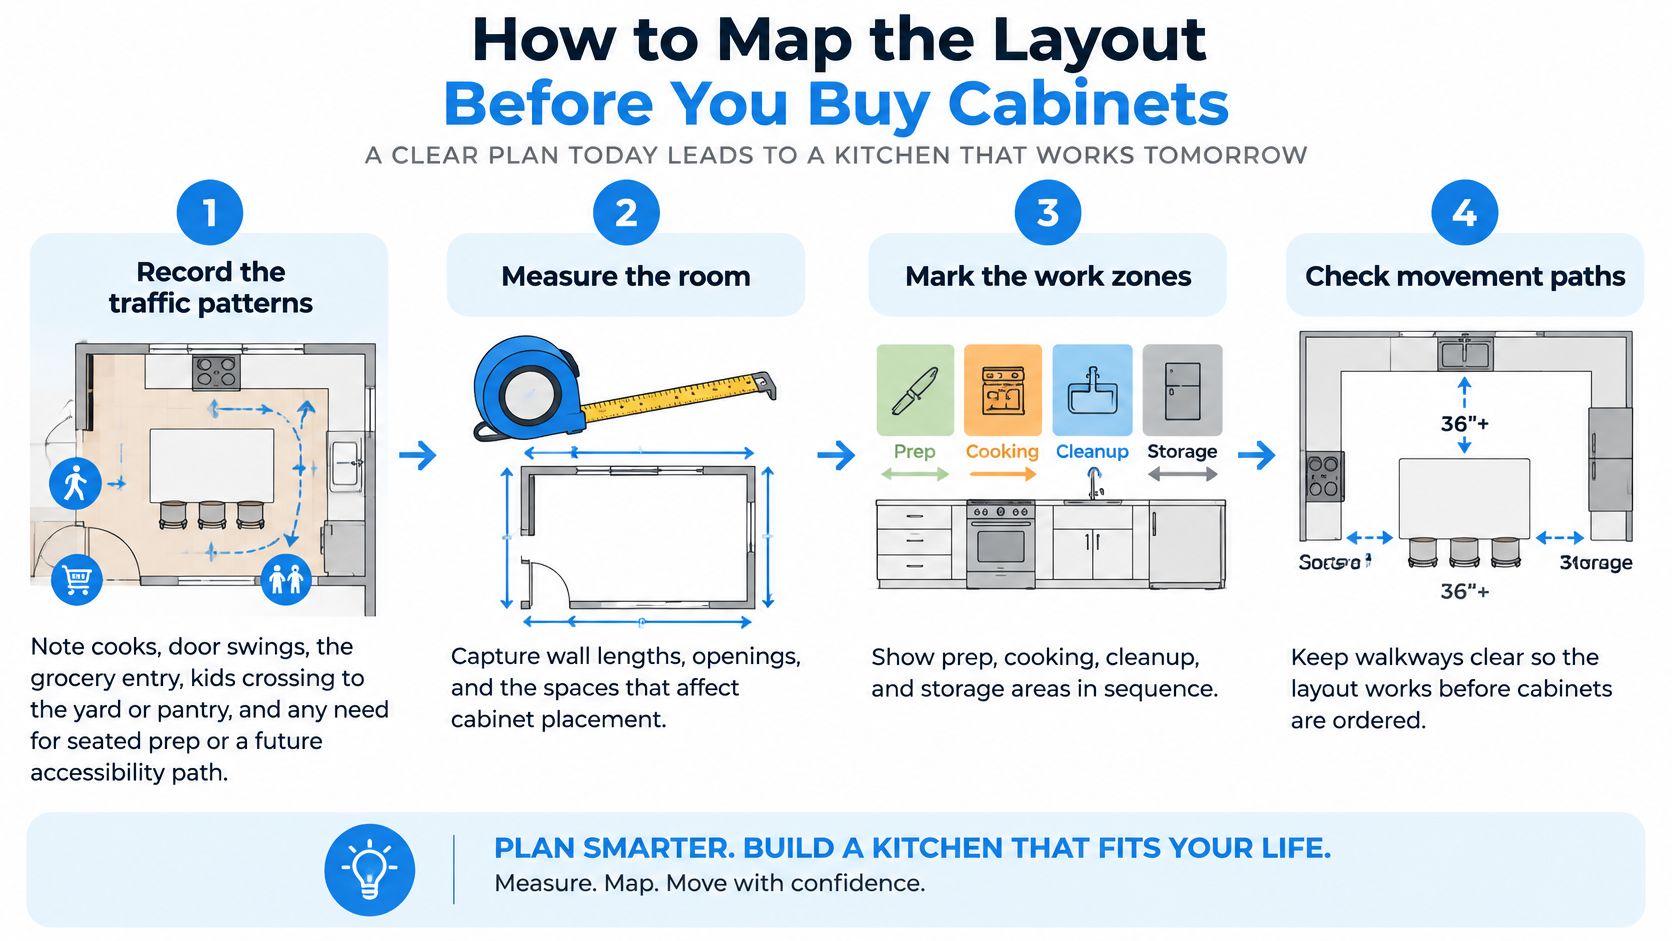
Build the plan around a shared evening
Record who uses the room. Write down who cooks, who cleans, and who passes through. Include the grocery entrance, refrigerator hinge direction, backyard route, seated preparation needs, and possible future mobility aids. This prevents designing for a household that doesn't resemble yours.
Measure the fixed room. Use a tape measure, graph paper, and a laser measure for cross-checking longer walls. Mark openings, trim, window heights, plumbing, gas, outlets, and the electrical panel location. Flag any wall proposed for removal for structural evaluation rather than assuming it's just a partition.
Place the primary appliances by task. Put grocery storage where arriving bags won't travel through the cooking area. Keeping the sink near its existing drain is a sensible budget starting point, while the cooktop should stay out of the main hallway route. This prevents convenient-looking appliance locations from creating repeated crossings.
Draw activities, not just appliances. Mark unloading, preparation, cooking, serving, cleanup, recycling, and guest gathering separately. On a shared cooking night, the person washing produce shouldn't have to stand where the other person opens the oven. Keep the dishwasher in the cleanup area beside the sink.
Fit optional furniture last. Draw the working aisles before adding an island, peninsula, or breakfast seating. In a compact room, use these ways to maximize space in a small kitchen to evaluate storage improvements before adding another cabinet block.
Tape the layout at full size. Mark cabinet fronts, appliance swings, and seating with painter's tape. Use cardboard to represent an open dishwasher or refrigerator door, then rehearse grocery unloading while someone prepares dinner. If a door hits a drawer or people can't pass, change the drawing before ordering.
Test reach with the actual users. Have each cook reach toward proposed upper storage, lower drawers, and countertop appliances. Name the adult who might need seated preparation later, and reserve a suitable work location away from the range. This prevents future accommodation from depending on a risky stretch across a hot surface.
Check the house beneath the drawing
In an older East Texas house, inspect what applies to that particular property: pier-and-beam construction, uneven floors, narrow delivery openings, or windows that leave little usable counter landing. Don't assume every older house has the same constraints.
Make a separate note for anything that needs investigation before demolition. A questionable floor or hidden plumbing route isn't a reason to abandon the layout, but it is a reason to delay the cabinet order.
Where Appliances and Cabinets Should Sit
Each appliance needs a useful neighbor and a landing surface. The refrigerator needs somewhere to set food, the sink needs space for wet work, and the cooking equipment needs somewhere to put hot cookware without carrying it across traffic.
Use the diagram to understand the relationship, then adjust it to the room you have.

A galley needs usable runs, not a crowded middle
Say your East Texas kitchen is a galley with a garage entry at the end. Place the refrigerator near that entrance only if the door opens properly and groceries have a nearby landing. Don't wedge it against a return wall that prevents access to the interior drawers.
Pair the sink and dishwasher so scraped dishes move directly into cleanup. Put everyday dishes where someone can unload them without reaching across the person washing vegetables. Keep the trash and recycling accessible during preparation rather than hidden behind an open dishwasher.
The opposite run can carry cooking and related storage. Pan drawers, utensils, and seasonings belong near the range, but tall pantry cabinets shouldn't interrupt the preparation counter between washing and cooking.
Counter landings and cabinet dimensions
Treat the dimension column as a project measurement to complete, not a set of universal stock dimensions. Use the selected appliance instructions, cabinet shop drawings, and countertop details to establish the final fit.
| Item | Dimension | Why it matters |
|---|---|---|
| Refrigerator landing | Record the clear counter available beside the opening side | Gives groceries a place to land |
| Sink landing | Record usable counter on each side, excluding obstructions | Lets dishes and produce sit beside the sink |
| Cooktop landing | Record clear landing on both sides under the appliance's installation requirements | Gives hot pans a safe resting place |
| Base cabinets | Record finished depth, including doors and countertop projection | Establishes the actual aisle boundary |
| Upper cabinets | Record depth and mounting height against user reach and appliance clearances | Keeps storage usable without obstructing work |
In an L-shaped kitchen, keep tall storage toward the end of a run where it won't divide the main work surface. A corner isn't automatically a good sink or range location. Check whether the placement leaves usable counter, service access, and room for neighboring doors to open.
The video offers another way to visualize appliance relationships before committing them to cabinetry.
A wall oven or microwave needs a landing that doesn't require turning into a passage with hot food. Guest seating should remain outside the dishwasher-loading position, even if shifting it makes the plan less symmetrical.
For another perspective on separating tasks, Hospitality's restaurant kitchen layout ideas illustrate workflow organization. Borrow the principle of keeping tasks in sequence, not commercial equipment arrangements or commercial clearance assumptions.
Stop adding cabinets when every appliance has a practical landing and its related supplies within reach. Filling the last blank wall isn't useful if it blocks a window or makes the room harder to use.
When an Island Helps and When It Hurts
If you want the island from a photograph, make it pass the movement test before discussing its finish. A photo doesn't show someone unloading groceries behind occupied stools or trying to walk around an open dishwasher.
The 2025 Houzz U.S. Kitchen Trends Study reports that 58% of renovating homeowners added or upgraded an island, and 57% of homeowners adding or renovating islands placed at least one appliance in it. Those figures establish popularity, not suitability for your room.
Choose the job before the centerpiece
An appliance-free island suits preparation, serving, and flexible household use. It leaves room to spread out baking trays or serve dinner without building plumbing or cooking equipment into the surface. Give everyday clutter another home, or the clear preparation area will disappear under mail and charging devices.
A cleanup island makes sense only when the sink, dishwasher, waste storage, and dish-handling positions work together. Test it with the dishwasher open and a person standing at the sink. Seating on the opposite side doesn't eliminate conflicts at the ends.
A cooking island demands a harder decision. You need a workable ventilation route, appropriate electrical or gas service, safe landings, and separation between guests and hot equipment. If conversation is the main attraction, consider whether preparation space facing the room would provide that benefit with fewer complications.
| Option | Choose it when | Main risk | Better alternate |
|---|---|---|---|
| Appliance island | Working aisles and door swings remain usable, and cooking or cleanup is the main job | Appliances and seating compete for access | Appliance-free island |
| Appliance-free island | The room supports flexible prep, homework, or serving | It becomes a drop zone | Peninsula with a clear end |
| Peninsula | An attached run can define the kitchen while preserving the main entrance | An awkward corner or trapped work area | Movable table |
| Movable table | The layout may change and the center can remain clear | No integrated power or storage | Stronger perimeter counters |
| No island | A centerpiece would constrict work or interrupt the refrigerator-to-sink route | Less casual seating | Nearby dining or a suitable banquette |
Opening a wall changes the traffic
Removing a partition doesn't automatically improve cooking. Houzz reports that 43% of renovating homeowners opened their kitchens to nearby interior spaces in 2024, and 64% of that group removed the wall separation completely, in its kitchen-remodeling trends coverage.
Before choosing that approach, draw where people will walk after the wall disappears. An opening that sends living-room traffic between the range and preparation counter can make an attractive kitchen harder to use.
Keep the island only if it earns its floor space during dinner preparation, not just when the room is empty.
Test seating with stools pulled out and someone sitting down. If there's no practical route behind that person, reduce the seating, move it, or remove it. A peninsula or nearby dining table is a better choice than a permanently blocked passage.
Lighting Power Materials and the Budget
A workable floor plan can still disappoint if the cook stands in shadow, countertop appliances have nowhere to plug in, or the ventilation route wasn't considered until the cabinets arrived. These decisions belong on the layout drawings, not on a finishing punch list.
The national median isn't a Tyler bid. In its 2025 renovation-spending analysis, Houzz reports median overall kitchen-remodel spending of $22,000 in 2024, down 8% from $24,000 in 2023. Your scope needs its own estimate, especially when it includes relocated utilities or structural work.
Protect the work surfaces
Use ambient lighting for general visibility and under-cabinet task lighting where hands, knives, and food meet the counter. A center ceiling fixture alone can leave your body between the light and the preparation surface. Locate task fixtures to illuminate the work rather than create glare on the backsplash.
Pendants should support the island's use without blocking sightlines or hanging in a walking route. Check their position against cabinet doors, hood placement, and the height of the people who'll use the space.
This checklist helps keep decorative selections tied to function.
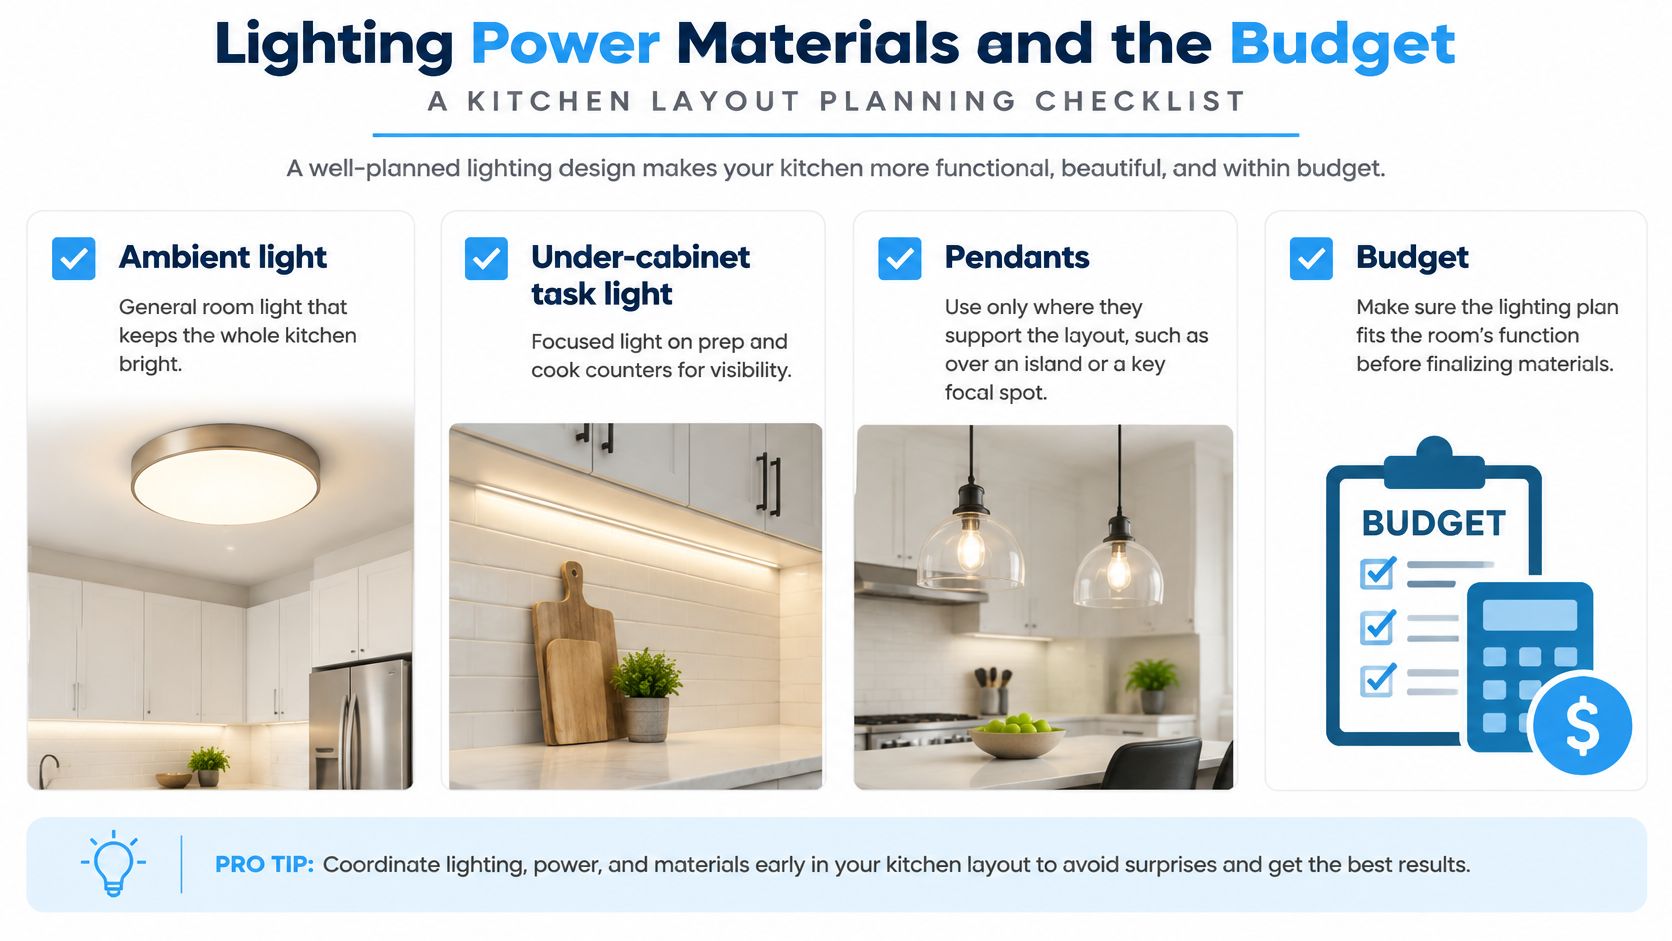
Have an electrician evaluate the panel, appliance loads, required circuits, receptacle locations, and GFCI protection under the locally adopted requirements. Mark where you'll use the coffee maker, mixer, and countertop cooking appliances. Don't approve the backsplash layout while the outlet locations are still undecided.
Plan ventilation using the selected hood's installation requirements and a feasible duct route. Prefer outdoor exhaust where the building allows it; if recirculation is necessary, understand the filter maintenance and performance trade-off before selecting the equipment.
Spend on the changes that improve daily use
- Keep useful infrastructure. An existing sink location may leave more budget for better storage and uninterrupted preparation space.
- Choose surfaces by care needs. Quartz, solid surface, and laminate offer different cost and maintenance compromises. Use this quartz-versus-granite countertop comparison to weigh the daily care alongside appearance.
- Specify the flooring assembly. Check spill resistance, subfloor condition, transitions, and the manufacturer's moisture requirements. Don't choose engineered wood, vinyl, or tile solely from a sample board.
- Price hidden work before finishes. Panel changes, duct routing, floor repairs, and relocated drains should be understood before premium decorative selections consume the budget.
Protect function first. A simpler countertop on a comfortable working plan is a better investment than an expensive surface wrapped around a daily bottleneck.
Hand the Plan to a Design-Build Contractor
Keep refining the arrangement yourself when the walls and utilities stay put and the household rehearsal works. Bring in a contractor before committing when a wall may be load-bearing, plumbing or gas must move, the panel needs evaluation, or a pier-and-beam floor affects the proposed work.
Those decisions need coordinated answers. A designer can place a sink beautifully without resolving the drain route, and a cabinet drawing can show an island without establishing how it will receive power. The HireArchitects guide to preconstruction teams helps explain which professionals should address those questions before construction.
Bring decisions rather than just inspiration
A useful consultation starts with your marked plan and the household activities it needs to support. Bring appliance model information, room photographs, photos of the panel and sink wall, and a budget ceiling. Keep inspiration images, but label what you want from each: clearer preparation space, better storage, or a place for guests away from cooking.
Before ordering: Resolve anything that could change cabinet sizes, utility locations, or the amount of usable floor space.
At Home Pro's Remodeling & Repairs, we're a licensed and insured design-build contractor based in Tyler, serving Lindale, Flint, Bullard, Whitehouse, and nearby East Texas communities. Our approach keeps the layout discussion connected to the house and the agreed budget.
How we move from idea to construction
Our 4-step design-build process runs from design through construction. It begins with an Initial Project Meeting to evaluate the property, project details, and expectations, and we proceed only when both sides agree the project makes sense.
Before designing, we establish a target budget so expectations and scope align. Design details must then be finalized and approved by you before construction begins. After approval of the final design concept, we provide a contract and an estimated production schedule.
If you're deciding whether this delivery method fits your remodel, our explanation of working with a design-build contractor gives you more context for that choice.
For a free in-home consultation, call 903-920-2969 or email homeprostyler@gmail.com. Bring the layout you've tested, including the compromises you haven't resolved. That gives the meeting a practical starting point: determining what the house can support and which changes are worth making.
Home Pro's Remodeling & Repairs offers kitchen renovations covering layout updates, cabinets, countertops, flooring, backsplashes, and lighting. Visit Home Pro's Remodeling & Repairs to arrange a free in-home consultation and turn your marked floor plan into a kitchen designed around the people who use it.