
You're standing beside a fresh cedar or pressure-treated pine fence with a stain can in one hand and a clear weekend forecast in the other. The boards look dry, the sun is out, and waiting feels unnecessary. Yet the most important question isn't whether Saturday is sunny. It's whether the wood is ready to accept a finish.
Good fence staining and sealing starts with moisture and timing, then moves to preparation and product selection. A coating applied too early can look fine at first and still fail through blotching, weak adhesion, or premature peeling. A patient, measured approach usually produces a better-looking fence and fewer repairs.
Table of Contents
- Why Your New Fence Might Not Be Ready to Stain
- The Workflow That Makes Stain Last
- Stain, Sealer, or Both and How to Choose
- Matching Maintenance Schedule to Your Wood Species
- Fixing the Most Common Fence Stain Problems
- Your Long-Term Fence Care Plan and When to Call a Pro
Why Your New Fence Might Not Be Ready to Stain
A homeowner once described the situation perfectly: the fence had just gone up, the lumber looked clean, and the only question was whether to stain it that weekend or wait. The answer depended less on the calendar than on what was happening inside the boards. New lumber can look dry on the surface while still holding enough moisture to interfere with penetration and curing.
For new or recently installed fences, a practical professional benchmark is 12% moisture content or less, checked with a moisture meter. Manufacturer guidance also calls for at least 48 hours of dry weather before application, while newly installed materials may still contain 20–28% moisture and require roughly 4–6 weeks of drying before they're ready. Those figures and the risks of early application are outlined in the manufacturer guidance for wood stain preparation.

Drying is not the same as curing
Pressure-treated pine often takes longer because the treatment process can leave the lumber saturated. Cedar and redwood may dry more readily, but shade, humidity, fresh milling, recent rain, and tight construction details can slow the process. Existing fences that have been pressure-washed also need time to release absorbed water before a finish goes on.
“Ready” means more than a board that feels dry when you touch it. The wood should be clean, dry, and absorbent. Sprinkle water across several boards. If the water darkens the wood and absorbs quickly, the surface is likely open enough for treatment. If droplets sit on top and bead, wait. The same field check is recommended in practical guidance from Ready Seal's fence preparation instructions.
Practical rule: Measure several areas, not just the easiest board to reach. Shaded sections and end grain often dry at a different rate than boards exposed to direct sun.
Curing describes the broader period during which new wood settles and reaches a stable moisture condition. Drying describes the loss of moisture itself. A fence can appear weathered and still be too wet for dependable coating performance, so a moisture meter is a better decision tool than a fixed waiting period.
That patience matters in East Texas, where humidity and shaded fence lines can keep boards wetter than expected. It's the same moisture-first thinking used in other exterior work, including vapor barrier installation. The finish can't compensate for a substrate that isn't ready.
The Workflow That Makes Stain Last
A durable fence finish depends on sequence. Skipping one step can create a failure the product label cannot correct.
Start with the substrate
Check the forecast before unloading your tools. The wood needs dry conditions during application and enough time afterward to cure. Confirm moisture readings on several boards, and follow the coating manufacturer's stated limit if it is stricter than the general benchmark.
Clean with the least aggressive method that will do the job. Remove dirt, mildew, loose fibers, and failing finish, then rinse thoroughly. Pressure washing works quickly, but excessive force scars soft wood and raises the grain. Let the fence dry fully after washing, then verify moisture before applying the finish.
A practical sequence is clean, rinse, dry, verify moisture, apply, and allow 24–48 hours of cure before moisture exposure. Keep the manufacturer's directions in control if they require more time.
Repair before coating:
- Replace compromised boards: Stain will not restore rotten wood.
- Secure loose hardware: Movement can crack a fresh coating around fasteners.
- Smooth raised fibers: Sand rough areas left by weathering or cleaning.
- Protect surrounding surfaces: Cover concrete, plants, metal, siding, and paving before opening the can.
Cedar often needs closer attention during preparation because its surface and natural oils can change how evenly a finish absorbs. For practical preparation details, see this guide to staining a new cedar fence.
Apply thinly and keep a wet edge
Stir the product thoroughly, then choose a brush, pad, roller, or sprayer suited to that formulation. Work from the top down in manageable sections while the stain remains workable. If you spray, back-brush while the coating is wet. This works the product into the grain and blends coverage across rough and smooth areas.
End grain absorbs more finish, so coat exposed cuts, board ends, and vulnerable joints without leaving puddles. A thick coat can remain soft, cure unevenly, or form a surface film when the product is designed to penetrate.
Follow the stated recoat interval instead of adding another layer because the first coat looks light. Keep pets, sprinklers, and irrigation overspray away from the fence until the coating cures. Clean brushes and equipment with the soap or solvent specified by the manufacturer.
Use a written quality check before leaving the job. Confirm coverage, missed end grain, overspray, drips, loose hardware, and cleanup from several viewing angles. That same discipline supports a broader quality assurance process, where the finished surface is checked against the intended result rather than judged only from a distance.
Stain, Sealer, or Both and How to Choose
The terms sound interchangeable, but they describe different jobs. Stain changes the wood's color and, when it contains pigment, can help reduce some ultraviolet exposure. A clear sealer primarily slows water entry while preserving the existing appearance. A combination product attempts to provide both functions in one formulation.
The right choice depends on the fence's current condition, the appearance you want, and how closely you're willing to monitor maintenance.
| Finish type | What it does well | Main trade-off |
|---|---|---|
| Solid stain | Provides the strongest color coverage and hides much of the grain | Can peel when applied over damp or poorly prepared wood |
| Semi-transparent stain | Shows more wood character while adding color and protection | Uneven absorption remains visible |
| Clear sealer | Preserves the natural tone and slows water entry | Often provides limited ultraviolet protection, so fading and graying need closer attention |
| Stain and sealer combination | Adds color and water resistance in one exterior finish | Must be compatible with the substrate and existing coating |
Penetrating oil finishes behave differently from film-building coatings. They soak into the wood instead of relying entirely on a surface layer, but they still need a clean, dry, absorbent substrate. Water-based products may offer easier cleanup, while oil-based products require the solvent and ventilation practices stated on the label. Neither category is automatically right for every fence.
Before buying, determine whether the fence already has a finish. A new product may not bond properly to an incompatible film, and a clear sealer over a failing coating only preserves the failure. Check the label for exterior fence use and compatibility with pressure-treated lumber.
A clear product isn't automatically a complete UV solution. If retaining color matters, look for the protection the formulation actually provides, not just the word “sealer” on the front.
Hardware near the fence also needs compatible protection. If you're evaluating finishes for hinges, brackets, or exposed metal, a resource covering top-rated protective coatings for hardware can help separate wood products from coatings designed for another substrate.
Matching Maintenance Schedule to Your Wood Species
Wood species sets the fence's maintenance rhythm. The finish affects water entry and color, but the lumber still determines how readily boards absorb moisture, respond to sunlight, and develop repair needs.
A cedar fence in good condition may hold up for 20+ years with staining every 2–3 years. Left untreated, that same type of fence in the same climate may begin rotting within about 8 years, according to the independent wood fence maintenance guide from Fence Advisors. Those figures are reference points, not promises. Ground contact, drainage, construction quality, and sun exposure can shorten or extend the service life.
Pressure-treated pine follows a different schedule. Preservative treatment helps protect the wood, but it does not protect exposed faces, cut ends, or areas that stay wet. A maintenance guide estimates 15–20 years when stain is applied every 1–2 years. Inspect the fence instead of assuming the treatment removes the need for upkeep.
Build the schedule around exposure
Cedar often fits a 2–3 year inspection and recoating cycle, but south-facing boards may need attention sooner if they fade or stop absorbing water evenly. Treated pine deserves close inspection during its early maintenance period. After that, base recoating on surface condition rather than an automatic annual application. Untreated softwoods generally need more frequent care because their softer grain reacts quickly to repeated wetting and drying.
Dense hardwoods require a separate product approach. Their tight grain may resist absorption, so choose a penetrating finish made for that species and test it on a small area before coating the entire fence.
Use this practical schedule:
- Inspect each season for fading, splitting, loose boards, and signs of water exposure.
- Recoat when the wood needs protection, not just when a calendar date arrives.
- Check shaded sections, sprinkler-hit boards, and the ground line more closely.
- Record the product and color used, so the next maintenance decision starts with reliable information.
A heavier coating schedule cannot compensate for unsuitable lumber, poor drainage, or boards already failing. Material quality and construction details often determine durability more than adding another layer.
Fixing the Most Common Fence Stain Problems
Peeling, blotchy color, and mildew each point toward a distinct preparation or moisture problem. Recoating without finding the cause may hide the symptom briefly, while making the next repair more difficult.
Peeling
Peeling usually means the coating could not bond to the wood. Damp boards, an older film-forming finish, or too much product applied in one pass are common causes.
Do not brush fresh stain over loose flakes. Remove failing material with a stiff brush or sander, feather the edges, and inspect the exposed wood. If the surface still beads water, it is not ready for another application. Clean away dust and residue, confirm that the new product is compatible with the remaining finish, and test a small area before continuing.
Peeling is a preparation failure until proven otherwise. A new coat will not correct moisture trapped beneath the old one.
Blotchy color
Blotching develops when planed boards, rough-sawn sections, end grain, and weathered patches absorb stain at different rates. Missed cleaning, uneven sanding, and stopping with a dry edge can produce the same uneven appearance.
For a small patch, use the product-compatible dilution specified by the manufacturer. An oil-based coating may call for mineral spirits, while a water-based product may call for water. Blend the repair into the surrounding area while the finish remains workable. For larger differences, treat the full panel wet-on-wet so the transition is less visible. Test the method in an inconspicuous corner first.
Keep the repair within the product's application window. If one section dries before the adjacent area is blended, overlapping marks can remain visible even after the finish cures.
Mildew
Mildew is biological growth, not ordinary dirt. It often appears as a black or gray haze on shaded sections, especially where the fence stays damp.
Use an oxygen bleach solution mixed at 1:3 with water for the cleaning approach described in the supplied trade guidance. Let it dwell for 15 minutes, scrub as needed, and rinse thoroughly. The wood must dry completely before stain or sealer is applied. Protect nearby plants and surfaces, and follow the cleaner's safety instructions.
If mildew returns quickly, inspect the fence's surroundings. Sprinkler spray, dense vegetation, poor airflow, and persistent shade can keep boards damp. Correcting those exposure conditions will do more than covering the growth with another coat.
Your Long-Term Fence Care Plan and When to Call a Pro
Fence care works best as a rhythm instead of a rescue project. Inspect the surface before it becomes visibly neglected, correct small problems while boards and hardware remain sound, and keep a record of what you apply.
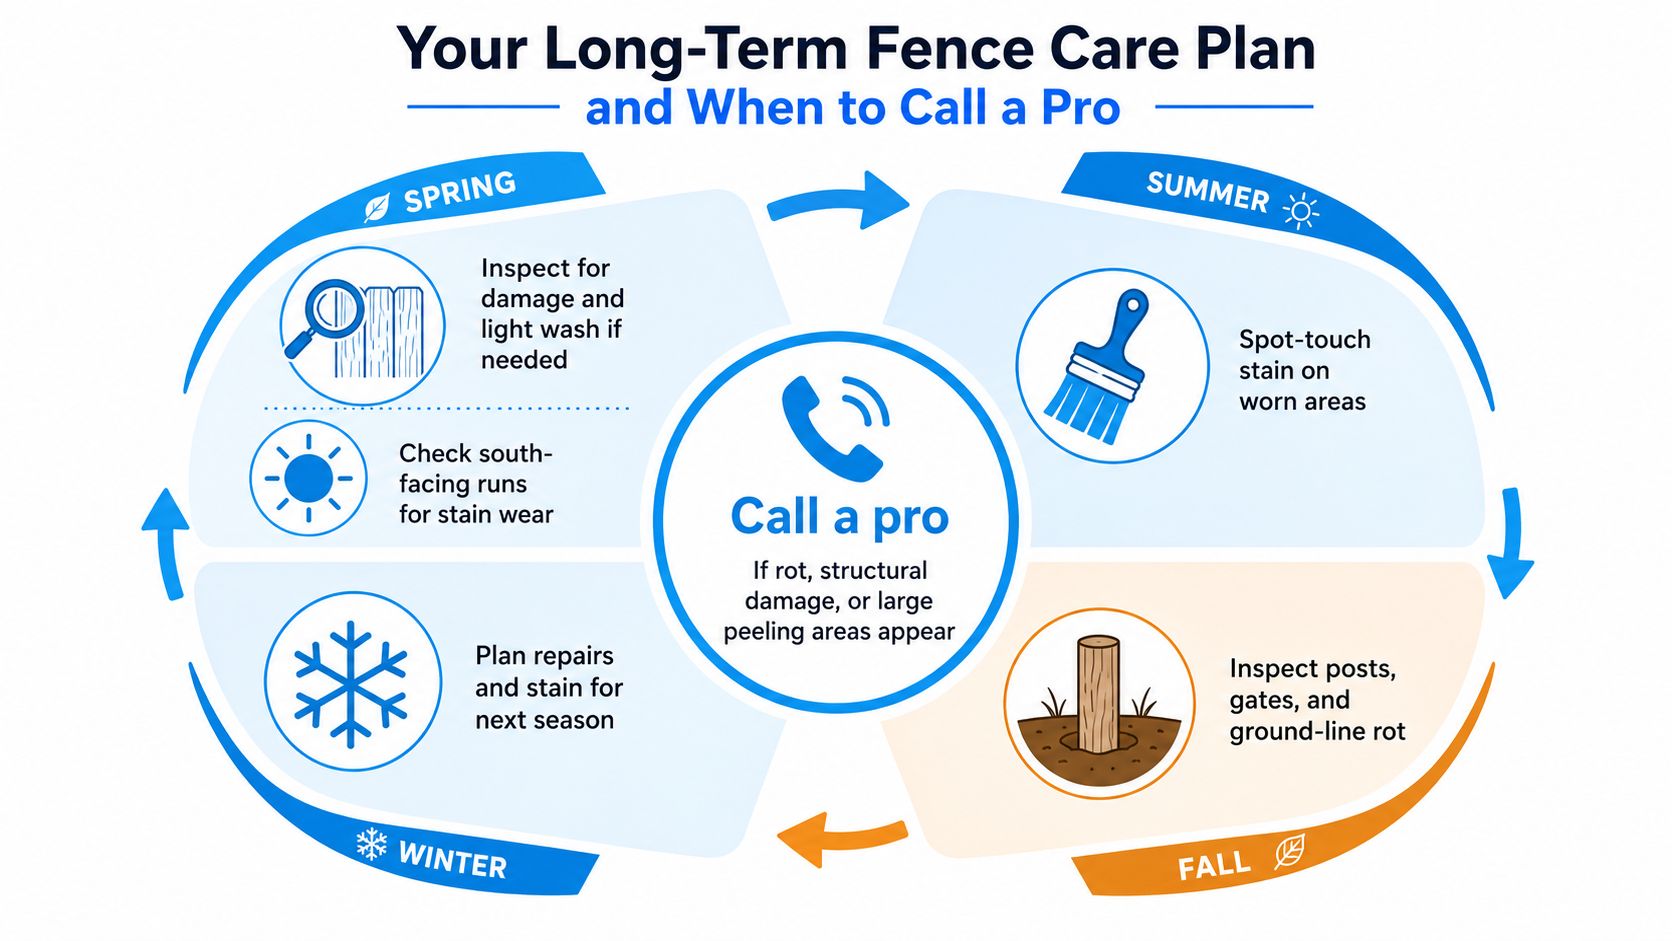
Use a one-page maintenance rhythm
In spring, inspect the visible faces, wash lightly if needed, and check south-facing runs for fading or dry-looking boards. Summer is a good time for small touch-ups when the wood meets the product's moisture requirements. In fall, look closely at posts, gates, fasteners, and the ground line, especially where sprinklers hit the fence. Winter is useful for planning repairs and selecting a compatible finish before the next suitable weather window.
Keep this checklist with your home maintenance records:
- Measure moisture: Take readings before any new coat.
- Clear the base: Remove leaves, soil buildup, and debris against the boards.
- Check fasteners: Look for rust, looseness, and movement around hinges.
- Trim vegetation: Keep plants from rubbing against or holding moisture beside the fence.
- Treat mildew: Clean affected areas instead of sealing over them.
- Square the gate: Correct sagging hardware before it strains the frame.
- Keep a photo log: Photograph the fence during regular inspections and record the product, color, and application date.
A short video can help you visualize the inspection and application process before you begin.
Know when coating is no longer the answer
DIY maintenance makes sense when the boards are structurally sound and the problem is limited to surface fading, light dirt, or a small repair area. Call a contractor when you find soft wood that you can pick apart at the base, widespread peeling across more than 30% of the surface, structural sag in posts, or active termite or carpenter ant activity. Those conditions indicate damage to the fence system, not merely a tired finish.
At that stage, stain and sealer won't restore strength. Replacing compromised boards or rebuilding affected sections is usually more responsible than applying another cosmetic layer.
If you're comparing professional work in another market, a guide such as Melbourne fence painting price 2026 can help you understand how labor, preparation, access, and coating choices affect an estimate, even though local conditions and pricing differ.
For East Texas homeowners who need help evaluating a damaged fence or planning replacement and gate work, fencing contractors near me can be a useful starting point. The best contractor will inspect the structure first, explain whether staining is appropriate, and separate maintenance from repairs that require carpentry or replacement.
The durable approach is straightforward: let the wood reach the right moisture condition, prepare it thoroughly, choose a finish that matches the material, and inspect it before failure becomes widespread. Fence staining and sealing protects a sound fence. It can't turn rotten wood into a sound frame.
Home Pro's Remodeling & Repairs provides licensed and insured fencing, gate, exterior remodeling, and repair services for homeowners and commercial properties across Tyler and East Texas. If your fence needs more than a surface coat, visit Home Pro's Remodeling & Repairs to schedule an onsite consultation, request a free estimate, or discuss a practical repair or replacement plan.