
You're staring at cracked shower tile, stained grout, and a surface that's been patched once too often. The urge is to grab a hammer and start peeling things back, but a shower retile isn't really a tile project, it's a waterproofing project with tile on top. That's why some showers look fine for a few months and then start leaking behind the walls, at the curb, or under the pan.
A solid shower retile follows a sequence, and every step matters. The goal is to rebuild the shower assembly so water stays where it belongs, the tile stays flat, and the floor still drains correctly after the new finish goes in. Skip the hidden details, and you can end up with lippage, loose tile, or a floor that holds water instead of shedding it.
Table of Contents
- What a Shower Retile Entails
- Demolition and Substrate Inspection
- Waterproofing and Membrane Installation
- Tile Layout and Setting Techniques
- Grouting and Sealing for Long-Term Durability
- Troubleshooting Common Shower Retile Problems
- Deciding Between DIY and Hiring a Professional
What a Shower Retile Entails
A homeowner usually starts this project because the tile looks tired, one section sounds hollow, or the grout keeps failing. The hard part is that a shower retile goes far beyond a surface refresh. It usually means opening up the shower, rebuilding the backing as needed, and protecting that rebuild with proper waterproofing before a single tile goes on.
The cost range reflects that reality. A full shower retile typically runs $4,500 to $12,000 when hired out, while a DIY version is often estimated at $1,000 to $3,500 and takes about 6 to 9 working days according to one trade guide on shower retiling (DG Floors). That same source breaks the work into real phases, including 1 day for demo and disposal, 1 to 2 days for waterproofing and the pan, and 2 to 3 days for tile setting. Those phases matter because curing time and waterproofing are part of the job, not cleanup after the fact.
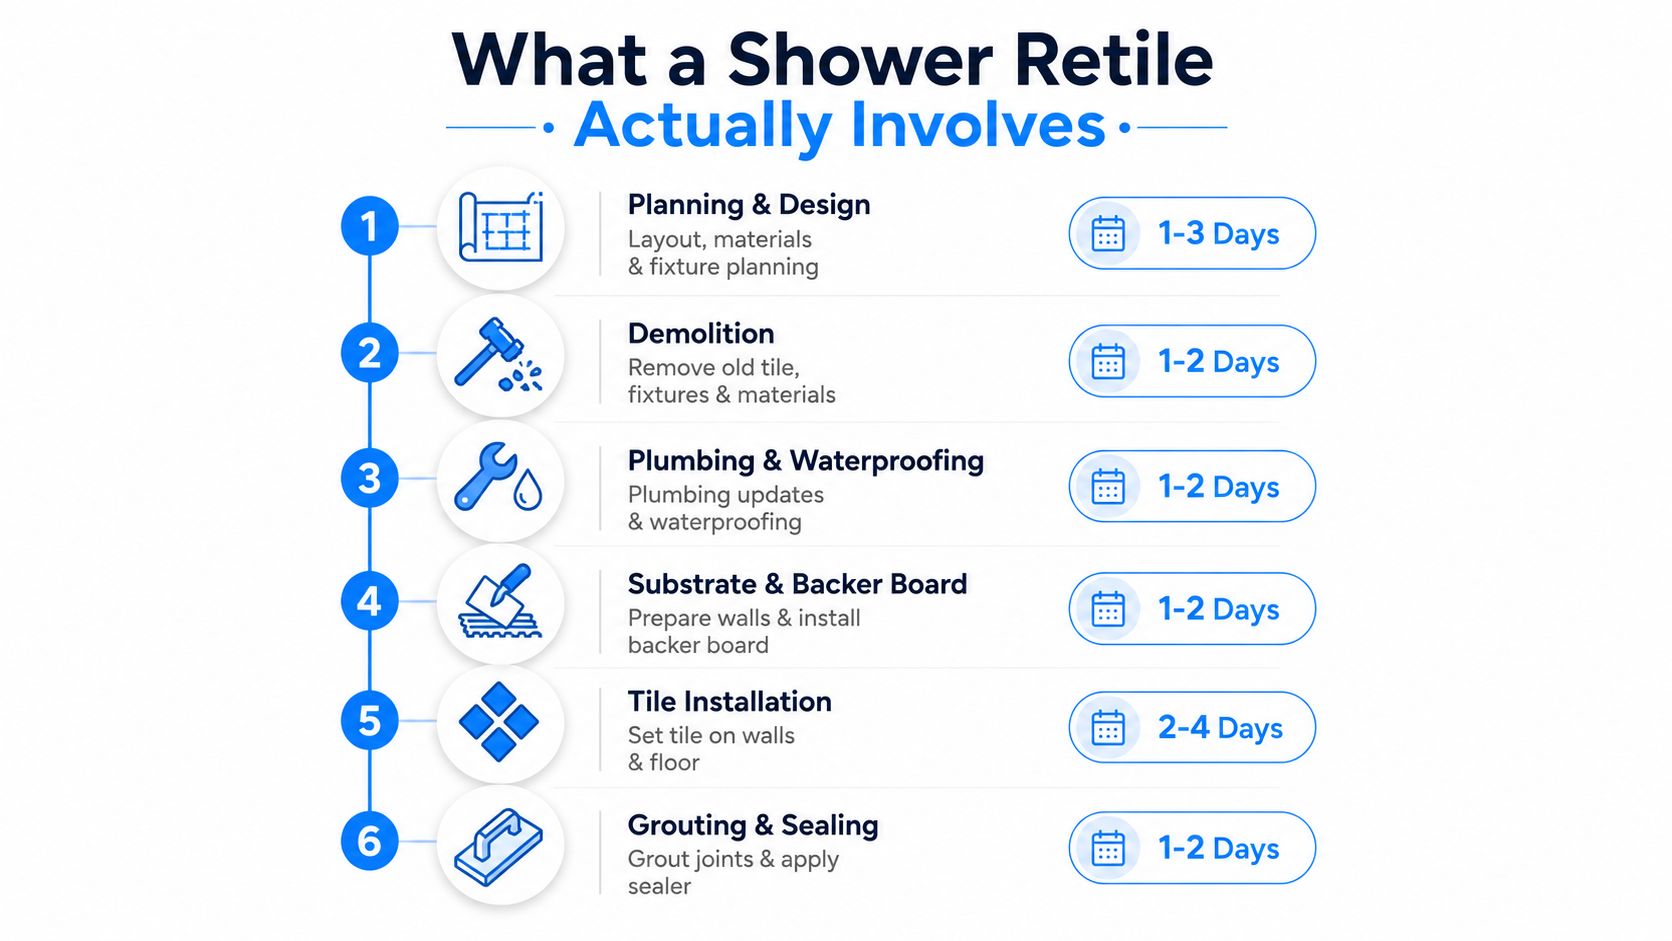
What drives the price
Professional cost guides put typical shower retiling around $2,700, with broader national estimates from $2,500 to $10,000+ depending on tile choice and labor (This Old House). Materials swing hard too, from about $0.15 to $15 per square foot for ceramic tile materials up to $32 per square foot for premium glass tile before installation. Labor is a major driver, and one bathroom renovation survey of 1,000 homeowners found 51% said labor was one of the biggest cost factors in tile projects (This Old House).
Practical rule: If the shower has failed at the base, curb, or corners, treat it like a rebuild. If the damage is only cosmetic and the substrate is still sound, the project may stay narrower.
The decision point is whether the existing shower can support a targeted retile or needs a full tear-out. If the wall assembly has already been compromised by water, tiling over it just hides the problem for a while. The budget should follow the condition of the structure, not just the look of the finish.
For homeowners who want a clearer sense of scope before hiring out the work, this bathroom remodeling team in Tyler can help evaluate whether the shower needs a full rebuild or a more limited retile.
Demolition and Substrate Inspection
Demo starts with restraint, not force. Remove trim, doors, and fixtures that can be taken off cleanly, then work from the tile layer inward so you can see what's behind the finish. The goal is to get to clean framing or a stable substrate without gouging plumbing, ripping adjacent drywall, or leaving hidden pockets of damaged material in place.
Old tile and backer board usually come out in sections, especially if the original install used weak adhesive or deteriorated fasteners. A flat bar, hammer, utility knife, and chisel are enough for a lot of showers, but the key skill is knowing where to stop prying. If a wall section sounds soft or keeps breaking in irregular chunks, that usually means the failure goes deeper than tile.
After the wall is open, inspect the framing, the substrate edges, and the areas around the valve, niche, and curb. Look for rot, mold, rusted fasteners, swollen framing, and any spot where the board no longer holds shape. A shower can't be made reliable on top of damaged structure, even if the tile pattern looks perfect from the outside.
Here's the best sequence in plain terms:
- Remove tile first: Get the finish off before worrying about cosmetics.
- Pull the backer board next: Expose the framing and drain area fully.
- Check every stud and sill: A soft or warped member needs repair before waterproofing.
- Confirm plumbing clearance: Valves, pipe penetrations, and drain parts should be accessible before closing the wall back up.
If the substrate is sound, the rebuild can move forward. If it isn't, the best move is to repair it now, not after waterproofing has already been installed. A shower only lasts as long as the structure underneath it.
One quick warning on debris. Shower demo creates sharp tile shards, backer-board dust, and heavy material that's awkward to haul, so a contractor-grade debris bin or lined trash plan makes the work easier to keep under control. This is the point where many homeowners realize the job is more like a small remodel than a weekend upgrade, which is why a structured contractor process can matter, especially if you're comparing local options like bathroom remodeling in Tyler, TX.
Waterproofing and Membrane Installation
The membrane, pan, and drain integration keep water out of the framing, subfloor, and curb. Tile can look perfect and still fail if the waterproofing is weak at seams, corners, or the drain connection.
Two broad systems show up on real jobs. Traditional mortar-bed pans rely on slope and a waterproof layer beneath the setting bed, while modern sheet-applied or liquid membranes place the waterproofing closer to the tile surface. Either system can work when it's installed correctly, but the details are different enough that the wrong method for your skill level can create problems fast.
The details that matter most
A durable setup starts with a flat, clean substrate, then cement board or a comparable tile backer, then a membrane that is tied into seams, corners, and penetrations. At the curb, dam corners are critical. At the drain, the membrane has to mate cleanly with the drain assembly, or water finds a path behind the visible finish.
Water doesn't care how nice the tile looks. If the membrane breaks at a seam, corner, or drain connection, the shower will eventually tell on itself.
Pre-slope also matters on traditional shower pans because standing water belongs in the drain, not under the bed. If the shower floor is being rebuilt, the slope should already be working toward the drain before tile ever goes down. That matters even more in curbless showers, older pans, and mosaic floors where drainage geometry is easy to get wrong.
The field habit that saves problems later is patience. Adhesives, membranes, and patch materials all need their own cure window, and rushing one layer just traps moisture in the next. Before tile installation begins, a flood test is the smart checkpoint. Fill the pan, let it sit, and verify that no leakage shows up before you bury the membrane under finish materials.
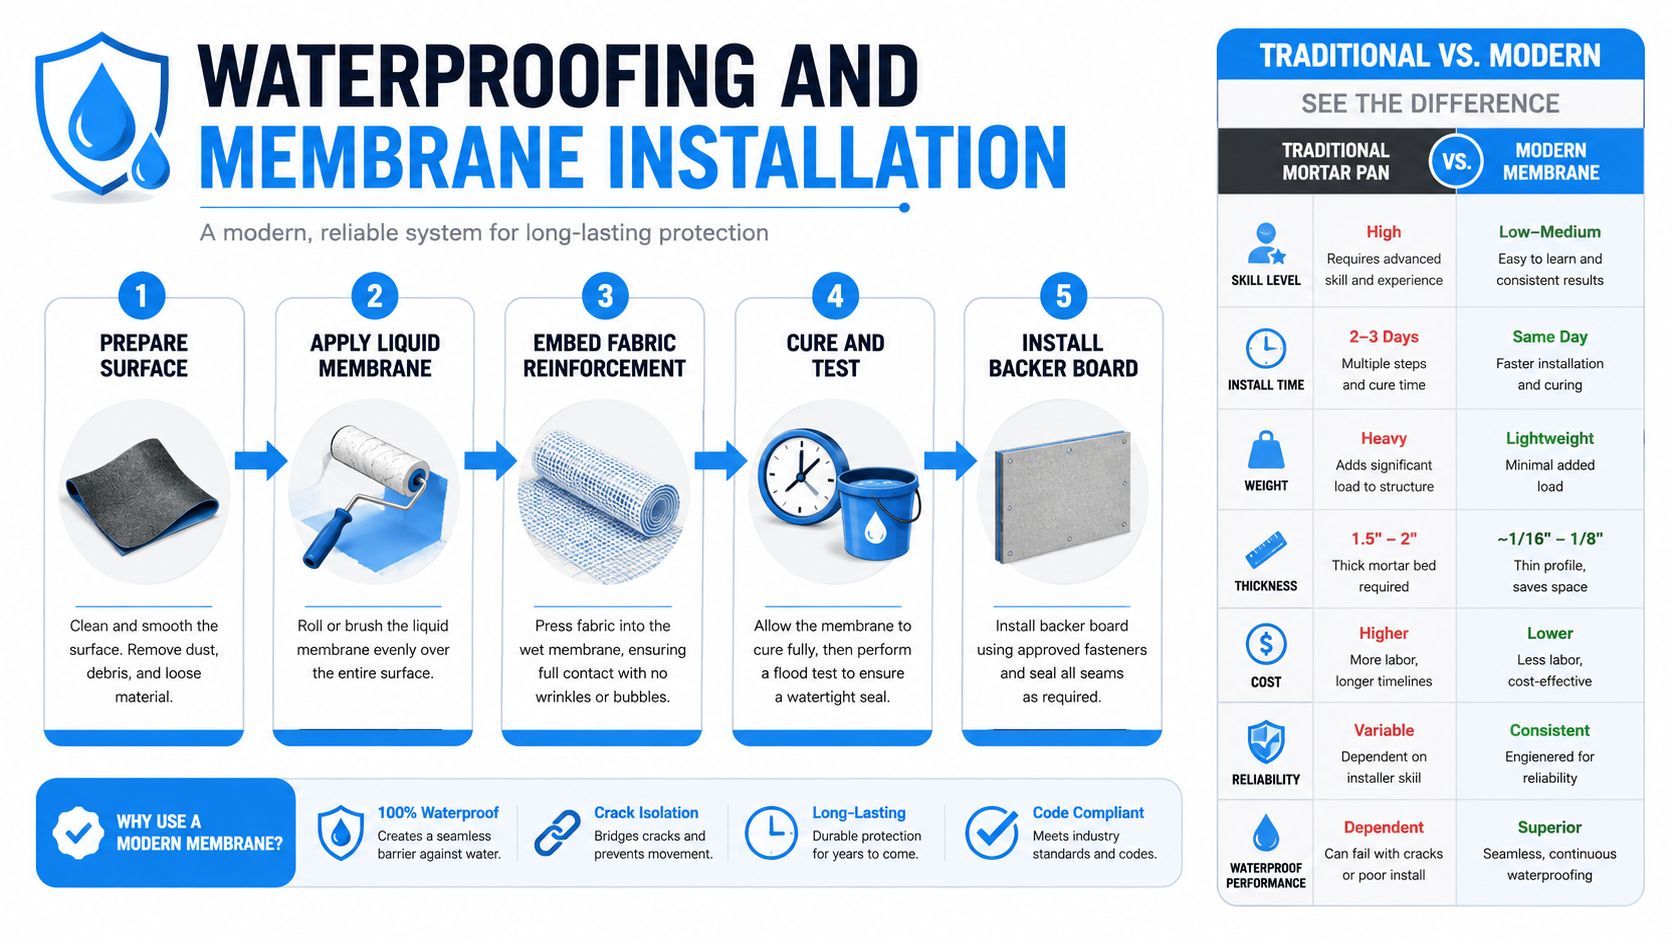
A good membrane install disappears behind the tile, and that's the point. The only visible sign of success is a shower that stays dry where it should and drains cleanly where it must.
Tile Layout and Setting Techniques
Tile layout begins with the walls. If the first course is crooked, every cut after that echoes the mistake. Dry fitting, reference lines, and a clear plan for corners and niches keep the layout balanced so you do not end up with slivers at the edge of a shower that should look intentional.
A level line at the right height gives you a straight course to build from, and the pattern can then work outward. That matters more with larger tile because big pieces show every deviation in the wall. If the substrate is not flat, large-format tile telegraphs the problem immediately, and lippage becomes much harder to control. I check the wall with a long straightedge before I ever comb thinset, because once tile is on the wall, the fix is slower and more expensive.
Managing adhesive before it skins over
Thinset does not wait for you. The workable window is short, so spread only the area you can tile before the adhesive skins over and loses grab. That keeps the mortar fresh enough for the tile to bond properly, and it gives you room to beat each piece in without rushing the next one.
Practical rule: If you cannot reach the section, set the tile, and adjust it before the thinset starts to dull, you spread too much at once.
Trowel notch size should match the tile and the substrate, because too little mortar leaves voids while too much makes alignment messy. For large-format tile, leveling clips can help, but they are not a substitute for a flat wall. They correct small height differences. They do not fix bad framing or a bowed backer board. The tile still has to be bedded fully so the corners do not rock or settle after the fact.
Floor tile needs a different kind of care. The slope has to stay consistent toward the drain, and the drain grate needs to meet the finished surface cleanly so water does not sit at the edge. If the floor is a mosaic pattern, the smaller format can help the tile follow the slope, but only if the slope was built correctly underneath. A homeowner who skips that check usually notices the mistake the first time water hangs around after a shower.
Corners and niches need planning before the first tile is set. If the cuts land randomly, the eye goes straight to them. If they are centered and balanced, the shower reads as finished rather than patched together. Before you start the first full course, a final walkthrough checklist helps catch missed layout issues, uneven reveals, and small defects that are easier to fix before the wall fills up with tile.
Grouting and Sealing for Long-Term Durability
Grout goes in only after the tile has had time to set properly. If the joints are muddy, dusty, or full of leftover thinset, the grout won't bond cleanly and the finished lines will look uneven. Clean joints, a consistent mix, and the right float pressure matter more than people think.
There's also a material choice to make. Cement-based grout is common, epoxy grout handles wet areas well, and urethane grout sits somewhere between the two in handling and maintenance. The best option depends on the tile, the joint width, and how much cleanup tolerance you have during installation.
Sealant, movement joints, and finish work
Natural stone and some cementitious grout joints need sealing after they cure. The sealer doesn't make the shower waterproof by itself, but it helps reduce staining and moisture absorption on porous surfaces. Change-of-plane joints, where walls meet floors or corners, should be caulked with a flexible sealant instead of grouted, because grout cracks when the shower moves.
The finishing sequence is simple:
- Let the tile cure: Don't rush into grout before the setting bed is ready.
- Clean the joints: Remove thinset squeeze-out and loose dust.
- Pack the grout firmly: Work it across the joint, not just on top of it.
- Tool the joints cleanly: Keep the finish even and compact.
- Caulk the movement joints: Use sealant where planes meet, not grout.
That last step is where a lot of showers are saved. A clean grout line can still fail at a corner if the installer treated every joint the same way.
For homeowners comparing finish quality and scope, a final checklist helps catch the small misses before the shower is put back into service. A simple walk-through like the one used in final walkthrough checklists is the right mindset here, even on a smaller tile project.
Troubleshooting Common Shower Retile Problems
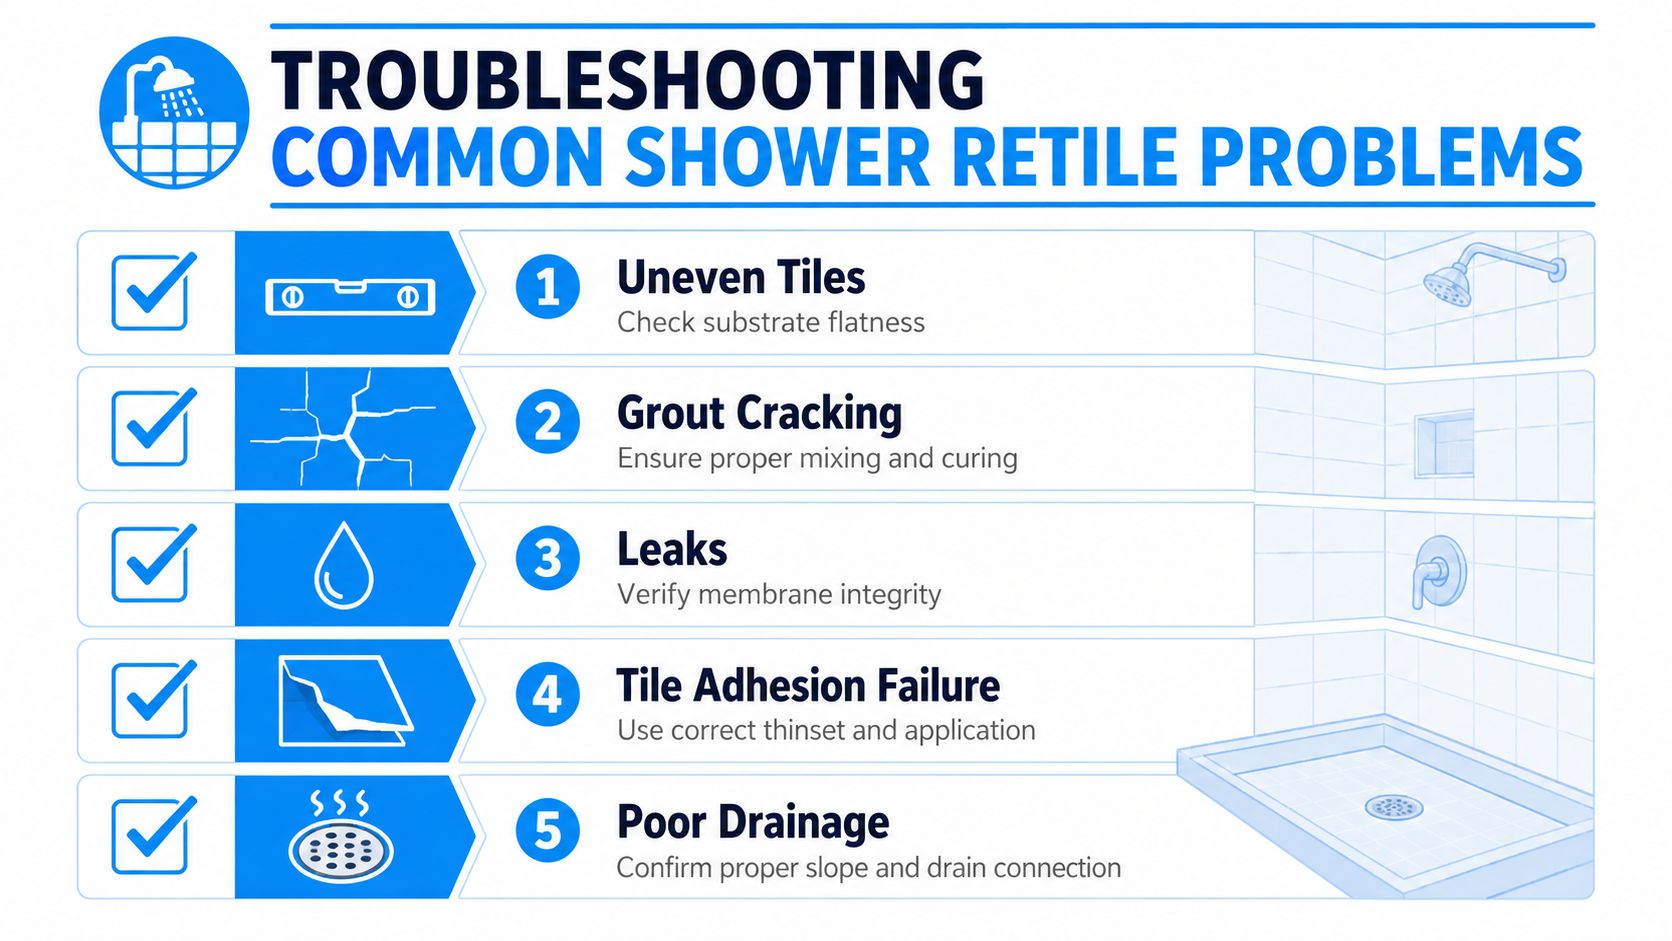
The biggest shower failures usually come from three places, the floor, the membrane, or the adhesive bond. If the floor doesn't drain right, water stays behind. If the membrane is punctured or poorly tied in, water gets into the structure. If the thinset skins over before the tile is embedded, the bond is weak from the start.
Floor-only retiling is often more complex than people expect. Older pans, curbless showers, and uneven substrates demand careful control of slope, and resloping has to happen in thin, controlled passes because thick mortar can slump and shrink as it cures (Happy DIY Home). Matching or raising the drain grate is part of that job too, especially when the new finish height changes the old relationship between tile and drain.
Reading the symptoms
Hollow-sounding tile usually points to poor coverage or bond failure, not just a cosmetic issue. Loose tile can come from movement in the substrate, thinset that skinned over, or a wall that was never flat enough to support the tile properly. Efflorescence, the white mineral deposit that shows up on some surfaces, usually means moisture is moving where it shouldn't.
Uneven walls create another common headache. Large-format tile will mirror every bow and dip, so the fix is in the substrate, not in heroic trowel work. If the wall isn't corrected before setting begins, the lippage battle starts before the first piece goes up.
If a floor has a bad slope, don't hope grout will hide it. Grout doesn't redirect water, the substrate does.
A floor-only repair can also snowball because the drain, slope, and perimeter height all interact. That's why a shower retile sometimes ends up being more efficient as a full replacement rather than a piecemeal patch. The job gets harder fast once the water-management layers are already compromised.
Deciding Between DIY and Hiring a Professional
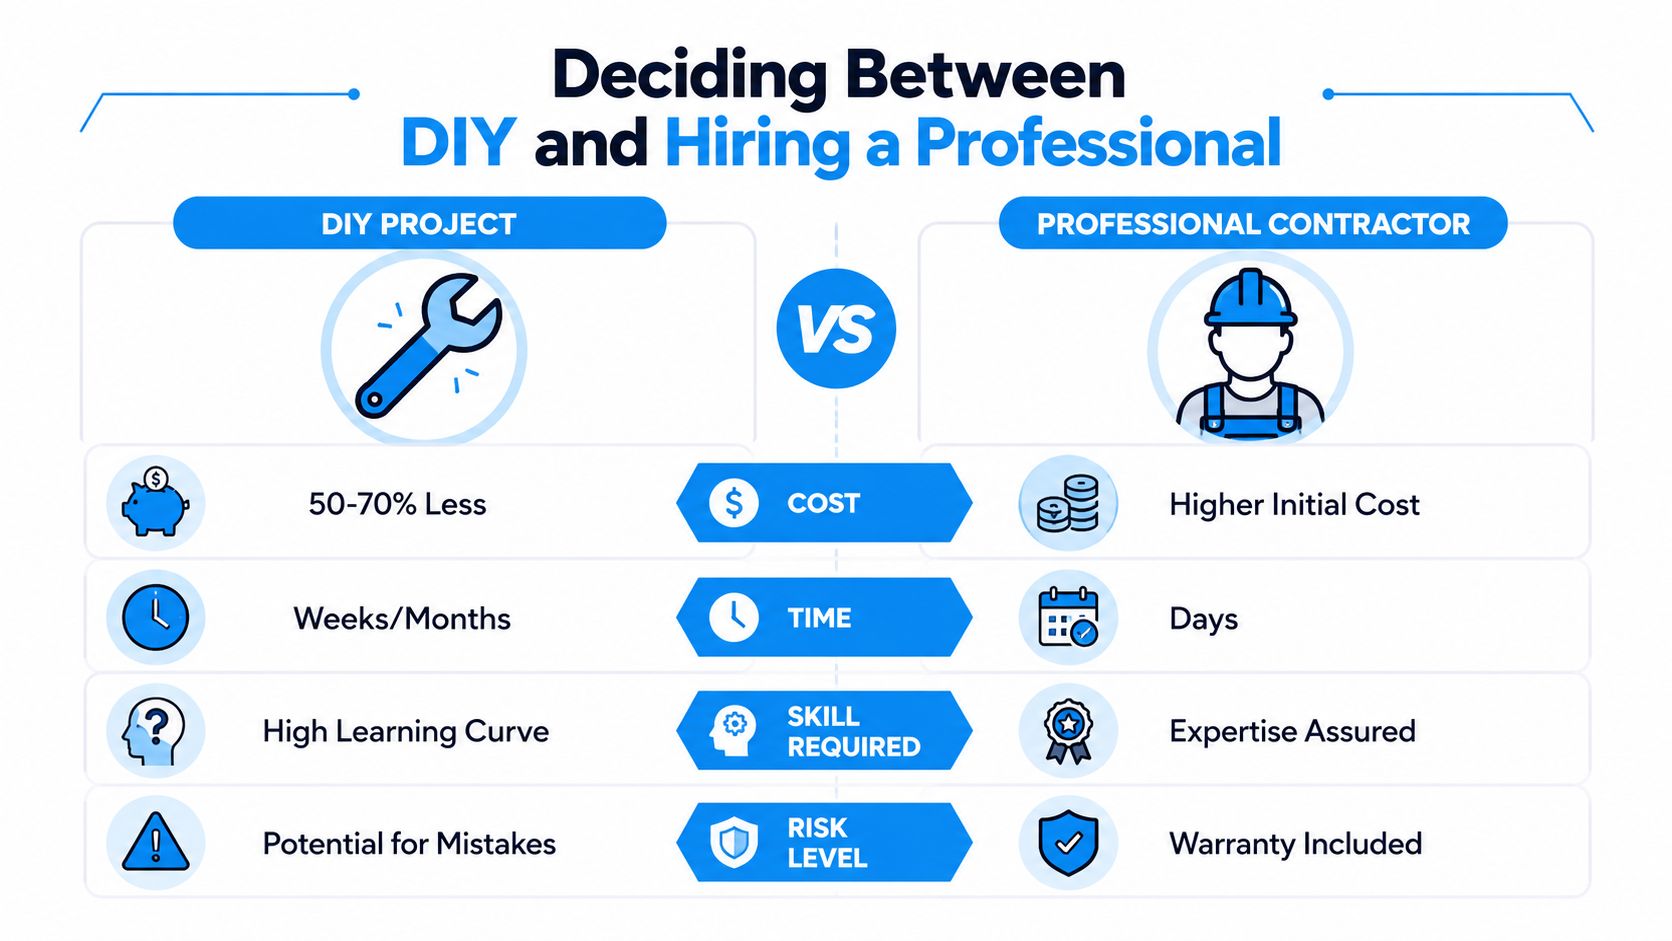
DIY makes sense when the shower is small, the structure is sound, and the homeowner can work methodically over several days. The lower price tag is real, but so are the tool purchases, the waste from learning curves, and the cost of fixing a bad waterproofing decision later. Professional installation costs more up front, but it usually comes with tighter scheduling, cleaner coordination, and warranty protection.
The skill test is honest and physical. You need to cut tile accurately, work overhead, keep seams aligned, manage curing windows, and stay disciplined when adhesive and grout are telling you to slow down. If any part of that sounds like a stretch, the project can still be done, but the learning curve is part of the price.
For East Texas homeowners comparing options, it helps to look for a contractor that handles design, scheduling, and build under one roof. A structured process lowers the odds of scope creep and keeps the shower retile from turning into a half-finished teardown. If you're pricing the work and trying to compare scope with the finished result, a local guide like tile shower remodel cost can help frame the conversation.
If you want your shower retile handled with careful planning, dependable waterproofing, and a finish that's built to hold up, Home Pro's Remodeling & Repairs can help. They handle bathroom remodeling, tile work, and full renovation projects across East Texas with a licensed, insured, design-build process. Visit Home Pro's Remodeling & Repairs to talk through your shower project and get a clear plan for the work.