
You notice the siding before you notice the wall behind it. A panel has started to warp near the back door, a few seams have opened, and the lower edge looks darker after every stretch of wet weather. In East Texas, that combination deserves more than a cosmetic patch. Humidity, driving rain, shaded elevations, and repeated temperature changes can expose a weak installation long before the siding face looks completely worn out.
Replacing siding means more than pulling off old panels and fastening new ones. The work has to protect the wall assembly, direct water away from openings, and give the selected material room to perform. If you skip those details, fresh siding can hide rot for a while, but it won't correct the conditions causing the damage.
Table of Contents
- Why Siding Replacement Matters for Your Home
- Choosing the Right Siding Material for East Texas
- Preparing for Siding Replacement, Tools and Steps
- Installing New Siding with Proper Moisture Management
- Safety, Permits, and Cost Estimates for Siding Projects
- When to Call a Professional for Siding Replacement
Why Siding Replacement Matters for Your Home
A Tyler-area homeowner may call the problem cosmetic at first: warped boards, cracked panels, loose trim, peeling coatings, or stains around windows. Those visible defects can point to trouble behind the cladding. Musty indoor odors, soft spots, repeated paint failure, or rooms that are difficult to keep comfortable deserve an exterior inspection. Higher energy bills have many possible causes, so they do not prove siding failure, but they can support a closer look at the wall.
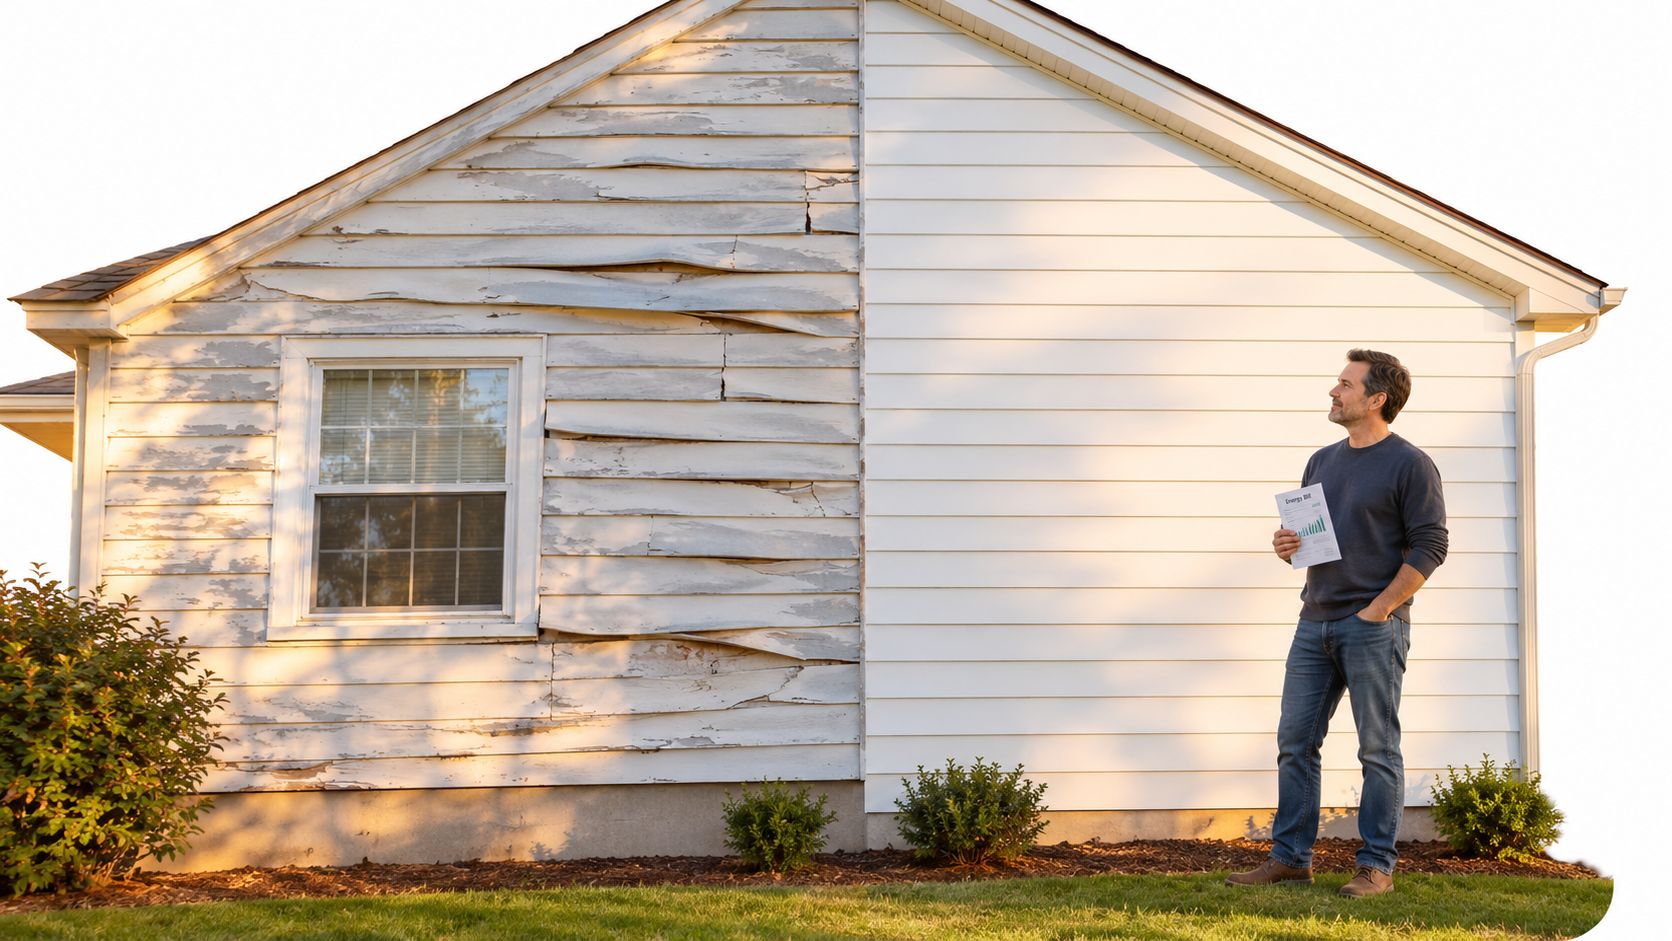
Siding is only one part of the wall assembly. Rain, wind-driven moisture, and trapped humidity must be directed outward while the wall retains a path to dry. A cracked panel or failed joint does not automatically mean damaged sheathing, yet repeated wetting around windows, doors, corners, and transitions can allow water to reach it. If framing has started to deteriorate, the work becomes a repair of the wall system rather than a simple change of exterior finish.
Practical rule: Treat stained, soft, or swollen areas as inspection points. Do not cover them with new material.
East Texas weather exposes shortcuts
East Texas heat, humidity, and hard rain quickly punish shortcuts. A clean-looking installation can fail if the crew fastens over damaged substrate, omits flashing, or closes off drainage paths. The Pacific Northwest National Laboratory siding guidance explains that siding is not the waterproof layer. The wall also needs a water-resistive barrier, integrated flashing, drainage, and a route for drying.
The repair sequence determines how long the replacement performs. Remove the existing cladding, inspect sheathing and framing, correct moisture damage, restore the weather-control layers, and then install the new siding. This approach may reveal extra work, but it prevents attractive new panels from concealing the same failure. Appearance matters for curb appeal and resale, while correct moisture control protects the investment underneath.
Choosing the Right Siding Material for East Texas
Material selection should follow the home's exposure, the condition of its walls, and the amount of maintenance the owner will realistically perform. Vinyl, fiber cement, and wood can all work, but they don't tolerate neglect or moisture in the same way.
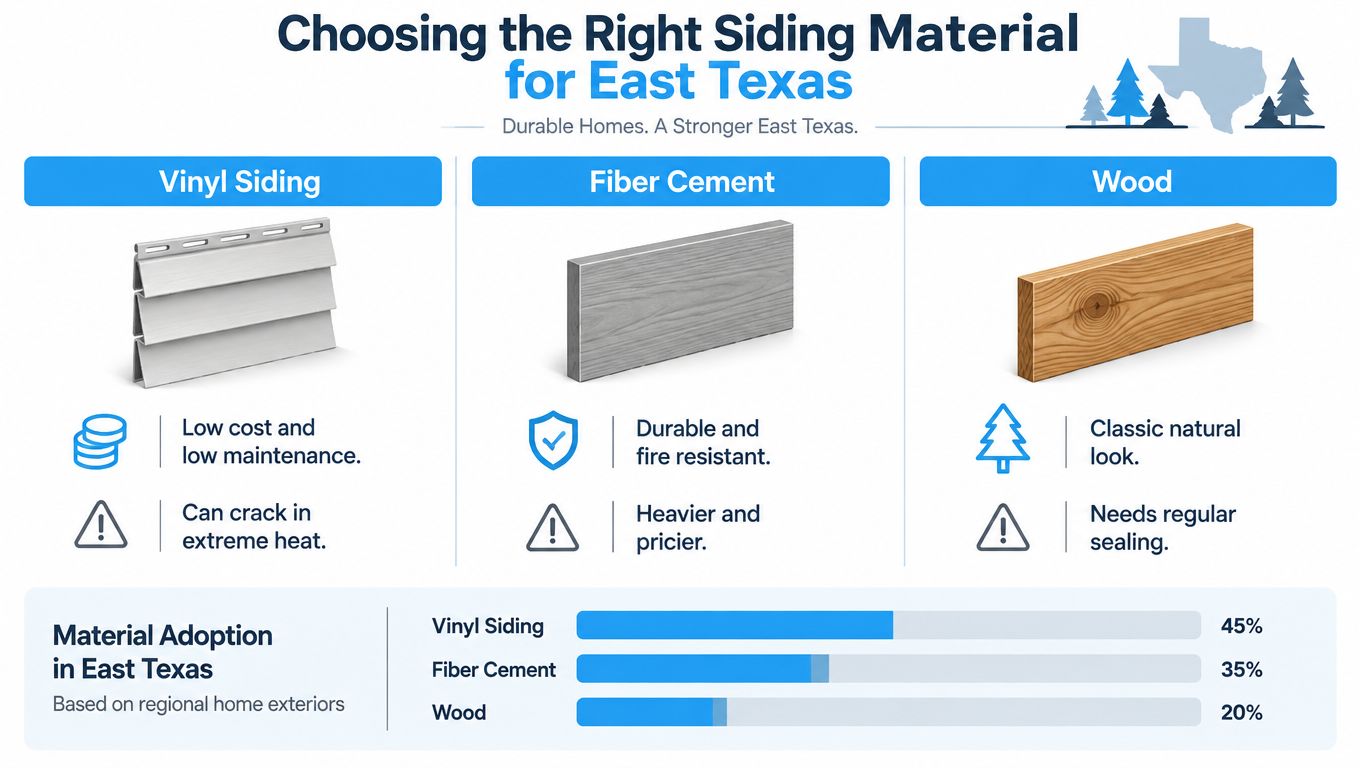
In the broader U.S. new-home market, vinyl siding, including vinyl-covered aluminum, accounted for 26% of principal exterior wall materials in 2024, followed by stucco at 25%, fiber cement at 23%, and brick or brick veneer at 16%, according to the cited siding market overview. Regional choices vary sharply. Vinyl led new homes in New England, the East North Central, and the Middle Atlantic, while stucco led in the Pacific and Mountain regions, and brick or brick veneer led across South Central states.
That regional variation matters in East Texas. Local building traditions, rain exposure, heat, resale expectations, and installer familiarity often influence the practical choice more than a national popularity list. For a broader comparison of profiles and finishes, review this guide to exterior siding types.
Vinyl siding
Vinyl is light, widely available, and relatively simple to maintain. It doesn't require routine painting, and individual panels can often be replaced without removing an entire wall. That makes it a reasonable fit for homeowners who want predictable upkeep and a broad range of colors and profiles.
The weakness is installation sensitivity. Vinyl can distort when fasteners are driven tight, and heat exposure can magnify poor spacing or restricted movement. It also won't correct a wet wall. If the substrate has staining, mold, or rot, those conditions need correction before insulated vinyl siding covers the assembly, as noted in PNNL's guidance for vinyl siding over existing walls.
Fiber cement
Fiber cement offers a substantial, stable cladding option for homeowners prioritizing durability and fire resistance. It can provide the look of painted wood while reducing some of the maintenance concerns associated with exposed wood. The trade-off is weight, handling, cutting dust, and a more demanding installation process. Crews need appropriate fastening, clearances, flashing, and finish treatment.
Market direction also makes fiber cement worth considering. Siding represented 35.11% of the global fiber cement market in 2025, and the broader siding market is projected to grow through 2034, according to the Research and Markets fiber cement siding report. Those figures don't decide what belongs on your house, but they show why homeowners are comparing longer service life and weather resistance against initial project complexity.
Wood siding
Wood delivers a natural appearance that many manufactured products imitate. It can suit older homes, traditional designs, and owners willing to maintain the finish. It also demands discipline. Cut ends need proper sealing or priming, joints need controlled clearances, and the surface must be kept protected from persistent wetting.
For practical guidance on evaluating material choices and installation considerations, Equity Building Materials' siding advice is a useful supplementary resource. The right answer isn't the material with the longest feature list. It's the one your wall, budget, exposure, and maintenance habits can support.
Preparing for Siding Replacement, Tools and Steps
Preparation decides whether the replacement is a repair or merely a new cover. Before ordering material, walk every elevation and mark damaged panels, soft trim, failed caulk, staining, and areas where gutters or downspouts discharge against the wall. Take photographs before removal so you can compare concealed conditions with the original exterior.

A useful tool setup includes a zip tool for vinyl panels, pry bars, a hammer drill where masonry requires it, a tape measure, chalk line, level, utility knife, snips, drill driver, moisture meter, gloves, eye protection, hearing protection, and stable access equipment. Keep replacement sheathing and compatible flashing materials available before opening the wall. Stopping halfway with exposed framing is how weather moves into a project.
Remove carefully and inspect openly
Disconnect or protect exterior lights, hose bibs, vents, address numbers, and other attachments. Remove trim and panels without blindly driving pry tools into the sheathing. With the cladding open, probe questionable areas and use a moisture meter as a screening tool, then investigate the source of any high reading rather than treating the meter as a final diagnosis.
Look closely at:
- Sheathing edges: Soft, swollen, delaminated, or stained panels need evaluation and possible replacement.
- Framing and sill areas: Rot often concentrates below windows, near doors, and where water collects.
- Penetrations: Hose bibs, vents, electrical boxes, and pipe openings need durable flashing or sealing details.
- Wall transitions: Roof lines, porches, decks, and changes in material frequently reveal missing kick-out or head flashing.
Don't install over a compromised substrate. PNNL's preparation guidance from Superior Home Improvement also reinforces the value of planning the work before the first panel comes down.
Keep the wall protected
Work in manageable areas and cover exposed walls with temporary protection when weather threatens. Replace damaged sheathing with material suitable for the assembly, fasten it correctly, and make sure the wall is flat enough for the new siding. A wavy substrate will show through thin cladding and can create stress at joints.
This video can help visualize the general removal and installation workflow, but local wall conditions still require a site-specific inspection.
Installing New Siding with Proper Moisture Management
A new siding job can look finished while water is already collecting behind it. In East Texas, heavy rain, humidity, and poor wall details expose shortcuts quickly. Build the assembly from the structural surface outward, and correct rot, mold, staining, or active leaks before covering the wall again.

Build the drainage plane first
Install a continuous water-resistive barrier over the prepared wall. At windows and doors, tie the flashing into that barrier so incidental water drains outside rather than into the wall. Work through sill, jamb, and head conditions, then check corners, utility penetrations, roof-to-wall transitions, and deck connections.
The flashing sequence matters more than the siding brand. Upper layers should lap over lower layers in a shingle-style arrangement, directing water outward. Surface caulk cannot replace missing sill flashing, kick-out flashing, or a proper drainage path.
Where the assembly requires furring or rain-screen strips, install them to maintain an air and drainage space behind the cladding. Wood siding may need time to acclimate before installation, and strip spacing must follow the siding manufacturer's instructions and the wall design. Do not copy a spacing detail from another product without checking its installation requirements.
Review the wall layers before adding a vapor-control layer. This guide to vapor barrier installation explains a related detail, but a vapor barrier does not replace exterior drainage. Adding layers without considering how the wall dries can trap moisture and create concealed damage.
Fasten siding so it can move
Vinyl siding expands and contracts with temperature changes. Center each fastener in the nailing slot, leave the head loose enough for movement, and avoid face-nailing unless the product instructions call for it. Use the manufacturer's specified penetration into nailable material and maintain the required clearance around openings.
Keep the stated clearances at corners, trim, windows, and transitions to dissimilar materials. A panel fastened tightly at both ends can buckle. Overdriven fasteners can also create waves across a wall that was straight during preparation.
Wood and fiber cement require different treatment. Seal or prime cut wood end grain, keep joints and flashing clearances open, and follow the specified fastener type and spacing for fiber cement. Caulk only the joints that the product and assembly require. The exterior needs controlled drainage, not a sealed surface that holds water behind the siding.
Inspect before closing the job
Check starter strips, courses, window trim, corner posts, utility penetrations, and the bottom edge of the wall. Confirm that gutters discharge away from the siding and that roof flashing sends water onto the exterior surface.
Look for tight fasteners, blocked drainage openings, open seams, missing sealant where it belongs, and excess sealant where it does not. Correct these details before cleanup makes them harder to reach.
Water management is not an accessory to siding installation. It is the installation.
Safety, Permits, and Cost Estimates for Siding Projects
Siding work combines sharp tools, work at height, exposed fasteners, heavy boards, and unpredictable weather. Wear eye protection when cutting or drilling, use gloves suited to the material, keep cords and debris out of walkways, and don't move a ladder while standing on it. For tall walls, steep ground, or work near electrical service, use properly rated access equipment and bring in trained help.
Permitting deserves attention before material delivery. A like-for-like finish replacement may be treated differently from a change in cladding type or an upgrade to wall performance. Changing the assembly can affect fire resistance, thermal performance, drainage, or weather protection, and some jurisdictions require updated moisture-management or rain-screen details, particularly in high-moisture areas. The fiber cement market discussion from Mordor Intelligence illustrates why material and assembly changes deserve more review than many basic how-to articles suggest.
Plan the budget by scope, not panel price
A siding estimate should separate visible cladding from the work behind it. Ask whether the proposal includes removal, disposal, substrate repairs, water-resistive barrier, flashing, trim, vents, painting or factory finish, permits, access equipment, and cleanup. The lowest number often excludes the items that determine whether the wall stays dry.
Project duration also depends on scope. A small, accessible elevation with sound sheathing is a different job from a full exterior replacement with multiple roof transitions, porches, dormers, damaged framing, and custom trim. Weather, material availability, and discovery behind the old siding can change the schedule.
Use a written comparison that answers these questions:
- Material scope: Which siding profile, color, trim, starter, and accessory pieces are included?
- Wall repairs: What happens if the crew finds rot or wet sheathing?
- Weather control: Which barrier and flashing products will be used, and how will they be integrated?
- Permits: Who confirms requirements and coordinates inspections?
- Closeout: Who checks clearances, fasteners, drainage openings, and cleanup?
For a local budgeting framework, review how much siding replacement costs. Treat any online estimate as a planning aid, not a promise. The existing wall condition and selected assembly control the final price.
When to Call a Professional for Siding Replacement
A homeowner can handle limited repairs when the wall is low, the substrate is sound, the material instructions are clear, and the work doesn't involve complex flashing. Full replacement becomes a different job once you find soft sheathing, active leaks, widespread rot, multiple roof-to-wall transitions, tall elevations, or architectural details that need custom fitting.
One failed corner can reveal a larger problem. If the crew removes a few panels and finds dark, soft sheathing around a window, covering it back up isn't a repair. The opening needs to be investigated, the water path corrected, and the wall rebuilt in the correct sequence.
A straight siding line doesn't prove the wall is healthy. The layers behind it have to be inspected.
Home Pro's Remodeling & Repairs is a licensed and insured contractor based in Tyler, serving communities across East Texas with exterior remodeling, siding work, on-site consultations, and estimates. Homeowners comparing installation approaches can also review this resource on expert siding installation by HIBCO ROOF LLC, then ask any contractor the same practical questions about substrate repairs, flashing, drainage, permits, and fastening.
If your siding is failing, start with an inspection rather than a material order. The right replacement addresses the wall condition, selects a material suited to the exposure, and documents the installation details before the first new panel goes up.
Home Pro's Remodeling & Repairs can inspect your exterior, identify hidden moisture or substrate problems, and plan siding replacement as part of a coordinated exterior remodeling project. Visit Home Pro's Remodeling & Repairs to request an onsite consultation or estimate for your Tyler or East Texas home.