
You notice it on an ordinary East Texas morning. The bedroom window has a damp ring on the sill, the living room feels warmer than the thermostat setting, and one sash rattles whenever the wind picks up. The glass hasn't shattered, but the window is already telling you something: the seal, frame, installation, or drainage may be failing.
That's when most homeowners call for a quote. The salesperson arrives with color samples, grille patterns, and a brochure full of impressive ratings. Those details matter, but they aren't where the decision starts. The right replacement window must fit the room, the exposure, the climate, the existing opening, and the installation conditions. Here's how to choose replacement windows for your home without getting distracted by features that look better on paper than they perform in the wall.
Table of Contents
- Why Replacing Your Windows Is Worth a Real Decision
- Matching Window Style to How Each Room Works
- Choosing the Right Frame Material for Your Climate
- Reading the Performance Labels the Right Way
- Measuring, Ordering, and Picking the Right Install Method
- Budget Trade-Offs and Questions to Ask Your Contractor
- Your Final Decision Checklist Before You Sign
Why Replacing Your Windows Is Worth a Real Decision
A homeowner usually starts thinking about replacement after a visible nuisance becomes impossible to ignore. A window sticks when someone tries to open it. Condensation keeps collecting at the corners. Paint blisters near the sill. The HVAC seems to run constantly, yet the room beside the glass still feels uncomfortable.
Those symptoms don't always mean the glass itself is the problem. Failed insulated-glass seals, soft wood below the frame, poor flashing, loose trim, and air leakage can all create trouble before a pane breaks. A stained sill deserves inspection, not just a new piece of glass. If water has reached the framing, an insert replacement can hide the damage while leaving the failure in place.
Start with the house you have
Energy savings depend heavily on the windows being replaced. ENERGY STAR's window savings guidance estimates that certified replacements can save about $125 to $340 per year when replacing single-pane windows, while the typical savings are only about $20 to $70 per year over double-pane clear-glass windows. In its Northern Zone example, replacing ten inefficient single-pane windows produces average annual savings of about $568, compared with about $282 when replacing double-pane windows.
That difference changes the conversation. If your existing windows are already decent double-pane units, comfort, condensation, glare, noise, appearance, and water management may matter more than a dramatic payback story. ENERGY STAR also uses about 13% average home energy-bill reduction as a broad benchmark for new certified windows, but your result depends on the condition of the existing units, the installation, the home envelope, and the glass exposure. The same source should be your reality check before a contractor promises savings.
Practical rule: Don't choose a replacement window until you can explain what the current window is doing poorly and what the new one is expected to improve.
Ask yourself three questions before looking at brands:
- What is failing? Separate drafts, water intrusion, broken seals, difficult operation, and appearance problems.
- Which rooms matter most? A west-facing bedroom has different comfort demands from a shaded bathroom.
- How long will you stay? A long-term homeowner may value durable frames and better condensation control more than the lowest initial price.
The salesperson's preferred style or package shouldn't answer those questions for you. Your house should.
Matching Window Style to How Each Room Works
Window operation affects how you ventilate, clean, furnish, and use a room every day. Pick the style after deciding what the opening needs to do, not because a display wall makes one option look modern.
A double-hung window works well in traditional bedrooms, hallways, and living spaces where you want familiar operation and easier cleaning from inside. Both sashes move, so you can create airflow without reaching far outside. A single-hung unit can suit a similar opening when the upper sash doesn't need to operate and a simpler configuration fits the project.
For a kitchen sink, I usually look first at a casement window. Its sash cranks outward and creates a tight seal when closed, while the open panel can catch a side breeze. Check the reach before ordering one. A tall casement above a counter may provide excellent ventilation but become an aggravating daily chore if the handle sits beyond comfortable reach.
Match the operation to the room
A slider makes sense for a wide opening over a patio, especially where a projecting sash would interfere with people, furniture, or a walkway. It's easy to operate from a seated position, although the moving panel usually offers a different ventilation pattern from a casement.
An awning window is useful in bathrooms and other spaces where you want ventilation during light rain. Because the sash opens from the bottom, it can provide airflow while helping shield the opening. A hopper opens inward and suits basement or lower-level applications where ventilation and security need to coexist.
A fixed or picture window gives you the broadest uninterrupted view and the fewest moving parts. Use it where daylight and sightlines matter more than ventilation, then pair it with an operable unit if the room needs fresh air.
| Window Style | Best Room Match | Key Advantage |
|---|---|---|
| Double-hung | Bedrooms and traditional living areas | Familiar operation and interior cleaning access |
| Casement | Kitchens and breezy side exposures | Tight closure and strong directional ventilation |
| Slider | Wide patio or low-reach openings | Easy horizontal operation |
| Awning | Bathrooms and sheltered exterior walls | Ventilation during light rain |
| Hopper | Lower-level rooms | Inward ventilation |
| Fixed or picture | Living rooms and view walls | Maximum glass and minimal operating hardware |
Before approving the style, verify bedroom egress requirements with your contractor or local building authority. A window can look large enough and still fail to provide the required emergency opening. Check screen placement, too. A screen that blocks the operating path or makes cleaning awkward will turn an attractive showroom choice into a daily irritation.
Choosing the Right Frame Material for Your Climate
Frame material controls more than appearance. It affects movement, maintenance, color choices, moisture tolerance, and how the unit handles a hot, humid, sun-exposed setting. In East Texas, I pay close attention to heat, moisture, and installation details before I get excited about a finish.
Vinyl is the value default
Vinyl is usually the practical starting point for a budget-conscious replacement. It resists routine painting and can deliver sound thermal performance when the whole unit is well designed. The trade-off is movement and appearance over time. Expansion joints can become more noticeable, and dark colors may fade or behave poorly under intense sun depending on the product.
Wood offers a warm appearance and natural insulation. It earns consideration in historic homes, high-end interiors, and projects where trim continuity matters. It also demands discipline. Unprotected exterior wood, failed paint, or poor sill flashing can lead to rot, especially where water remains trapped.
Premium materials solve specific problems
Fiberglass is the material I'd discuss with a homeowner who wants dark colors, long-term dimensional stability, and less concern about temperature-driven movement. It typically costs more than basic vinyl, but the premium can make sense when the window receives strong sun or the homeowner expects to keep the house for many years.
Aluminum-clad wood puts a weather-resistant exterior over a wood interior. That combination can deliver an excellent architectural look, but the interior still carries maintenance responsibilities. If exterior cladding or surrounding seals fail, repairs can become more involved than repainting a basic vinyl frame.
Composite frames combine wood fiber and polymers to balance appearance, stability, and upkeep. They sit between conventional vinyl and premium wood or fiberglass in many product lines. Judge the actual construction and warranty rather than assuming every composite behaves the same way.
| Frame Material | Cost | Maintenance | Heat & Sun Performance | Expected Lifespan |
|---|---|---|---|---|
| Vinyl | Lower initial cost | Low routine upkeep | Good when properly specified, but dark colors need scrutiny | Depends heavily on product and installation |
| Wood | Mid to high | Regular painting and moisture checks | Good insulation, vulnerable to neglected moisture | Long when maintained |
| Fiberglass | Premium | Low to moderate | Strong dimensional stability in sun and temperature swings | Long-term option when installed correctly |
| Aluminum-clad wood | Premium | Exterior protection, interior wood upkeep | Good weather protection with interior maintenance needs | Long when cladding and seals remain sound |
| Composite | Mid to premium | Moderate | Stable alternative with product-specific performance | Varies by construction and installation |
Choose vinyl when initial cost and low upkeep lead the decision. Choose fiberglass when dark exterior colors and stability matter. Choose wood when architectural character justifies the maintenance. Choose composite when you want a middle path. The frame earns its price only if it matches your priorities.
Reading the Performance Labels the Right Way
The NFRC label is where window shopping becomes measurable. It lets you compare the whole window unit, including frame, glass, spacer, and operating components, instead of judging a sample pane in isolation. Use the National Fenestration Rating Council label guidance to compare products by U-factor, solar heat gain coefficient, air leakage, and condensation resistance.
U-factor measures how readily heat passes through the complete window. Lower is better for insulation. ENERGY STAR notes that certified products commonly fall somewhere around 0.25 to 1.25, so don't compare a glass-center value with a whole-unit rating and assume they mean the same thing. SHGC measures solar heat admitted through the window on a scale from 0 to 1. Lower values reduce solar heat gain, but lower isn't automatically better in every room.
Climate targets come before brand names
ENERGY STAR's residential specification sets climate-zone targets for U-factor at 0.22 in the Northern Zone, 0.24 in North-Central, 0.28 in South-Central, and 0.32 in Southern. Its SHGC targets range from at least 0.17 in the Northern Zone to 0.23 in the Southern and South-Central Zones. Check the current ENERGY STAR residential windows specification and match the product to your climate zone rather than accepting a generic “energy efficient” label.
Orientation still matters. A sun-baked west-facing room may benefit from stronger solar-control glass to reduce afternoon heat and glare. A shaded or winter-sensitive exposure may need a different balance. Natural Resources Canada's guidance on window U-factor and solar gain reinforces the point that insulation and solar admission must be considered together.
Four numbers deserve your attention
- U-factor: Lower values generally improve resistance to heat transfer.
- SHGC: Lower values limit solar heat gain, which can help hot, bright rooms.
- Air leakage: Lower leakage means fewer uncontrolled drafts through the assembled unit.
- Condensation resistance: Higher resistance can matter greatly in humid or cold conditions.
Suppose two similarly priced units differ in U-factor by 0.05. That gap isn't a universal promise of a specific bill reduction, but it does indicate a measurable difference in thermal performance. The lower-U-factor unit may improve interior surface temperature and comfort, while the actual result still depends on orientation, frame, installation, shading, and the rest of the building envelope.
Don't let a contractor discuss U-factor while ignoring SHGC, air leakage, or condensation resistance. A window can insulate well and still create glare, admit unwanted heat, or develop interior moisture if the specification doesn't fit the room.
Measuring, Ordering, and Picking the Right Install Method
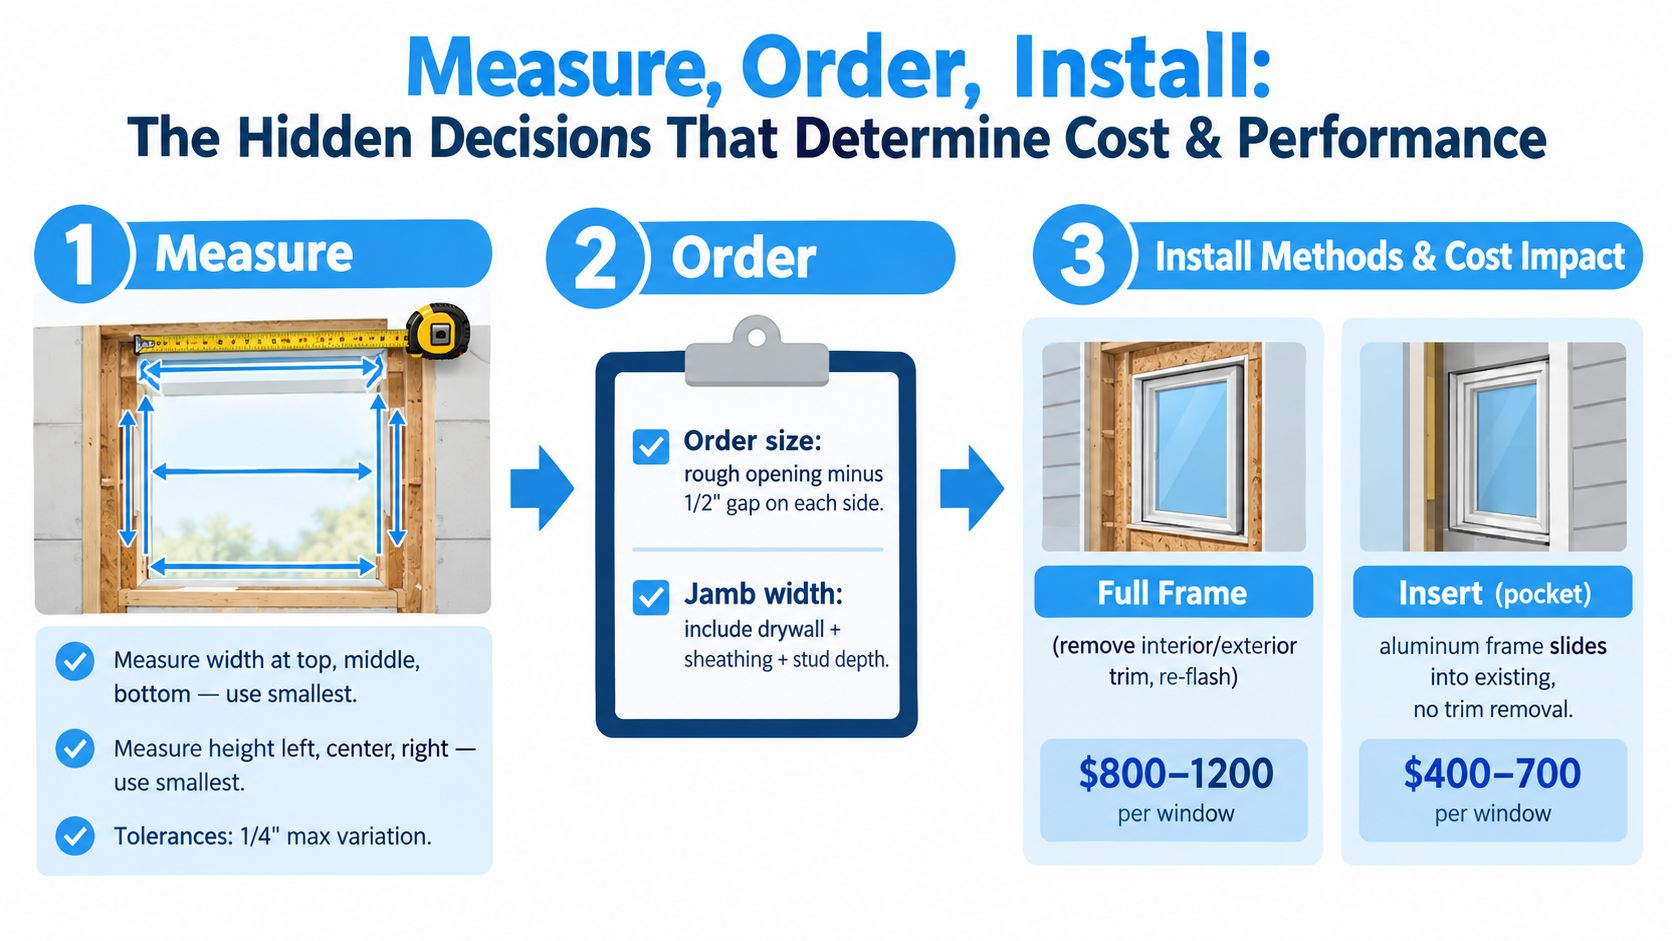
A premium window installed into a damaged or incorrectly measured opening is still a bad project. Measurement day should include more than writing down width and height. The installer needs to inspect the sill, determine whether the opening is square, check exterior clearances, and identify how trim, siding, drywall, and flashing meet the existing unit.
Measure the opening, not your assumptions
Take width at the top, middle, and bottom, then use the smallest measurement. Take height at the left, center, and right, and again use the smallest. Record the jamb depth and inspect for out-of-square conditions before anyone orders a custom unit. A one-inch error can leave you with a window that doesn't fit, a rushed field modification, or an expensive re-order.
An insert replacement, also called a pocket replacement, fits inside the existing frame. It usually preserves more exterior and interior trim and can reduce disruption, but it also leaves the old frame in place and may reduce visible glass area. It makes sense when the existing frame is sound, square, dry, and properly flashed.
A full-frame replacement removes the old unit and exposes the rough opening. It's the honest choice when the sill is soft, water damage is present, flashing has failed, or the existing frame is distorted. You get a chance to repair the opening and rebuild the water-management details, but the work involves more trim, finish, and labor.
Before signing, make sure the scope addresses removal, disposal, sill repair, flashing, insulation, exterior sealing, interior trim, paint touch-up, and cleanup. If the project includes adjacent openings or a door, review the contractor's separate sliding glass door installation services rather than assuming window methods transfer directly.
Installation quality matters more than the logo printed on the brochure.
The contractor should explain how the sill drains, where flashing goes, how the unit is shimmed, and how the exterior seal connects to the wall. If the measurement visit lasts only long enough to glance at the existing sash, you haven't received a serious installation assessment.
Budget Trade-Offs and Questions to Ask Your Contractor
Compare window quotes by scope, not by the final number at the bottom. A lower bid may contain a simpler frame, less capable glass, insert installation instead of full-frame work, limited trim repair, or exclusions for disposal and paint. A higher bid may include necessary waterproofing rather than unnecessary decoration.
Build an apples-to-apples quote
Ask each contractor to identify these items in writing:
- Window unit: Frame material, glass configuration, coatings, hardware, screens, and the exact model.
- Installation: Insert or full-frame method, shimming, insulation, flashing, sill pan, and exterior sealant.
- Finish work: Interior casing, exterior trim, drywall repair, caulking, and paint.
- Project logistics: Permits, inspections, disposal, protection for floors and furniture, and cleanup.
- Warranty: Product coverage, seal coverage, hardware coverage, and labor coverage, with exclusions clearly stated.
You should also verify the contractor's license and insurance, request references from older completed projects, confirm manufacturer training or certification where applicable, and insist on a written schedule. Homeowners who want a broader vetting list can use this guide to what questions to ask contractors.
Cash-only discounts, pressure to sign during the first visit, vague start dates, missing measurements, and promises that “the crew will figure it out” are warning signs. So is a proposal that calls every upgrade essential without explaining what the base package already includes.
A good quote tells you what happens when the installer finds rot. A bad quote pretends the opening can't surprise anyone.
Review whether the hardware, glass package, and frame upgrade solve a real comfort or durability problem. Spend first on correct sizing, whole-unit performance, flashing, and skilled installation. Decorative grilles, premium handles, and showroom finishes belong lower on the priority list unless they matter to the architecture of your home.
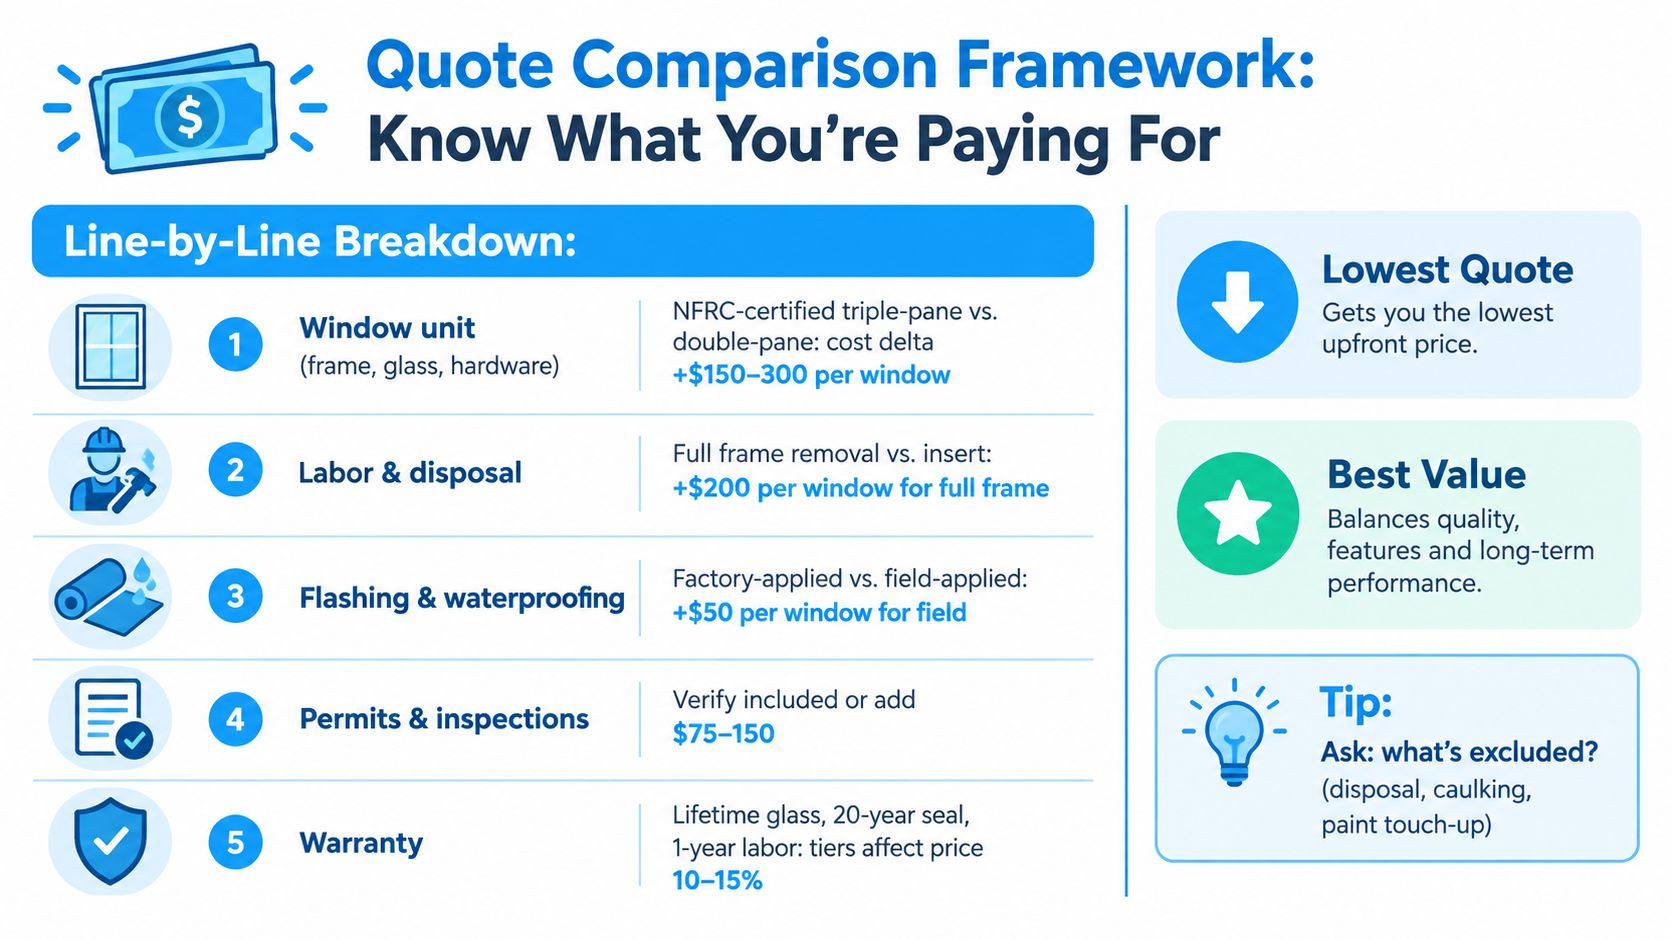
Before you sign, ask who measures, who installs, who repairs concealed damage, what changes the contract price, how water intrusion is handled, and what documentation you'll receive at completion. A confident contractor should answer directly without turning every question into a sales pitch.
Your Final Decision Checklist Before You Sign
By the time a contractor sits at your kitchen table, you should be able to reduce the decision to a short sequence. Don't let a complicated presentation replace basic verification. The window needs to be right for the opening, the room, and the way the house handles heat and moisture.
Use this decision sequence
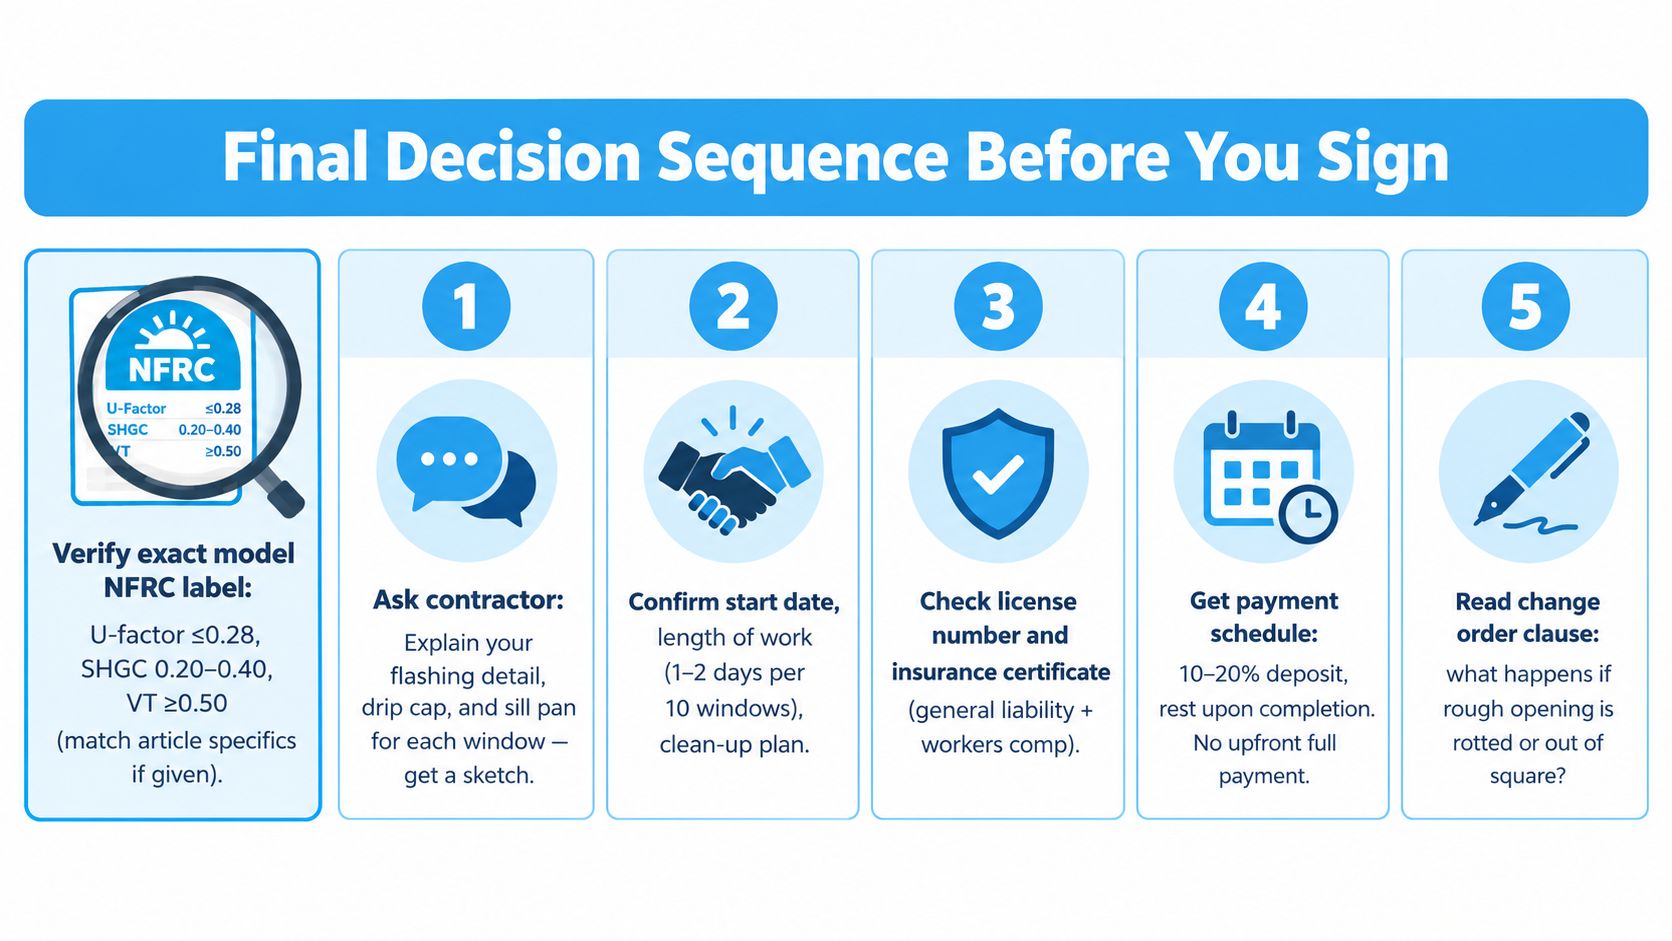
Verify the exact NFRC label. Match the model and configuration on the quote to the label. Check U-factor, SHGC, air leakage, and condensation resistance. Don't accept a performance number from a different size or operating style.
Match the window to the room. Confirm the operation, screen position, cleaning access, ventilation need, bedroom egress, and exposure. A strong rating can't rescue a window that nobody can operate comfortably.
Confirm the frame and glass package. Get the material, color, glazing, hardware, spacer, and warranty written into the contract. Ask the salesperson to identify which upgrades are optional and which are already standard in another bid.
Specify the installation method. The agreement should clearly state insert or full-frame replacement. It should also describe flashing, sill protection, shimming, insulation, exterior sealing, trim, repairs, disposal, and cleanup.
Review the money and change-order language. Look at the deposit, progress payments, completion payment, cancellation terms, and the process for concealed rot or an out-of-square opening. Never approve an open-ended promise that the final price will be determined later.
Use a final walkthrough checklist to verify operation, locks, screens, seals, trim, cleanup, and documentation after installation. The final walkthrough checklist can help you inspect the work before releasing the final payment.
Take sixty seconds before handing over a deposit. Read every line item, confirm the exact window count and sizes, check the payment schedule, verify insurance information, and ask for lien waivers where appropriate. If the contract doesn't say who owns the risk when the opening is damaged, stop and get that answer in writing.
Home Pro's Remodeling & Repairs offers window replacement and exterior remodeling through onsite consultations, with energy-efficient window options available for Tyler and surrounding East Texas communities. Visit Home Pro's Remodeling & Repairs to request a consultation, compare the installation scope, and plan a window project around your home's comfort, condition, and budget.