
You're standing in a tile showroom with three shower samples under one arm, a vanity catalog under the other, and no clear answer to the question that matters most: what will this bathroom cost once the walls are open? That uncertainty is common in East Texas homes, especially when an older bathroom hides tired plumbing, inadequate ventilation, or water damage behind attractive finishes.
The most dependable answer to how to plan a bathroom remodel isn't to start with tile. It's to establish the sequence first. Define the room's purpose, set a target budget, confirm the layout, investigate hidden systems, and only then finalize finishes and construction dates. A design-build process helps because the person developing the design is working from the same budget and construction realities as the team that will build it.
Table of Contents
- Why Bathroom Remodel Planning Goes Wrong and How to Get It Right
- Define Your Scope and Set a Realistic Budget Early
- Choose a Layout and Fixtures That Fit Your Space and Plumbing
- Plan for Plumbing Electrical Ventilation and Waterproofing
- Build Your Timeline Permits and Design Build Consultation Checklist
- Final Tips to Keep Your Bathroom Remodel on Track
Why Bathroom Remodel Planning Goes Wrong and How to Get It Right
A homeowner may begin with a modest plan: replace the vanity, refresh the floor, and install a better mirror. During the site visit, the dated shower makes the new vanity look out of place. The toilet location limits the layout, and opening one wall reveals old wiring, weak ventilation, or water damage. A finish update can quickly become a plumbing, electrical, tile, and structural project.
Scope creep usually starts with decisions made in the wrong order. Homeowners select visible products before confirming whether the drain locations, wiring, subfloor, walls, and exhaust route can support them. Late changes then affect several trades, which can mean new labor, reordered materials, and inspection delays.
Practical rule: Decide what the room must do before deciding what it should look like.
Start with a short scope brief. Record what is failing, what must remain, and what you would change if funds allow. An East Texas hall bathroom may need durable storage, a comfortable shower, and surfaces that clean easily. A primary bathroom may place greater value on a larger shower, a soaking tub, improved lighting, or stronger ventilation. Those priorities should guide the design before saved images and finish samples take over.
Treat the project as a sequence
A reliable design-build workflow moves from site conditions to finishes:
- Room goals: Identify problems with function, storage, accessibility, lighting, and moisture.
- Existing conditions: Measure the room and inspect plumbing, electrical service, ventilation, walls, flooring, and subfloor.
- Budget and scope: Lock the working budget and project boundaries before detailed design begins.
- Layout and systems: Confirm fixture locations, rough-ins, waterproofing, exhaust, and inspection points.
- Selections and production: Approve products, check lead times, schedule trades, and protect the work area.
- Closeout: Test fixtures, review finishes, complete inspections, and document remaining service items.
The budget needs to account for both visible work and conditions behind the walls. Labor commonly represents roughly 40% to 65% of a bathroom remodeling budget, and typical projects often take 2 to 4 weeks, while a full gut renovation can extend to as long as 12 weeks. These figures are summarized in current bathroom remodel planning guidance. A shower relocation or hidden water damage can therefore affect the project more than a higher-priced faucet.
Before finishes are ordered, verify ventilation, waterproofing, and hidden mechanicals during an on-site consultation. In East Texas, that inspection gives the design-build team a chance to align the drawings, budget, and construction plan while changes are still manageable.
On the first construction day, a planned remodel feels orderly. The crew knows what will be removed, the approved layout is on site, materials have been checked, inspection points are understood, and you are not making an expensive decision beside demolition debris.
Define Your Scope and Set a Realistic Budget Early
A bathroom can look straightforward until demolition exposes a soft subfloor, outdated wiring, or a vent that never reached the exterior. Set the project boundaries and working budget before detailed design, then use an East Texas on-site consultation to verify what the room can support.
Start by identifying the project type. A cosmetic refresh keeps the layout and most systems intact while changing paint, hardware, mirrors, finishes, or selected fixtures. A full gut remodel removes finishes and may expose plumbing, electrical, framing, ventilation, and subfloor conditions. A primary-suite renovation often includes more fixtures or expanded features, so design decisions and concealed work can grow quickly.
Room size gives you another early reference point. The 2025 U.S. Houzz Bathroom Trends Study reports that the national median spend for bathroom renovations fell from $15,000 in 2023 to $13,000 in 2024, while major remodels increased from $21,000 to $22,000. Bathrooms measuring 100 square feet or more had a median spend of $25,000. The top 10% of projects reached $60,000, and bathrooms with a fully upgraded shower reached a 90th percentile of $70,000. These benchmarks appear in the 2025 U.S. Houzz Bathroom Trends Study. Use them as context, not as a quote for your room.
Build a scope brief before choosing finishes
Write down four decisions:
- What problems are you solving? List leaks, poor storage, unsafe flooring, weak lighting, inadequate exhaust, or an inefficient room arrangement.
- What stays? Identify walls, fixture locations, doors, windows, and products that can remain.
- What changes? Record proposed plumbing moves, shower expansion, vanity replacement, lighting, flooring, and accessibility work.
- What can wait? Separate required repairs from upgrades that can be removed if concealed conditions change the budget.
Build the estimate by trade. Include demolition and disposal, plumbing, electrical, ventilation, waterproofing, tile, cabinetry, countertops, fixtures, paint, permits, inspections, finish carpentry, and labor. A bathroom remodel cost planning guide can help organize the discussion, but the existing room, access conditions, and selected scope should determine the working number.
Reserve money for what you can't see
Set contingency aside before final selections. Damaged subfloor, corroded supply lines, obsolete wiring, framing repairs, and code corrections can change the plan after walls or floors open. The reserve addresses concealed conditions, not a later decision to choose a different tile pattern or a larger vanity.
Use a target-budget-first process. Agree on the budget range and priorities, then select products that fit the allowances. Bring the scope brief, measurements, inspiration images, and must-have features to the consultation. Before finishes are ordered, verify ventilation, waterproofing, and hidden mechanicals on site so the drawings, budget, and construction sequence stay aligned.
Choose a Layout and Fixtures That Fit Your Space and Plumbing
A layout can look spacious on paper and feel cramped once the door, vanity, toilet, and shower are installed. In an East Texas on-site consultation, start by measuring those relationships and confirming the existing plumbing before selecting finishes. Keeping the toilet, vanity, and shower near their current locations usually limits demolition, drain work, supply lines, wall access, floor repairs, and inspections. Relocating fixtures can improve circulation, but the added work must fit the budget agreed on before design selections begin.
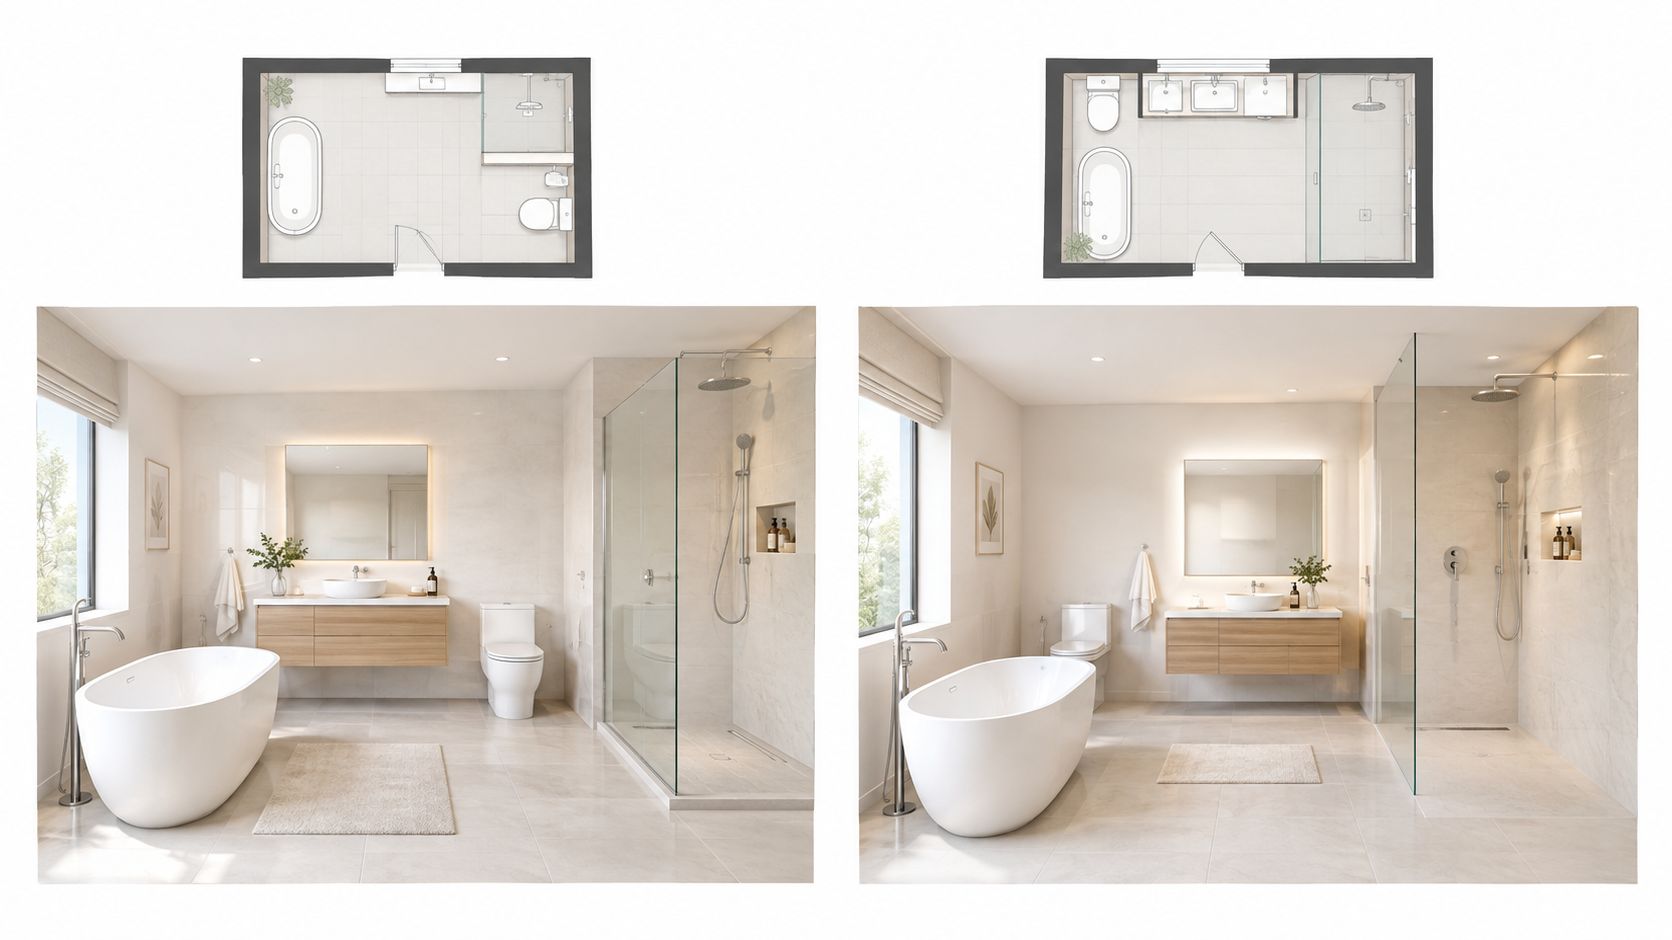
A small hall bath may benefit from keeping the plumbing wall intact and directing funds toward a dependable shower valve, storage, lighting, and durable tile. A larger primary bath allows more flexibility, although every added fixture brings more cleaning, ventilation, waterproofing, and installation decisions.
Compare the main layout choices
Keep the existing fixture locations
This is generally the simpler route and can still create a major visual change through a new vanity, improved mirror lighting, a better shower enclosure, and coordinated tile. The trade-off is that an awkward door swing, cramped vanity, or poorly positioned toilet may remain.
Move one fixture
Relocating a vanity or shower can improve circulation without rebuilding the entire room. Feasibility depends on access below the floor, drain direction, wall construction, and the existing vent path. Confirm those conditions before approving the drawing.
Create a wet-room style shower
A continuous waterproofed area can provide an open, accessible feel. It requires accurate slope, suitable drain placement, wall protection, and carefully finished transitions. The format does not reduce waterproofing requirements.
Use a separate tub and shower
This arrangement can suit a spacious primary suite where bathing is a priority. In a tighter room, the second fixture may consume circulation space better used for storage or a larger shower.
Vanity dimensions need the same discipline. A double sink can reduce counter landing space or crowd the toilet. In a compact room, one generous basin with drawers may serve better than two small basins with limited storage. Plan layered lighting, including general illumination, mirror lighting that reduces shadows, and focused light for grooming.
Choose products with maintenance in mind. Porcelain or ceramic tile can work well in wet areas, but grout layout, cleaning access, edge details, and replacement availability matter alongside color. Spa features and efficient fixtures may improve comfort while increasing electrical, plumbing, ventilation, or framing work behind the finished surfaces.
Before finalizing the layout, mark door swings, walking paths, shower entry, vanity depth, toilet position, towel storage, and shutoff-valve access. Verify ventilation, waterproofing, and concealed mechanical conditions during the site review, before finishes are ordered. A short visual walkthrough can then confirm circulation and fixture relationships.
Plan for Plumbing Electrical Ventilation and Waterproofing
A bathroom can look finished while a hidden leak, undersized duct, or overloaded circuit is waiting behind the walls. Confirm those systems during the East Texas site consultation, then set the budget and design around what the room can support.
Plumbing planning starts with supply and drain routing. Locate existing lines, confirm the drain connection, and verify that the vent stack can serve the proposed layout. Moving a fixture across the room may require opened walls, cut flooring, framing protection, and coordination with electrical work and inspections. That added labor belongs in the budget before the layout is finalized.
Electrical planning should cover outlets, lighting, switches, exhaust controls, and specialty features. Wet locations need appropriate protection, and the arrangement should be checked against applicable local requirements. Use separate layers for general illumination, mirror lighting, and shower lighting instead of relying on one ceiling fixture.
Treat ventilation as moisture control
Mechanical exhaust commonly discharges outdoors, and 50 CFM is used as a baseline in many codes. Ducts routed through unconditioned space should be insulated to reduce condensation. The bathroom remodel requirements document also supports checking fan sizing against room area, confirming the discharge location, and specifying a humidistat or timer so the fan continues after the shower.
Inspect the complete exhaust path, not only the fan's appearance or noise rating. Confirm the duct route, termination, condition, and controls before drywall closes the wall. A powerful fan cannot manage moisture well if its duct is crushed or its exterior discharge is poorly located. East Texas humidity makes this verification especially important during the rough-in review.

Waterproof before tile enters the room
Select and document the shower waterproofing system before ordering tile. Options may include a sheet membrane, liquid-applied membrane, approved shower pan, or another compatible system. Continuity matters at corners, seams, penetrations, niches, benches, curbs, and transitions, so each condition needs a defined treatment.
Tile does not waterproof the assembly. Grout can absorb moisture, and installation errors can direct water into framing or the subfloor. The installer should follow the selected system's requirements, allow curing time, and complete required reviews before the work is concealed. For related moisture protection details, review vapor barrier installation alongside the shower system being proposed.
Plan for testing and documentation, not just installation. Photograph rough-ins before walls close, keep product instructions, and confirm who coordinates each inspection. A concealed plumbing leak or failed membrane can require finished surfaces to be removed, making the lowest bid a poor measure of total cost.
Build Your Timeline Permits and Design Build Consultation Checklist
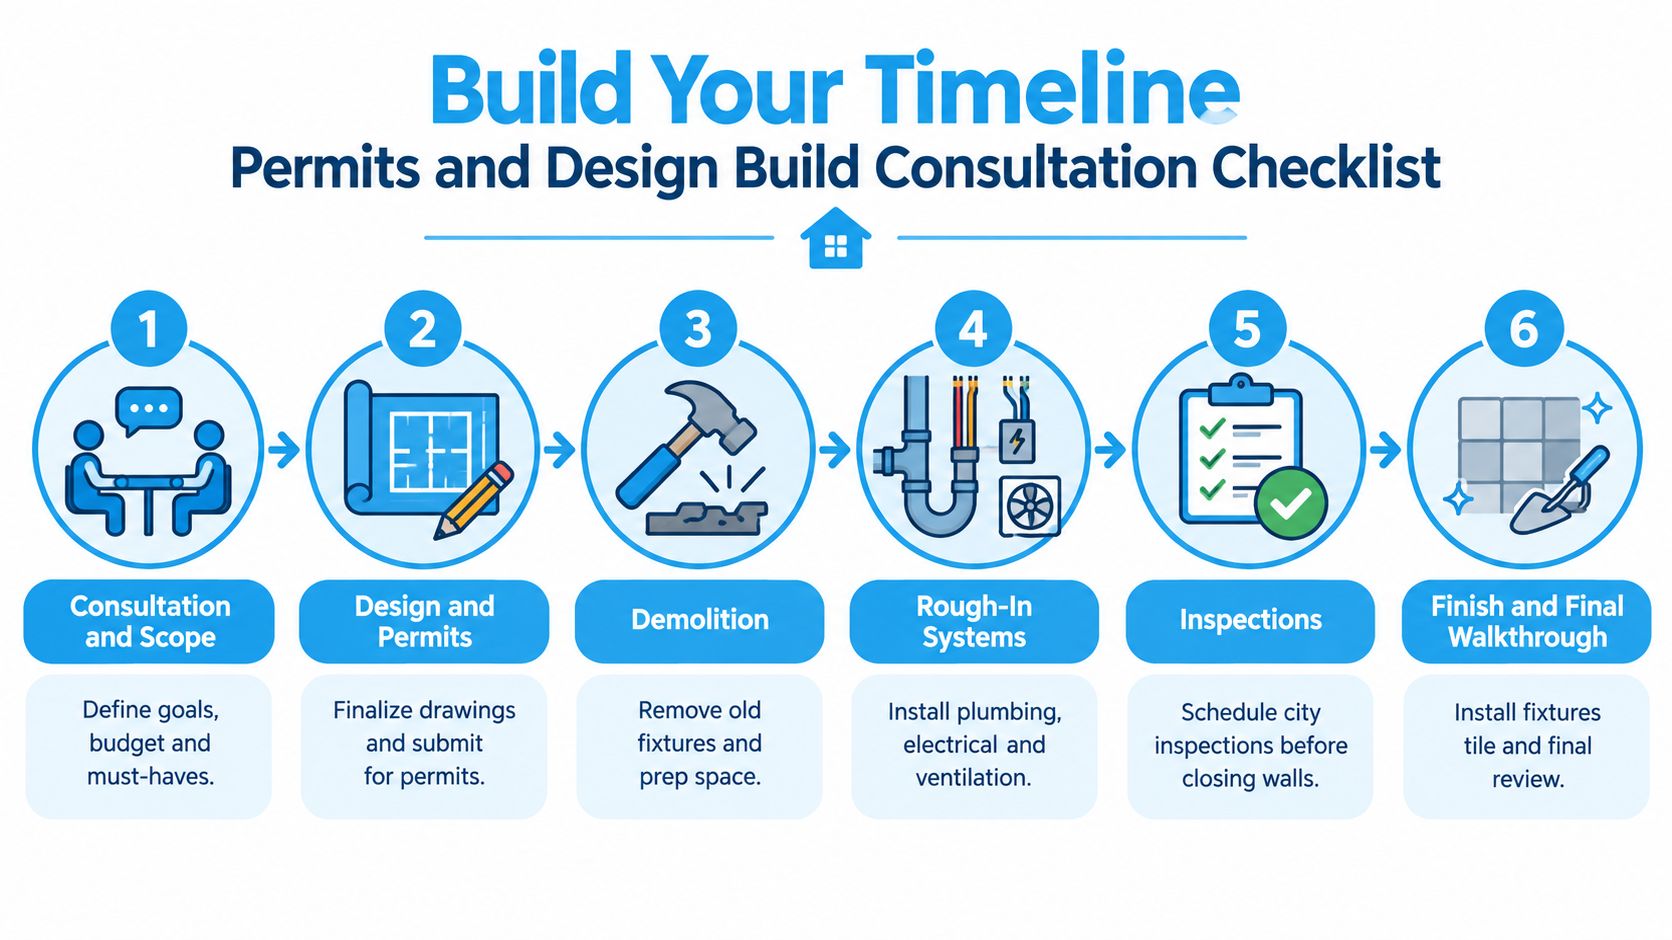
A reliable bathroom schedule follows the work's dependencies, not a preferred finish date. Demolition must expose the room before hidden conditions can be priced or repaired. Rough plumbing, electrical, ventilation, and framing repairs come before walls close. Waterproofing must be installed and reviewed before tile conceals it, and fixtures wait until the supporting surfaces are ready.
Most remodels take several weeks, while a full gut renovation can extend much longer, depending on the scope. Structural repairs, relocated fixtures, extensive waterproofing, long-lead products, and multiple inspections all add time. Build the schedule around those decisions instead of promising a finish date before the room and product availability are verified.
Use a production sequence that people can follow
A practical sequence looks like this:
- Consultation and scope: Review goals, existing conditions, priorities, target budget, access, and the East Texas home's site limitations.
- Design and permits: Finalize the layout, fixture specifications, ventilation and waterproofing details, and permit requirements before ordering the full package.
- Material confirmation: Verify quantities, colors, sizes, trim, valves, drains, fans, lighting, and delivery timing.
- Demolition: Protect nearby areas, remove existing materials, and document concealed conditions as they appear.
- Rough-in work: Install plumbing, electrical, ventilation, framing repairs, and required blocking.
- Inspections and close-in: Complete required reviews before insulation, backer, drywall, or other coverings hide the work.
- Waterproofing and finishes: Install the wet-area system, then complete tile, flooring, paint, cabinetry, countertops, mirrors, and fixtures.
- Testing and walkthrough: Test drainage, shutoffs, outlets, lighting, exhaust operation, doors, hardware, and finish quality.
Permit requirements vary by jurisdiction and scope. Moving plumbing, changing circuits, altering structure, or modifying ventilation may require permits and inspections. Confirm who prepares applications, schedules inspections, answers correction notices, and keeps the final documentation with the homeowner.
Prepare for the on-site consultation
Bring information that helps the contractor price and sequence the actual room:
- Measurements: Record room length, width, ceiling height, door and window locations, fixture dimensions, and nearby access points.
- Photos: Photograph fixtures, electrical devices, ceiling, floor, attic or crawl-space access, and staining.
- Priorities: Separate must-haves from preferred upgrades and features you would remove first if the budget tightens.
- Product ideas: Save fixture models, tile sizes, vanity dimensions, lighting styles, and shower hardware references.
- Home logistics: Identify the bathroom available during construction, parking, pet access, work-hour concerns, and areas needing protection.
- Decision makers: Include everyone approving layout, budget, and finishes in the key meeting.
A design-build company such as Home Pro's Remodeling & Repairs can connect the target budget, finalized design, permit path, and production schedule through its design-build contractor process. Ask any contractor for a written scope, clear allowances, assigned communication contact, and a defined change-order process before work begins.
Final Tips to Keep Your Bathroom Remodel on Track
A bathroom can look finished while unresolved details remain behind the walls. Protect the contingency for concealed conditions, rather than spending it on upgrades before demolition reveals the actual room. Confirm the vanity, countertop, sink, faucet, mirror, lighting, shower hardware, tile, grout, and trim together before placing orders. Matching products on paper do not guarantee matching dimensions or delivery dates.
Keep one written decision record in a shared folder, spreadsheet, or project-management app such as Trello. Include approved product links, model numbers, colors, dimensions, delivery confirmations, drawings, and change approvals. A decision made beside the demolition dumpster can be misunderstood later.
Make decisions easy to verify
Use these checks during construction:
- Confirm the approved layout: Keep the latest drawing accessible and identify every revision clearly.
- Ask system questions early: Verify exhaust discharge, waterproofing coverage, shutoff access, outlet locations, and inspection timing before walls close.
- Check deliveries: Inspect tile, fixtures, glass, cabinetry, and trim as soon as they arrive. Report damage or mismatched products before installation.
- Keep communication regular: Confirm your project contact, update method, and decision deadlines.
- Plan daily life: Arrange access to another bathroom, remove fragile items nearby, and keep pets and children away from the work zone.
- Review before final payment: Test every fixture, switch, outlet, drain, fan, door, and cabinet. Record agreed service items in writing.
A good remodel is easier to manage when every decision has an owner, a date, and a written confirmation.
Judge the plan by more than the tile board. The budget should account for labor and contingency. The layout should respect existing plumbing where possible. Ventilation and waterproofing should be documented, and the schedule should allow for inspections, deliveries, and corrections. These controls reduce rushed substitutions and avoidable rework.
For Tyler and nearby East Texas communities, an on-site consultation can convert ideas into a measured scope, budget discussion, design direction, and production sequence. Ask the contractor to explain which choices work within the room, which add complexity, and which can wait. That conversation should include visible finishes and hidden mechanicals before the design is finalized.
Home Pro's Remodeling & Repairs offers on-site bathroom remodeling consultations, target-budget planning, design-build coordination, same-day quotes, free onsite estimates, and financing options for homeowners in Tyler and nearby East Texas communities. Visit Home Pro's Remodeling & Repairs to request a consultation and review the existing space, concealed systems, and construction sequence.